Jul 28, 2011

Start Google Maps using intent with specified location

Modify from the last post get latitude and longitude from android.location.Address, start a intent of ACTION_VIEW, with location; to start Google Maps on the location.

Start Google Maps using intent with specified location

package com.AndroidgetFromLocationName;

import java.io.IOException;
import java.util.List;

import android.app.Activity;
import android.content.Context;
import android.content.Intent;
import android.location.Address;
import android.location.Geocoder;
import android.net.Uri;
import android.os.Bundle;
import android.view.View;
import android.view.ViewGroup;
import android.widget.AdapterView;
import android.widget.AdapterView.OnItemClickListener;
import android.widget.ArrayAdapter;
import android.widget.Button;
import android.widget.EditText;
import android.widget.ListView;
import android.widget.TextView;
import android.widget.Toast;

public class AndroidgetFromLocationNameActivity extends Activity {

EditText searchText;
Button searchButton;
ListView listviewResult;
Button goButton;

Geocoder myGeocoder;
final static int MAX_RESULT = 10;
final static String DEFAULT_SEARCH = "London";

double golat, golon;
boolean govalid;

/** Called when the activity is first created. */
@Override
public void onCreate(Bundle savedInstanceState) {
super.onCreate(savedInstanceState);
setContentView(R.layout.main);
searchText = (EditText)findViewById(R.id.searchtext);
searchText.setText(DEFAULT_SEARCH);
searchButton = (Button)findViewById(R.id.searchbutton);
listviewResult = (ListView)findViewById(R.id.listviewresult);
goButton = (Button)findViewById(R.id.gobutton);

searchButton.setOnClickListener(searchButtonOnClickListener);
goButton.setOnClickListener(goButtonOnClickListener);

myGeocoder = new Geocoder(this);

//for API Level 9 or higher
if (!Geocoder.isPresent()){
Toast.makeText(AndroidgetFromLocationNameActivity.this,
"Sorry! Geocoder service not Present.",
Toast.LENGTH_LONG).show();
}

listviewResult.setOnItemClickListener(listviewResultOnItemClickListener);

govalid = false;
}

Button.OnClickListener goButtonOnClickListener
= new Button.OnClickListener(){

@Override
public void onClick(View arg0) {
// TODO Auto-generated method stub
if(govalid){

final String zoom = "12";
String stringLoc = "geo:" + golat + "," + golon + "?z=" + zoom;

Intent intent = new Intent(android.content.Intent.ACTION_VIEW, Uri.parse(stringLoc));
startActivity(intent);

}
}};

OnItemClickListener listviewResultOnItemClickListener
= new OnItemClickListener(){

@Override
public void onItemClick(AdapterView<?> parent, View view, int position,
long id) {
// TODO Auto-generated method stub

double lat = ((Address)parent.getItemAtPosition(position)).getLatitude();
double lon = ((Address)parent.getItemAtPosition(position)).getLongitude();
String loc = "lat: " + lat + "\n" + "lon: " + lon;
Toast.makeText(AndroidgetFromLocationNameActivity.this,
loc,
Toast.LENGTH_LONG).show();

govalid = true;
golat = lat;
golon = lon;
}

};

Button.OnClickListener searchButtonOnClickListener
= new Button.OnClickListener(){

@Override
public void onClick(View arg0) {
// TODO Auto-generated method stub
String searchString = searchText.getText().toString();
searchFromLocationName(searchString);

govalid = false;
}};

private void searchFromLocationName(String name){
try {
List<Address> result
= myGeocoder.getFromLocationName(name, MAX_RESULT);

if ((result == null)||(result.isEmpty())){
Toast.makeText(AndroidgetFromLocationNameActivity.this,
"No matches were found or there is no backend service!",
Toast.LENGTH_LONG).show();
}else{

MyArrayAdapter adapter = new MyArrayAdapter(this,
android.R.layout.simple_list_item_1, result);
listviewResult.setAdapter(adapter);

Toast.makeText(AndroidgetFromLocationNameActivity.this,
"Finished!",
Toast.LENGTH_LONG).show();
}


} catch (IOException e) {
// TODO Auto-generated catch block
e.printStackTrace();
Toast.makeText(AndroidgetFromLocationNameActivity.this,
"The network is unavailable or any other I/O problem occurs!",
Toast.LENGTH_LONG).show();
}
}

public class MyArrayAdapter extends ArrayAdapter<Address> {
Context mycontext;
public MyArrayAdapter(Context context, int textViewResourceId,
List<Address> objects) {
super(context, textViewResourceId, objects);
// TODO Auto-generated constructor stub
mycontext = context;
}

@Override
public View getView(int position, View convertView, ViewGroup parent) {
// TODO Auto-generated method stub

int maxAddressLineIndex = getItem(position).getMaxAddressLineIndex();
String addressLine = "";

for (int j = 0; j <= maxAddressLineIndex; j++){
addressLine += getItem(position).getAddressLine(j) + ",";
}

TextView rowAddress = new TextView(mycontext);
rowAddress.setText(addressLine);

return rowAddress;

}

}

}


<?xml version="1.0" encoding="utf-8"?>
<LinearLayout xmlns:android="http://schemas.android.com/apk/res/android"
android:orientation="vertical"
android:layout_width="fill_parent"
android:layout_height="fill_parent"
>
<TextView
android:layout_width="fill_parent"
android:layout_height="wrap_content"
android:text="@string/hello"
/>
<EditText
android:id="@+id/searchtext"
android:layout_width="fill_parent"
android:layout_height="wrap_content"
/>
<Button
android:id="@+id/searchbutton"
android:layout_width="fill_parent"
android:layout_height="wrap_content"
android:text="Search"
/>
<ListView
android:id="@+id/listviewresult"
android:layout_width="fill_parent"
android:layout_height="wrap_content"
/>
<Button
android:id="@+id/gobutton"
android:layout_width="fill_parent"
android:layout_height="wrap_content"
android:text="Go"
/>
</LinearLayout>


Related post:
- Start Google Maps using intent of ACTION_VIEW

Jul 27, 2011

get latitude and longitude from android.location.Address

The result returned from Geocoder.getFromLocationName() is a List of android.location.Address object. To retrieve the latitude and longitude of the selected item's Address, getLatitude() and getLongitude() methods can be used.

get latitude and longitude from android.location.Address

Further work on last post, Display address from Geocoder.getFromLocationName() in a ListView. Implement listviewResultOnItemClickListener of OnItemClickListener to handle the item click event, and display the location (latitude and longitude) in Toast.

package com.AndroidgetFromLocationName;

import java.io.IOException;
import java.util.List;

import android.app.Activity;
import android.content.Context;
import android.location.Address;
import android.location.Geocoder;
import android.os.Bundle;
import android.view.View;
import android.view.ViewGroup;
import android.widget.AdapterView;
import android.widget.AdapterView.OnItemClickListener;
import android.widget.ArrayAdapter;
import android.widget.Button;
import android.widget.EditText;
import android.widget.ListView;
import android.widget.TextView;
import android.widget.Toast;

public class AndroidgetFromLocationNameActivity extends Activity {

EditText searchText;
Button searchButton;
ListView listviewResult;

Geocoder myGeocoder;
final static int MAX_RESULT = 10;
final static String DEFAULT_SEARCH = "谷歌";

/** Called when the activity is first created. */
@Override
public void onCreate(Bundle savedInstanceState) {
super.onCreate(savedInstanceState);
setContentView(R.layout.main);
searchText = (EditText)findViewById(R.id.searchtext);
searchText.setText(DEFAULT_SEARCH);
searchButton = (Button)findViewById(R.id.searchbutton);
listviewResult = (ListView)findViewById(R.id.listviewresult);

searchButton.setOnClickListener(searchButtonOnClickListener);

myGeocoder = new Geocoder(this);

//for API Level 9 or higher
if (!Geocoder.isPresent()){
Toast.makeText(AndroidgetFromLocationNameActivity.this,
"Sorry! Geocoder service not Present.",
Toast.LENGTH_LONG).show();
}

listviewResult.setOnItemClickListener(listviewResultOnItemClickListener);
}

OnItemClickListener listviewResultOnItemClickListener
= new OnItemClickListener(){

@Override
public void onItemClick(AdapterView<?> parent, View view, int position,
long id) {
// TODO Auto-generated method stub

double lat = ((Address)parent.getItemAtPosition(position)).getLatitude();
double lon = ((Address)parent.getItemAtPosition(position)).getLongitude();
String loc = "lat: " + lat + "\n" + "lon: " + lon;
Toast.makeText(AndroidgetFromLocationNameActivity.this,
loc,
Toast.LENGTH_LONG).show();
}

};

Button.OnClickListener searchButtonOnClickListener
= new Button.OnClickListener(){

@Override
public void onClick(View arg0) {
// TODO Auto-generated method stub
String searchString = searchText.getText().toString();
searchFromLocationName(searchString);
}};

private void searchFromLocationName(String name){
try {
List<Address> result
= myGeocoder.getFromLocationName(name, MAX_RESULT);

if ((result == null)||(result.isEmpty())){
Toast.makeText(AndroidgetFromLocationNameActivity.this,
"No matches were found or there is no backend service!",
Toast.LENGTH_LONG).show();
}else{

MyArrayAdapter adapter = new MyArrayAdapter(this,
android.R.layout.simple_list_item_1, result);
listviewResult.setAdapter(adapter);

Toast.makeText(AndroidgetFromLocationNameActivity.this,
"Finished!",
Toast.LENGTH_LONG).show();
}


} catch (IOException e) {
// TODO Auto-generated catch block
e.printStackTrace();
Toast.makeText(AndroidgetFromLocationNameActivity.this,
"The network is unavailable or any other I/O problem occurs!",
Toast.LENGTH_LONG).show();
}
}

public class MyArrayAdapter extends ArrayAdapter<Address> {
Context mycontext;
public MyArrayAdapter(Context context, int textViewResourceId,
List<Address> objects) {
super(context, textViewResourceId, objects);
// TODO Auto-generated constructor stub
mycontext = context;
}

@Override
public View getView(int position, View convertView, ViewGroup parent) {
// TODO Auto-generated method stub

int maxAddressLineIndex = getItem(position).getMaxAddressLineIndex();
String addressLine = "";

for (int j = 0; j <= maxAddressLineIndex; j++){
addressLine += getItem(position).getAddressLine(j) + ",";
}

TextView rowAddress = new TextView(mycontext);
rowAddress.setText(addressLine);

return rowAddress;

}

}

}


next:
- Start Google Maps using intent with specified location

Jul 26, 2011

Display address from Geocoder.getFromLocationName() in a ListView

The last post show how to Get full address from result of getFromLocationName(). In this example show you how to show it in a ListView, instead of showing in TextView.

Display address from Geocoder.getFromLocationName() in a ListView

package com.AndroidgetFromLocationName;

import java.io.IOException;
import java.util.List;

import android.app.Activity;
import android.content.Context;
import android.location.Address;
import android.location.Geocoder;
import android.os.Bundle;
import android.view.View;
import android.view.ViewGroup;
import android.widget.ArrayAdapter;
import android.widget.Button;
import android.widget.EditText;
import android.widget.ListView;
import android.widget.TextView;
import android.widget.Toast;

public class AndroidgetFromLocationNameActivity extends Activity {

EditText searchText;
Button searchButton;
ListView listviewResult;

Geocoder myGeocoder;
final static int MAX_RESULT = 10;
final static String DEFAULT_SEARCH = "谷歌";

/** Called when the activity is first created. */
@Override
public void onCreate(Bundle savedInstanceState) {
super.onCreate(savedInstanceState);
setContentView(R.layout.main);
searchText = (EditText)findViewById(R.id.searchtext);
searchText.setText(DEFAULT_SEARCH);
searchButton = (Button)findViewById(R.id.searchbutton);
listviewResult = (ListView)findViewById(R.id.listviewresult);

searchButton.setOnClickListener(searchButtonOnClickListener);

myGeocoder = new Geocoder(this);

//for API Level 9 or higher
if (!Geocoder.isPresent()){
Toast.makeText(AndroidgetFromLocationNameActivity.this,
"Sorry! Geocoder service not Present.",
Toast.LENGTH_LONG).show();
}
}

Button.OnClickListener searchButtonOnClickListener
= new Button.OnClickListener(){

@Override
public void onClick(View arg0) {
// TODO Auto-generated method stub
String searchString = searchText.getText().toString();
searchFromLocationName(searchString);
}};

private void searchFromLocationName(String name){
try {
List<Address> result
= myGeocoder.getFromLocationName(name, MAX_RESULT);

if ((result == null)||(result.isEmpty())){
Toast.makeText(AndroidgetFromLocationNameActivity.this,
"No matches were found or there is no backend service!",
Toast.LENGTH_LONG).show();
}else{

MyArrayAdapter adapter = new MyArrayAdapter(this,
android.R.layout.simple_list_item_1, result);
listviewResult.setAdapter(adapter);

Toast.makeText(AndroidgetFromLocationNameActivity.this,
"Finished!",
Toast.LENGTH_LONG).show();
}


} catch (IOException e) {
// TODO Auto-generated catch block
e.printStackTrace();
Toast.makeText(AndroidgetFromLocationNameActivity.this,
"The network is unavailable or any other I/O problem occurs!",
Toast.LENGTH_LONG).show();
}
}

public class MyArrayAdapter extends ArrayAdapter<Address> {
Context mycontext;
public MyArrayAdapter(Context context, int textViewResourceId,
List<Address> objects) {
super(context, textViewResourceId, objects);
// TODO Auto-generated constructor stub
mycontext = context;
}

@Override
public View getView(int position, View convertView, ViewGroup parent) {
// TODO Auto-generated method stub

int maxAddressLineIndex = getItem(position).getMaxAddressLineIndex();
String addressLine = "";

for (int j = 0; j <= maxAddressLineIndex; j++){
addressLine += getItem(position).getAddressLine(j) + ",";
}

TextView rowAddress = new TextView(mycontext);
rowAddress.setText(addressLine);

return rowAddress;

}

}

}


<?xml version="1.0" encoding="utf-8"?>
<LinearLayout xmlns:android="http://schemas.android.com/apk/res/android"
android:orientation="vertical"
android:layout_width="fill_parent"
android:layout_height="fill_parent"
>
<TextView
android:layout_width="fill_parent"
android:layout_height="wrap_content"
android:text="@string/hello"
/>
<EditText
android:id="@+id/searchtext"
android:layout_width="fill_parent"
android:layout_height="wrap_content"
/>
<Button
android:id="@+id/searchbutton"
android:layout_width="fill_parent"
android:layout_height="wrap_content"
android:text="Search"
/>
<ListView
android:id="@+id/listviewresult"
android:layout_width="fill_parent"
android:layout_height="wrap_content"
/>
</LinearLayout>


next post:
- get latitude and longitude from android.location.Address

Jul 25, 2011

Get full address from result of getFromLocationName()

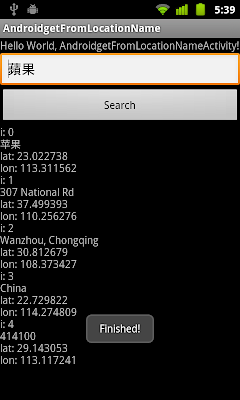
In the last post, it was shown how to Get address from location name, using Geocoder. But in the example code, the address line is in-correct. Refer to the following code, to retrieve full address line.

Get full address from result of getFromLocationName()

package com.AndroidgetFromLocationName;

import java.io.IOException;
import java.util.List;

import android.app.Activity;
import android.location.Address;
import android.location.Geocoder;
import android.os.Bundle;
import android.view.View;
import android.widget.Button;
import android.widget.EditText;
import android.widget.TextView;
import android.widget.Toast;

public class AndroidgetFromLocationNameActivity extends Activity {

EditText searchText;
Button searchButton;
TextView listResult;

Geocoder myGeocoder;
final static int MAX_RESULT = 5;
//final static String DEFAULT_SEARCH = "1600 Amphitheatre Parkway Mountain View";
//final static String DEFAULT_SEARCH = "Times Square";
final static String DEFAULT_SEARCH = "蘋果";

/** Called when the activity is first created. */
@Override
public void onCreate(Bundle savedInstanceState) {
super.onCreate(savedInstanceState);
setContentView(R.layout.main);
searchText = (EditText)findViewById(R.id.searchtext);
searchText.setText(DEFAULT_SEARCH);
searchButton = (Button)findViewById(R.id.searchbutton);
listResult = (TextView)findViewById(R.id.result);

searchButton.setOnClickListener(searchButtonOnClickListener);

myGeocoder = new Geocoder(this);

//for API Level 9 or higher
if (!Geocoder.isPresent()){
Toast.makeText(AndroidgetFromLocationNameActivity.this,
"Sorry! Geocoder service not Present.",
Toast.LENGTH_LONG).show();
}
}

Button.OnClickListener searchButtonOnClickListener
= new Button.OnClickListener(){

@Override
public void onClick(View arg0) {
// TODO Auto-generated method stub
String searchString = searchText.getText().toString();
searchFromLocationName(searchString);
}};

private void searchFromLocationName(String name){
try {
List<Address> result
= myGeocoder.getFromLocationName(name, MAX_RESULT);

if ((result == null)||(result.isEmpty())){
Toast.makeText(AndroidgetFromLocationNameActivity.this,
"No matches were found or there is no backend service!",
Toast.LENGTH_LONG).show();
}else{
String stringResult = "";
for (int i =0; i < result.size(); i++){
String AddressLine = "";
int maxAddressLineIndex = result.get(i).getMaxAddressLineIndex();
if (maxAddressLineIndex != -1){
for (int j = 0; j <= result.get(i).getMaxAddressLineIndex(); j++){
AddressLine += result.get(i).getAddressLine(j) + "\n";
}
}

stringResult += "i: " + i + "\n"
+ "lat: " + result.get(i).getLatitude() + "\n"
+ "lon: " + result.get(i).getLongitude() + "\n"
+ AddressLine + "\n";
}
listResult.setText(stringResult);

Toast.makeText(AndroidgetFromLocationNameActivity.this,
"Finished!",
Toast.LENGTH_LONG).show();
}


} catch (IOException e) {
// TODO Auto-generated catch block
e.printStackTrace();
Toast.makeText(AndroidgetFromLocationNameActivity.this,
"The network is unavailable or any other I/O problem occurs!",
Toast.LENGTH_LONG).show();
}
}
}


next:
- Display address from Geocoder.getFromLocationName() in a ListView

Get address from location name, using Geocoder

android.location.Geocoder is a class for handling geocoding and reverse geocoding. Geocoding is the process of transforming a street address or other description of a location into a (latitude, longitude) coordinate. Reverse geocoding is the process of transforming a (latitude, longitude) coordinate into a (partial) address. The amount of detail in a reverse geocoded location description may vary. The Geocoder class requires a backend service that is not included in the core android framework.

The Geocoder query methods will return an empty list if there no backend service in the platform. Use the isPresent() method to determine whether a Geocoder implementation exists.

The method getFromLocationName() returns an array of Addresses that are known to describe the named location.

example:
Get address from location name, using Geocoder

(Please note that the retrieving of Address Line is in-correct in this code; refer to the next post for how to Get full address from result of getFromLocationName().)
package com.AndroidgetFromLocationName;

import java.io.IOException;
import java.util.List;

import android.app.Activity;
import android.location.Address;
import android.location.Geocoder;
import android.os.Bundle;
import android.view.View;
import android.widget.Button;
import android.widget.EditText;
import android.widget.TextView;
import android.widget.Toast;

public class AndroidgetFromLocationNameActivity extends Activity {

EditText searchText;
Button searchButton;
TextView listResult;

Geocoder myGeocoder;
final static int MAX_RESULT = 5;
//final static String DEFAULT_SEARCH = "1600 Amphitheatre Parkway Mountain View";
//final static String DEFAULT_SEARCH = "Times Square";
final static String DEFAULT_SEARCH = "蘋果";

/** Called when the activity is first created. */
@Override
public void onCreate(Bundle savedInstanceState) {
super.onCreate(savedInstanceState);
setContentView(R.layout.main);
searchText = (EditText)findViewById(R.id.searchtext);
searchText.setText(DEFAULT_SEARCH);
searchButton = (Button)findViewById(R.id.searchbutton);
listResult = (TextView)findViewById(R.id.result);

searchButton.setOnClickListener(searchButtonOnClickListener);

myGeocoder = new Geocoder(this);

//for API Level 9 or higher
if (!Geocoder.isPresent()){
Toast.makeText(AndroidgetFromLocationNameActivity.this,
"Sorry! Geocoder service not Present.",
Toast.LENGTH_LONG).show();
}
}

Button.OnClickListener searchButtonOnClickListener
= new Button.OnClickListener(){

@Override
public void onClick(View arg0) {
// TODO Auto-generated method stub
String searchString = searchText.getText().toString();
searchFromLocationName(searchString);
}};

private void searchFromLocationName(String name){
try {
List<Address> result
= myGeocoder.getFromLocationName(name, MAX_RESULT);

if ((result == null)||(result.isEmpty())){
Toast.makeText(AndroidgetFromLocationNameActivity.this,
"No matches were found or there is no backend service!",
Toast.LENGTH_LONG).show();
}else{
String stringResult = "";
for (int i =0; i < result.size(); i++){
stringResult += "i: " + i + "\n"
+ result.get(i).getAddressLine(i) + "\n"
+ "lat: " + result.get(i).getLatitude() + "\n"
+ "lon: " + result.get(i).getLongitude() + "\n";
}
listResult.setText(stringResult);

Toast.makeText(AndroidgetFromLocationNameActivity.this,
"Finished!",
Toast.LENGTH_LONG).show();
}


} catch (IOException e) {
// TODO Auto-generated catch block
e.printStackTrace();
Toast.makeText(AndroidgetFromLocationNameActivity.this,
"The network is unavailable or any other I/O problem occurs!",
Toast.LENGTH_LONG).show();
}
}
}


<?xml version="1.0" encoding="utf-8"?>
<LinearLayout xmlns:android="http://schemas.android.com/apk/res/android"
android:orientation="vertical"
android:layout_width="fill_parent"
android:layout_height="fill_parent"
>
<TextView
android:layout_width="fill_parent"
android:layout_height="wrap_content"
android:text="@string/hello"
/>
<EditText
android:id="@+id/searchtext"
android:layout_width="fill_parent"
android:layout_height="wrap_content"
/>
<Button
android:id="@+id/searchbutton"
android:layout_width="fill_parent"
android:layout_height="wrap_content"
android:text="Search"
/>
<ScrollView
android:layout_width="fill_parent"
android:layout_height="fill_parent" >
<TextView
android:id="@+id/result"
android:layout_width="fill_parent"
android:layout_height="wrap_content"
/>
</ScrollView>
</LinearLayout>

Jul 24, 2011

Create custom dialog using AlertDialog.Builder, by inflating XML

Example:
Create custom dialog using AlertDialog.Builder, by inflating XML

Create a XML file of custom layout, /res/layout/mylayout.xml.
<?xml version="1.0" encoding="utf-8"?>
<LinearLayout xmlns:android="http://schemas.android.com/apk/res/android"
android:orientation="vertical"
android:layout_width="fill_parent"
android:layout_height="fill_parent"
>
<AnalogClock
android:layout_width="wrap_content"
android:layout_height="wrap_content"
/>
<Button
android:id="@+id/idButton"
android:layout_width="fill_parent"
android:layout_height="wrap_content"
android:text="Button"
/>
</LinearLayout>


package com.AndroidCustomDialog;

import android.app.Activity;
import android.app.AlertDialog;
import android.content.Context;
import android.content.DialogInterface;
import android.os.Bundle;
import android.view.LayoutInflater;
import android.view.View;
import android.widget.Button;
import android.widget.Toast;

public class AndroidCustomDialogActivity extends Activity {

void openCustomDialog(){
AlertDialog.Builder customDialog
= new AlertDialog.Builder(AndroidCustomDialogActivity.this);
customDialog.setTitle("Custom Dialog");

LayoutInflater layoutInflater
= (LayoutInflater)getApplicationContext().getSystemService(Context.LAYOUT_INFLATER_SERVICE);
View view=layoutInflater.inflate(R.layout.mylayout,null);

Button btn = (Button)view.findViewById(R.id.idButton);
btn.setOnClickListener(new Button.OnClickListener(){

@Override
public void onClick(View arg0) {
// TODO Auto-generated method stub
Toast.makeText(getApplicationContext(), "Button Pressed", Toast.LENGTH_LONG).show();
}});

customDialog.setPositiveButton("OK", new DialogInterface.OnClickListener(){

@Override
public void onClick(DialogInterface arg0, int arg1) {
// TODO Auto-generated method stub

}});

customDialog.setNegativeButton("Cancel", new DialogInterface.OnClickListener(){

@Override
public void onClick(DialogInterface arg0, int arg1) {
// TODO Auto-generated method stub

}});

customDialog.setView(view);
customDialog.show();
}

/** Called when the activity is first created. */
@Override
public void onCreate(Bundle savedInstanceState) {
super.onCreate(savedInstanceState);
setContentView(R.layout.main);
openCustomDialog();
}
}


Related Post:
- Create custom dialog using AlertDialog.Builder, with dynamic content

Jul 22, 2011

Update BaseAdapter in backgrond Thread, to insert Gallery items in run-time.

Refer to the last post "Implement a photo bar using android.widget.Gallery, with custom BaseAdapter, and custom object"; in some case such as the Gallery items have to be downloaded from internet, we cannot wait too long to load Gallery in UI thread.

Update BaseAdapter in backgrond Thread, to insert Gallery items in run-time

We will modify the Java code in "Implement a photo bar using android.widget.Gallery, with custom BaseAdapter, and custom object", to implement a background Thread to insert Gallery items in a dummy delay of 500ms for each item, in run-time. After each item inserted, send a message from the thread to the handle in UI thread to call notifyDataSetChanged() to update the Gallery.

package com.AndroidPhotoBar;

import java.util.ArrayList;

import android.app.Activity;
import android.content.Context;
import android.graphics.Bitmap;
import android.graphics.BitmapFactory;
import android.os.Bundle;
import android.os.Handler;
import android.os.Message;
import android.view.View;
import android.view.ViewGroup;
import android.widget.BaseAdapter;
import android.widget.Gallery;
import android.widget.ImageView;

public class AndroidPhotoBarActivity extends Activity {

MyThread myThread;

ArrayList<ImageItem> arrayImageItem;
MyAdapter myAdapter;

public class ImageItem {

Bitmap bitmapImage;

ImageItem(){
//To simplify, we use a default image here
bitmapImage = BitmapFactory.decodeResource(
AndroidPhotoBarActivity.this.getResources(), R.drawable.icon);
}

public Bitmap getImage(){
return bitmapImage;
}

}

Gallery myPhotoBar;

/** Called when the activity is first created. */
@Override
public void onCreate(Bundle savedInstanceState) {
super.onCreate(savedInstanceState);
setContentView(R.layout.main);
myPhotoBar = (Gallery)findViewById(R.id.photobar);

myAdapter = new MyAdapter(this); //init myAdapter without ImageItem
myPhotoBar.setAdapter(myAdapter);

myThread = new MyThread();
myThread.setRunning(true);
myThread.start();

}

private void insertDummyImageItem(int cnt){

//Insert dummy ImageItem into myAdapter
for(int i = 0; i < cnt; i++){
myAdapter.addImageItem(new ImageItem());
}

}

public class MyAdapter extends BaseAdapter {

Context context;
ArrayList<ImageItem> _arrayImageItem;

MyAdapter(Context c){
context = c;
_arrayImageItem = new ArrayList<ImageItem>();
}

public void addImageItem(ImageItem item){
_arrayImageItem.add(item);
}

public int getCount() {
// TODO Auto-generated method stub
return _arrayImageItem.size();
}

public Object getItem(int position) {
// TODO Auto-generated method stub
return _arrayImageItem.get(position);
}

public long getItemId(int position) {
// TODO Auto-generated method stub
return position;
}

public View getView(int position, View convertView, ViewGroup parent) {
// TODO Auto-generated method stub
ImageView imageView;
imageView = new ImageView(context);

imageView.setLayoutParams(new Gallery.LayoutParams(150, 150));
imageView.setScaleType(ImageView.ScaleType.CENTER_CROP);
imageView.setImageBitmap(_arrayImageItem.get(position).getImage());

return imageView;
}
}

public class MyThread extends Thread{
volatile boolean running = false;
int cnt;

void setRunning(boolean b){
running = b;
cnt = 10;
}

@Override
public void run() {
// TODO Auto-generated method stub
while(running){
try {
sleep(500);
insertDummyImageItem(1);
handler.sendMessage(handler.obtainMessage());
if(cnt-- == 0){
running = false;
}
} catch (InterruptedException e) {
e.printStackTrace();

}
}

}

}

Handler handler = new Handler(){

@Override
public void handleMessage(Message msg) {
// TODO Auto-generated method stub
myAdapter.notifyDataSetChanged();
}

};
}

Jul 21, 2011

Implement a photo bar using android.widget.Gallery, with custom BaseAdapter, and custom object.

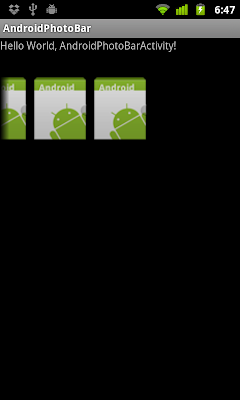
In this example, I will implement a photo bar using android.widget.Gallery.

a photo bar using android.widget.Gallery, with custom BaseAdapter, and custom object.

We will implement MyAdapter extends BaseAdapter, it hold a ArrayList of our custom object ImageItem. In the constructor of MyAdapter, an empty ArrayList of ImageItem will be new. And a method addImageItem is implemented to add new items into the ArrayList.

insertDummyImageItem(3) is a dummy method to add new items into the ArrayList of MyAdapter. As a example, all items have the same bitmap - R.drawable.icon. After items inserted, we have to call notifyDataSetChanged() of the MyAdapter to update the photo bar.

In such a approach, we can add new item on runtime. We will do more on coming post "Update BaseAdapter in backgrond Thread, to insert Gallery items in run-time.".

package com.AndroidPhotoBar;

import java.util.ArrayList;

import android.app.Activity;
import android.content.Context;
import android.graphics.Bitmap;
import android.graphics.BitmapFactory;
import android.os.Bundle;
import android.view.View;
import android.view.ViewGroup;
import android.widget.BaseAdapter;
import android.widget.Gallery;
import android.widget.ImageView;

public class AndroidPhotoBarActivity extends Activity {

ArrayList<ImageItem> arrayImageItem;
MyAdapter myAdapter;

public class ImageItem {

Bitmap bitmapImage;

ImageItem(){
//To simplify, we use a default image here
bitmapImage = BitmapFactory.decodeResource(
AndroidPhotoBarActivity.this.getResources(), R.drawable.icon);
}

public Bitmap getImage(){
return bitmapImage;
}

}

Gallery myPhotoBar;

/** Called when the activity is first created. */
@Override
public void onCreate(Bundle savedInstanceState) {
super.onCreate(savedInstanceState);
setContentView(R.layout.main);
myPhotoBar = (Gallery)findViewById(R.id.photobar);

myAdapter = new MyAdapter(this); //init myAdapter without ImageItem

//insert dummy ImageItem into myAdapter
insertDummyImageItem(2);
myPhotoBar.setAdapter(myAdapter);

//insert dummy ImageItem into myAdapter in Run time
insertDummyImageItem(3);
myAdapter.notifyDataSetChanged();

}

private void insertDummyImageItem(int cnt){

//Insert dummy ImageItem into myAdapter
for(int i = 0; i < cnt; i++){
myAdapter.addImageItem(new ImageItem());
}

}

public class MyAdapter extends BaseAdapter {

Context context;
ArrayList<ImageItem> _arrayImageItem;

MyAdapter(Context c){
context = c;
_arrayImageItem = new ArrayList<ImageItem>();
}

public void addImageItem(ImageItem item){
_arrayImageItem.add(item);
}

public int getCount() {
// TODO Auto-generated method stub
return _arrayImageItem.size();
}

public Object getItem(int position) {
// TODO Auto-generated method stub
return _arrayImageItem.get(position);
}

public long getItemId(int position) {
// TODO Auto-generated method stub
return position;
}

public View getView(int position, View convertView, ViewGroup parent) {
// TODO Auto-generated method stub
ImageView imageView;
imageView = new ImageView(context);

imageView.setLayoutParams(new Gallery.LayoutParams(150, 150));
imageView.setScaleType(ImageView.ScaleType.CENTER_CROP);
imageView.setImageBitmap(_arrayImageItem.get(position).getImage());

return imageView;
}

}
}


<?xml version="1.0" encoding="utf-8"?>
<LinearLayout xmlns:android="http://schemas.android.com/apk/res/android"
android:orientation="vertical"
android:layout_width="fill_parent"
android:layout_height="fill_parent"
>
<TextView
android:layout_width="fill_parent"
android:layout_height="wrap_content"
android:text="@string/hello"
/>
<Gallery
android:id="@+id/photobar"
android:layout_width="fill_parent"
android:layout_height="150dp"
/>
</LinearLayout>


next post:
- Update BaseAdapter in backgrond Thread, to insert Gallery items in run-time.

related article:
- Implement Horizontal ListView using android.widget.Gallery, with custom BaseAdapter.

Jul 20, 2011

android.webkit.WebView

android.webkit.WebView displays web pages. This class is the basis upon which you can roll your own web browser or simply display some online content within your Activity. It uses the WebKit rendering engine to display web pages and includes methods to navigate forward and backward through a history, zoom in and out, perform text searches and more.

example:

android.webkit.WebView

package com.AndroidWebView;


import android.app.Activity;
import android.os.Bundle;
import android.webkit.WebView;

public class AndroidWebViewActivity extends Activity {

WebView webView;
final String DEFAULT_URL = "http://android-coding.blogspot.com/?m=1";

/** Called when the activity is first created. */
@Override
public void onCreate(Bundle savedInstanceState) {
super.onCreate(savedInstanceState);
setContentView(R.layout.main);
webView = (WebView)findViewById(R.id.webview);
webView.loadUrl(DEFAULT_URL);

}
}


<?xml version="1.0" encoding="utf-8"?>

<LinearLayout xmlns:android="http://schemas.android.com/apk/res/android"
android:orientation="vertical"
android:layout_width="fill_parent"
android:layout_height="fill_parent"
>
<TextView
android:layout_width="fill_parent"
android:layout_height="wrap_content"
android:text="@string/hello"
/>
<WebView
android:id="@+id/webview"
android:layout_width="fill_parent"
android:layout_height="fill_parent"
/>
</LinearLayout>


next:
- More on WebView, override url loading

Jul 19, 2011

android.text.InputType and textMultiLine

android.text.InputType is bit definitions for an integer defining the basic content type of text held in an Editable object. Supported classes may be combined with variations and flags to indicate desired behaviors.

example:
android.text.InputType

<?xml version="1.0" encoding="utf-8"?>
<LinearLayout xmlns:android="http://schemas.android.com/apk/res/android"
android:orientation="vertical"
android:layout_width="fill_parent"
android:layout_height="fill_parent"
>
<TextView
android:layout_width="fill_parent"
android:layout_height="wrap_content"
android:text="@string/hello"
/>
<TextView
android:layout_width="fill_parent"
android:layout_height="wrap_content"
android:text="TextView WITHOUT inputType\n - default text: abcdefghijklmnopqrstuvwxyz! "
/>
<TextView
android:layout_width="fill_parent"
android:layout_height="wrap_content"
android:inputType="text"
android:text="TextView WITHOUT textMultiLine\n - default text: abcdefghijklmnopqrstuvwxyz! "
/>
<TextView
android:layout_width="fill_parent"
android:layout_height="wrap_content"
android:inputType="text|textMultiLine"
android:text="TextView WITH textMultiLine\n - default text: abcdefghijklmnopqrstuvwxyz! "
/>
<EditText
android:layout_width="fill_parent"
android:layout_height="wrap_content"
android:text="EditText WITHOUT inputType\n - default text: abcdefghijklmnopqrstuvwxyz! "
/>
<EditText
android:layout_width="fill_parent"
android:layout_height="wrap_content"
android:inputType="text"
android:text="EditText WITHOUT textMultiLine\n - default text: abcdefghijklmnopqrstuvwxyz! "
/>
<EditText
android:layout_width="fill_parent"
android:layout_height="wrap_content"
android:inputType="text|textMultiLine"
android:text="EditText WITH textMultiLine\n - default text: abcdefghijklmnopqrstuvwxyz! "
/>
<Button
android:layout_width="fill_parent"
android:layout_height="wrap_content"
android:text="Button WITHOUT inputType\n - default text: abcdefghijklmnopqrstuvwxyz! "
/>
<Button
android:layout_width="fill_parent"
android:layout_height="wrap_content"
android:inputType="text"
android:text="Button WITHOUT textMultiLine\n - default text: abcdefghijklmnopqrstuvwxyz! "
/>
<Button
android:layout_width="fill_parent"
android:layout_height="wrap_content"
android:inputType="text|textMultiLine"
android:text="Button WITH textMultiLine\n - default text: abcdefghijklmnopqrstuvwxyz! "
/>
</LinearLayout>

Related Post:
- android:singleLine

Jul 18, 2011

android:singleLine

android:singleLine attribute (either "true" or "false") constrains the text to a single horizontally scrolling line instead of letting it wrap onto multiple lines.

example:

Example of using android:singleLine

<?xml version="1.0" encoding="utf-8"?>
<LinearLayout xmlns:android="http://schemas.android.com/apk/res/android"
android:orientation="vertical"
android:layout_width="fill_parent"
android:layout_height="fill_parent"
>
<TextView
android:layout_width="fill_parent"
android:layout_height="wrap_content"
android:text="@string/hello"
/>
<TextView
android:layout_width="fill_parent"
android:layout_height="wrap_content"
android:text="TextView without singleLine\n - default text: abcdefghijklmnopqrstuvwxyz! "
/>
<TextView
android:layout_width="fill_parent"
android:layout_height="wrap_content"
android:singleLine="true"
android:text="TextView WITH singleLine\n - default text: abcdefghijklmnopqrstuvwxyz! "
/>
<EditText
android:layout_width="fill_parent"
android:layout_height="wrap_content"
android:text="EditText without singleLine\n - default text: abcdefghijklmnopqrstuvwxyz! "
/>
<EditText
android:layout_width="fill_parent"
android:layout_height="wrap_content"
android:singleLine="true"
android:text="EditText WITH singleLine\n - default text: abcdefghijklmnopqrstuvwxyz! "
/>
<Button
android:layout_width="fill_parent"
android:layout_height="wrap_content"
android:text="Button without singleLine\n - default text: abcdefghijklmnopqrstuvwxyz! "
/>
<Button
android:layout_width="fill_parent"
android:layout_height="wrap_content"
android:singleLine="true"
android:text="Button WITH singleLine\n - default text: abcdefghijklmnopqrstuvwxyz! "
/>
</LinearLayout>


Related Post:
- android.text.InputType

Jul 14, 2011

Overwrite MENU key to create custom menu

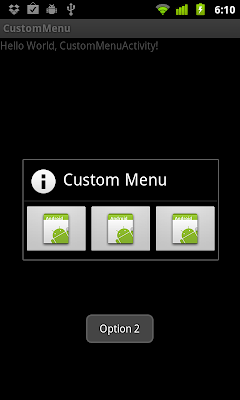
When user click on the hardware MENU key, Android OS will pop-up option menu; refer to the post "Create OptionsMenu in /res/menu/menu.xml" to know how to implement a formal OptionMenu. Alternatively, we can overwrite the default menu to create our custom menu as shown below:

Custom Menu

Create /res/layout/menu.xml to make the layout of our manu. You can replace the android:src items for your own icon.
<?xml version="1.0" encoding="utf-8"?>
<LinearLayout xmlns:android="http://schemas.android.com/apk/res/android"
android:layout_width="fill_parent"
android:layout_height="wrap_content"
android:orientation="horizontal">
<ImageButton
android:id="@+id/opt1"
android:layout_width="fill_parent"
android:layout_height="wrap_content"
android:layout_weight="1"
android:src="@drawable/icon"/>
<ImageButton
android:id="@+id/opt2"
android:layout_width="fill_parent"
android:layout_height="wrap_content"
android:layout_weight="1"
android:src="@drawable/icon"/>
<ImageButton
android:id="@+id/opt3"
android:layout_width="fill_parent"
android:layout_height="wrap_content"
android:layout_weight="1"
android:src="@drawable/icon"/>
</LinearLayout>


package com.CustomMenu;

import android.app.Activity;
import android.app.AlertDialog;
import android.content.Context;
import android.os.Bundle;
import android.view.KeyEvent;
import android.view.View;
import android.widget.ImageView;
import android.widget.Toast;

public class CustomMenuActivity extends Activity {

/** Called when the activity is first created. */
@Override
public void onCreate(Bundle savedInstanceState) {
super.onCreate(savedInstanceState);
setContentView(R.layout.main);
}

@Override
public boolean onKeyUp(int keyCode, KeyEvent event) {
if(keyCode == KeyEvent.KEYCODE_MENU) {
if(menuDialog == null) {
menuDialog = new MenuDialog(this);
}
menuDialog.show();
return true;
}
return super.onKeyUp(keyCode, event);
}

MenuDialog menuDialog;
private class MenuDialog extends AlertDialog{

ImageView Option1, Option2, Option3;

public MenuDialog(Context context) {
super(context);
setTitle("Custom Menu");
View menu = getLayoutInflater().inflate(R.layout.menu, null);
setView(menu);

Option1 = (ImageView)menu.findViewById(R.id.opt1);
Option2 = (ImageView)menu.findViewById(R.id.opt2);
Option3 = (ImageView)menu.findViewById(R.id.opt3);

Option1.setOnClickListener(new View.OnClickListener() {

public void onClick(View v) {
// TODO Auto-generated method stub
Toast.makeText(CustomMenuActivity.this, "Option 1", Toast.LENGTH_LONG).show();
dismiss();
}
});

Option2.setOnClickListener(new View.OnClickListener() {

public void onClick(View v) {
// TODO Auto-generated method stub
Toast.makeText(CustomMenuActivity.this, "Option 2", Toast.LENGTH_LONG).show();
dismiss();
}
});

Option3.setOnClickListener(new View.OnClickListener() {

public void onClick(View v) {
// TODO Auto-generated method stub
Toast.makeText(CustomMenuActivity.this, "Option 3", Toast.LENGTH_LONG).show();
dismiss();
}
});

}
}
}

Jul 13, 2011

Add icon on the title bar

Add icon on the title bar

package com.AndroidFeatureIcon;

import android.app.Activity;
import android.os.Bundle;
import android.view.Window;

public class AndroidFeatureIconActivity extends Activity {
/** Called when the activity is first created. */
@Override
public void onCreate(Bundle savedInstanceState) {
super.onCreate(savedInstanceState);

requestWindowFeature(Window.FEATURE_LEFT_ICON);
setContentView(R.layout.main);
getWindow().setFeatureDrawableResource(Window.FEATURE_LEFT_ICON,R.drawable.icon);
}
}


Jul 11, 2011

Add contact using Contacts content provider

Add contact using Contacts content provider

package com.AddContact;

import android.app.Activity;
import android.content.ContentValues;
import android.net.Uri;
import android.os.Bundle;
import android.provider.Contacts.People;
import android.view.View;
import android.widget.Button;
import android.widget.EditText;
import android.widget.Toast;

public class AddContactActivity extends Activity {

EditText inputName, inputNumber;
Button buttonAdd;

/** Called when the activity is first created. */
@Override
public void onCreate(Bundle savedInstanceState) {
super.onCreate(savedInstanceState);
setContentView(R.layout.main);

inputName = (EditText)findViewById(R.id.name);
inputNumber = (EditText)findViewById(R.id.number);

inputName.setText("Coding");
inputNumber.setText("12345678");

buttonAdd = (Button)findViewById(R.id.add);

buttonAdd.setOnClickListener(new Button.OnClickListener(){

public void onClick(View arg0) {
// TODO Auto-generated method stub

String contactName = inputName.getText().toString();
String contactNumber = inputNumber.getText().toString();

ContentValues contentValues = new ContentValues();
contentValues.put(People.NAME, contactName);
contentValues.put(People.STARRED, 1);
Uri newContactUri = getContentResolver().insert(People.CONTENT_URI, contentValues);

Uri phoneUri = Uri.withAppendedPath(newContactUri, People.Phones.CONTENT_DIRECTORY);
contentValues.clear();
contentValues.put(People.Phones.TYPE, People.TYPE_MOBILE);
contentValues.put(People.NUMBER, contactNumber);

getContentResolver().insert(phoneUri, contentValues);

Toast.makeText(AddContactActivity.this,
contactName + " : " + contactNumber,
Toast.LENGTH_LONG).show();
}});
}
}


<?xml version="1.0" encoding="utf-8"?>
<LinearLayout xmlns:android="http://schemas.android.com/apk/res/android"
android:orientation="vertical"
android:layout_width="fill_parent"
android:layout_height="fill_parent"
>
<TextView
android:layout_width="fill_parent"
android:layout_height="wrap_content"
android:text="@string/hello"
/>
<EditText
android:id="@+id/name"
android:layout_width="fill_parent"
android:layout_height="wrap_content"
/>
<EditText
android:id="@+id/number"
android:layout_width="fill_parent"
android:layout_height="wrap_content"
/>
<Button
android:id="@+id/add"
android:layout_width="fill_parent"
android:layout_height="wrap_content"
android:text="Add Contact"
/>
</LinearLayout>


Related Post:
- Query data from the Contacts content provider

Jul 8, 2011

Query data from the Contacts content provider

Android ships with a number of content providers for common data types (audio, video, images, personal contact information, and so on). You can see some of them listed in the android.provider package. You can query these providers for the data they contain (although, for some, you must acquire the proper permission to read the data).

Example to Query data from the Contacts content provider

Query data from the Contacts content provider

package com.GetContact;

import android.app.Activity;
import android.database.Cursor;
import android.net.Uri;
import android.os.Bundle;
import android.provider.Contacts.People;
import android.widget.TextView;

public class GetContactActivity extends Activity {
/** Called when the activity is first created. */
@Override
public void onCreate(Bundle savedInstanceState) {
super.onCreate(savedInstanceState);
setContentView(R.layout.main);
TextView tvContacts = (TextView)findViewById(R.id.contacts);

String[] contacts = new String[] {People.NAME, People.NUMBER};
Uri contentUri = People.CONTENT_URI;
Cursor cursor = managedQuery(contentUri, contacts, null, null, null);

String textContacts = "";

if (cursor.moveToFirst()) {
String myname = null;
String mynumber = null;
do {
textContacts = textContacts
+ cursor.getString(cursor.getColumnIndex(People.NAME)) + " : "
+ cursor.getString(cursor.getColumnIndex(People.NUMBER)) + "\n";
} while (cursor.moveToNext());

tvContacts.setText(textContacts);
}
}
}


<?xml version="1.0" encoding="utf-8"?>
<LinearLayout xmlns:android="http://schemas.android.com/apk/res/android"
android:orientation="vertical"
android:layout_width="fill_parent"
android:layout_height="fill_parent"
>
<TextView
android:layout_width="fill_parent"
android:layout_height="wrap_content"
android:text="@string/hello"
/>
<TextView
android:id="@+id/contacts"
android:layout_width="fill_parent"
android:layout_height="wrap_content"
/>
</LinearLayout>


In order to query data from the Contacts content provider, we have to grant permission of "android.permission.READ_CONTACTS".


Related Post:
- Pick contact using intent of Intent.ACTION_PICK, with People.CONTENT_URI
- Add contact using Contacts content provider

Jul 4, 2011

HttpClient and HttpGet

org.apache.http.client.HttpClient is a Interface class for an HTTP client. HTTP clients encapsulate a smorgasbord of objects required to execute HTTP requests.

org.apache.http.client.methods.HttpGet provide HTTP GET method.

A simple example:

HttpClient and HttpGet

package com.AndroidHttpGet;

import java.io.BufferedReader;
import java.io.IOException;
import java.io.InputStream;
import java.io.InputStreamReader;

import org.apache.http.HttpEntity;
import org.apache.http.client.ClientProtocolException;
import org.apache.http.client.HttpClient;
import org.apache.http.client.methods.HttpGet;
import org.apache.http.impl.client.DefaultHttpClient;

import android.app.Activity;
import android.os.Bundle;
import android.widget.TextView;
import android.widget.Toast;

public class AndroidHttpGetActivity extends Activity {

final String httpPath = "http://feeds.feedburner.com/AndroidCoding";

/** Called when the activity is first created. */
@Override
public void onCreate(Bundle savedInstanceState) {
super.onCreate(savedInstanceState);
setContentView(R.layout.main);

TextView text = (TextView)findViewById(R.id.text);

HttpClient httpclient = new DefaultHttpClient();
HttpGet httpget = new HttpGet(httpPath);
try {

HttpEntity httpEntity = httpclient.execute(httpget).getEntity();

if (httpEntity != null){
InputStream inputStream = httpEntity.getContent();
BufferedReader bufferedReader = new BufferedReader(new InputStreamReader(inputStream));
StringBuilder stringBuilder = new StringBuilder();

String line = null;

while ((line = bufferedReader.readLine()) != null) {
stringBuilder.append(line + "\n");
}

inputStream.close();

text.setText(stringBuilder.toString());
}
} catch (ClientProtocolException e) {
// TODO Auto-generated catch block
e.printStackTrace();
Toast.makeText(AndroidHttpGetActivity.this, e.toString(), Toast.LENGTH_LONG).show();
} catch (IOException e) {
// TODO Auto-generated catch block
e.printStackTrace();
Toast.makeText(AndroidHttpGetActivity.this, e.toString(), Toast.LENGTH_LONG).show();
}
}
}


<?xml version="1.0" encoding="utf-8"?>
<LinearLayout xmlns:android="http://schemas.android.com/apk/res/android"
android:orientation="vertical"
android:layout_width="fill_parent"
android:layout_height="fill_parent"
>
<TextView
android:layout_width="fill_parent"
android:layout_height="wrap_content"
android:text="@string/hello"
/>
<TextView
android:id="@+id/text"
android:layout_width="fill_parent"
android:layout_height="wrap_content"
/>
</LinearLayout>


note: In order to access internet, uses-permission of "android.permission.INTERNET" have to be defined in AndroidManifest.xml.

Infolinks In Text Ads