Jan 29, 2011

RadioButton and RadioGroup

A radio button is a two-states button that can be either checked or unchecked. When the radio button is unchecked, the user can press or click it to check it. However, contrary to a CheckBox, a radio button cannot be unchecked by the user once checked.

Radio buttons are normally used together in a RadioGroup. When several radio buttons live inside a radio group, checking one radio button unchecks all the others.

RadioButton and RadioGroup

<?xml version="1.0" encoding="utf-8"?>
<LinearLayout xmlns:android="http://schemas.android.com/apk/res/android"
android:orientation="vertical"
android:layout_width="fill_parent"
android:layout_height="fill_parent"
>
<TextView
android:layout_width="fill_parent"
android:layout_height="wrap_content"
android:text="@string/hello"
/>
<RadioGroup
android:layout_width="fill_parent"
android:layout_height="wrap_content"
android:checkedButton="@+id/option1"
android:id="@+id/radiogrooup">
<RadioButton
android:text="Option 1"
android:id="@+id/option1"/>
<RadioButton
android:text="Option 2"
android:id="@+id/option2"/>
<RadioButton
android:text="Option 3"
android:id="@+id/option3"/>
<RadioButton
android:text="Option 4"
android:id="@+id/option4"/>
</RadioGroup>
</LinearLayout>

Jan 28, 2011

ScrollView and HorizontalScrollView

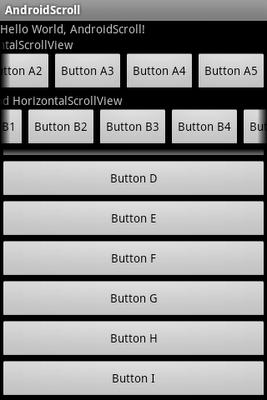
ScrollView and HorizontalScrollView are layout container for a view hierarchy that can be scrolled vertically or horizontally by the user, allowing it to be larger than the physical display. A ScrollView/HorizontalScrollView is a FrameLayout, meaning you should place one child in it containing the entire contents to scroll; this child may itself be a layout manager with a complex hierarchy of objects.

ScrollView and HorizontalScrollView

<?xml version="1.0" encoding="utf-8"?>
<LinearLayout xmlns:android="http://schemas.android.com/apk/res/android"
android:orientation="vertical"
android:layout_width="fill_parent"
android:layout_height="fill_parent"
>
<TextView
android:layout_width="fill_parent"
android:layout_height="wrap_content"
android:text="@string/hello"
/>
<HorizontalScrollView
android:layout_width="wrap_content"
android:layout_height="wrap_content">
<LinearLayout
android:orientation="vertical"
android:layout_width="wrap_content"
android:layout_height="wrap_content">
<TextView
android:layout_width="fill_parent"
android:layout_height="wrap_content"
android:text="Inside 1st HorizontalScrollView" />
<LinearLayout
android:orientation="horizontal"
android:layout_width="wrap_content"
android:layout_height="wrap_content">
<Button
android:text="Button A1"
android:layout_width="wrap_content"
android:layout_height="wrap_content"/>
<Button
android:text="Button A2"
android:layout_width="wrap_content"
android:layout_height="wrap_content"/>
<Button
android:text="Button A3"
android:layout_width="wrap_content"
android:layout_height="wrap_content"/>
<Button
android:text="Button A4"
android:layout_width="wrap_content"
android:layout_height="wrap_content"/>
<Button
android:text="Button A5"
android:layout_width="wrap_content"
android:layout_height="wrap_content"/>
</LinearLayout>
</LinearLayout>
</HorizontalScrollView>
<HorizontalScrollView
android:layout_width="wrap_content"
android:layout_height="wrap_content">
<LinearLayout
android:orientation="vertical"
android:layout_width="wrap_content"
android:layout_height="wrap_content">
<TextView
android:layout_width="fill_parent"
android:layout_height="wrap_content"
android:text="Inside 2nd HorizontalScrollView" />
<LinearLayout
android:orientation="horizontal"
android:layout_width="wrap_content"
android:layout_height="wrap_content">
<Button
android:text="Button B1"
android:layout_width="wrap_content"
android:layout_height="wrap_content"/>
<Button
android:text="Button B2"
android:layout_width="wrap_content"
android:layout_height="wrap_content"/>
<Button
android:text="Button B3"
android:layout_width="wrap_content"
android:layout_height="wrap_content"/>
<Button
android:text="Button B4"
android:layout_width="wrap_content"
android:layout_height="wrap_content"/>
<Button
android:text="Button B5"
android:layout_width="wrap_content"
android:layout_height="wrap_content"/>
<Button
android:text="Button B6"
android:layout_width="wrap_content"
android:layout_height="wrap_content"/>
</LinearLayout>
</LinearLayout>
</HorizontalScrollView>
<ScrollView
android:layout_height="fill_parent"
android:layout_width="fill_parent">
<LinearLayout
android:orientation="vertical"
android:layout_width="fill_parent"
android:layout_height="fill_parent" >
<TextView
android:layout_width="fill_parent"
android:layout_height="wrap_content"
android:text="Inside ScrollView" />
<Button
android:layout_width="fill_parent"
android:layout_height="wrap_content"
android:text="Button C"/>
<Button
android:layout_width="fill_parent"
android:layout_height="wrap_content"
android:text="Button D"/>
<Button
android:layout_width="fill_parent"
android:layout_height="wrap_content"
android:text="Button E"/>
<Button
android:layout_width="fill_parent"
android:layout_height="wrap_content"
android:text="Button F"/>
<Button
android:layout_width="fill_parent"
android:layout_height="wrap_content"
android:text="Button G"/>
<Button
android:layout_width="fill_parent"
android:layout_height="wrap_content"
android:text="Button H"/>
<Button
android:layout_width="fill_parent"
android:layout_height="wrap_content"
android:text="Button I"/>
</LinearLayout>
</ScrollView>
</LinearLayout>

Jan 27, 2011

Context Menu

A context menu is conceptually similar to the menu displayed when the user performs a "right-click" on a PC. You should use a context menu to provide the user access to actions that pertain to a specific item in the user interface. On Android, a context menu is displayed when the user performs a "long press" (press and hold) on an item.

You can create a context menu for any View, though context menus are most often used for items in a ListView. When the user performs a long-press on an item in a ListView and the list is registered to provide a context menu.

Example:

Context Menu

<?xml version="1.0" encoding="utf-8"?>
<LinearLayout xmlns:android="http://schemas.android.com/apk/res/android"
android:orientation="vertical"
android:layout_width="fill_parent"
android:layout_height="fill_parent"
>
<TextView
android:layout_width="fill_parent"
android:layout_height="wrap_content"
android:text="@string/hello"
/>
<TextView
android:id="@+id/startcontextmenu"
android:layout_width="fill_parent"
android:layout_height="wrap_content"
android:text="Long-Press on me!"
/>
</LinearLayout>


package com.MyContextMenu;

import android.app.Activity;
import android.os.Bundle;
import android.view.ContextMenu;
import android.view.MenuItem;
import android.view.View;
import android.view.ContextMenu.ContextMenuInfo;
import android.widget.TextView;
import android.widget.Toast;

public class MyContextMenu extends Activity {
/** Called when the activity is first created. */
@Override
public void onCreate(Bundle savedInstanceState) {
super.onCreate(savedInstanceState);
setContentView(R.layout.main);
TextView textStartContextMenu = (TextView)findViewById(R.id.startcontextmenu);
registerForContextMenu(textStartContextMenu);
}

@Override
public boolean onContextItemSelected(MenuItem item) {
// TODO Auto-generated method stub

Toast.makeText(MyContextMenu.this,
String.valueOf(item.getItemId()),
Toast.LENGTH_LONG).show();

return super.onContextItemSelected(item);
}

@Override
public void onCreateContextMenu(ContextMenu menu, View v,
ContextMenuInfo menuInfo) {
// TODO Auto-generated method stub
super.onCreateContextMenu(menu, v, menuInfo);
menu.add(0, 0, 0, "- A -");
menu.add(0, 1, 0, "- B -");
menu.add(0, 2, 0, "- C -");
menu.add(0, 4, 0, "- D -");
}
}


Jan 25, 2011

startActivity(Intent)

The startActivity(Intent) method is used to start a new activity, which will be placed at the top of the activity stack. It takes a single argument, an Intent, which describes the activity to be executed.

 Intent intent = new Intent();
intent.setClass(MyActivity.this, NewActivity.class);
startActivity(intent);


Jan 16, 2011

ListActivity and onListItemClick

ListActivity: An activity that displays a list of items by binding to a data source such as an array or Cursor, and exposes event handlers when the user selects an item.

ListActivity hosts a ListView object that can be bound to different data sources, typically either an array or a Cursor holding query results. Binding, screen layout, and row layout are discussed in the following sections.

protected void onListItemClick (ListView l, View v, int position, long id)
Since: API Level 1

The method onListItemClick() will be called when an item in the list is selected. Subclasses should override. Subclasses can call getListView().getItemAtPosition(position) if they need to access the data associated with the selected item.
Parameters
l: The ListView where the click happened
v: The view that was clicked within the ListView
position: The position of the view in the list
id: The row id of the item that was clicked

ListActivity and onListItemClick

package com.AndroidListActivity;

import android.app.ListActivity;
import android.os.Bundle;
import android.view.View;
import android.widget.ArrayAdapter;
import android.widget.ListView;
import android.widget.Toast;

public class AndroidListActivity extends ListActivity {

String[] DayOfWeek = new String[] {
"Sunday", "Monday", "Tuesday", "Wednesday",
"Thursday", "Friday", "Saturday"};

/** Called when the activity is first created. */
@Override
public void onCreate(Bundle savedInstanceState) {
super.onCreate(savedInstanceState);
setListAdapter(new ArrayAdapter<String>(this, android.R.layout.simple_list_item_1, DayOfWeek));
}

@Override
protected void onListItemClick(ListView l, View v, int position, long id) {
// TODO Auto-generated method stub
super.onListItemClick(l, v, position, id);

Toast.makeText(getBaseContext(), (CharSequence) getListView().getItemAtPosition(position), Toast.LENGTH_LONG).show();
}


}

Jan 13, 2011

Learn Java for Android Development


Product Description

Android development is hot, and many programmers are interested in joining the fun. However, because this technology is based on Java, you should first obtain a solid grasp of the Java language and its foundational APIs to improve your chances of succeeding as an Android app developer. After all, you will be busy learning the architecture of an Android app, the various Android-specific APIs, and Android-specific tools. If you do not already know Java fundamentals, you will probably end up with a massive headache from also having to quickly cram those fundamentals into your knowledge base.

Learn Java for Android Development
teaches programmers of any skill level the essential Java language and foundational Java API skills that must be learned to improve the programmer’s chances of succeeding as an Android app developer. Each of the book’s 10 chapters provides an exercise section that gives you the opportunity to reinforce your understanding of the chapter’s material. Answers to the book’s more than 300 exercises are provided in an appendix. Once you complete this book, you will be ready to dive into Android, and you can start that journey by obtaining a copy of Beginning Android 2.

Additionally, author Jeff Friesen will provide supplementary material (such as 6 more chapters) on his javajeff.mb.ca website, available over the next few months following this book's release.

What you’ll learn

  • The Java language: This book provides complete coverage of nearly every pre-Java version 7 language feature (native methods are briefly mentioned but not formally covered). Starting with those features related to classes and objects, you progress to object-oriented features related to inheritance, polymorphism, and interfaces. You then explore the advanced language features for nested types, packages, static imports, exceptions, assertions, annotations, generics, and enums. Continuing, you investigate strictfp, class literals, synchronized, volatile, the enhanced for loop statement, autoboxing/unboxing, and transient fields. The book also briefly presents most (if not all) of Java version 7’s language features, although not much is said about closures or modules (which were not finalized at the time of writing).
  • Java APIs: In addition to Object and APIs related to exceptions, you explore Math, StrictMath, BigDecimal, BigInteger, Package, Boolean, Character, Byte, Short, Integer, Long, Float, Double, Number, the References API, the Reflection API, String, StringBuffer, System, the Threading API, the collections framework, the concurrency utilities, the internationalization APIs, the Preferences API, Random, the Regular Expressions API, File, RandomAccessFile, stream classes, and writer/reader classes. You will also get a tiny taste of Swing in the context of internationalization.
  • Tools: You will learn how to use the JDK’s javac (compiler), java (application launcher), javadoc (Java documentation generator), and jar (Java archive creator, updater, and extractor) tools. You will also receive an introduction to the NetBeans and Eclipse integrated development environments. Although you can develop Android apps without NetBeans or Eclipse, working with these IDEs is much more pleasant.

Who this book is for

This book is for any programmer (including existing Java programmers and Objective-C (iPhone/iPad) programmers) of any skill level who needs to obtain a solid understanding of the Java language and foundational Java APIs before jumping into Android app development.

Table of Contents

  1. Getting Started with Java
  2. Learning Language Fundamentals
  3. Learning Object-Oriented Language Features
  4. Mastering Advanced Language Features Part 1
  5. Mastering Advanced Language Features Part 2
  6. Exploring the Basic APIs Part 1
  7. Exploring the Basic APIs Part 2
  8. Discovering the Collections Framework
  9. Discovering Additional Utility APIs
  10. Performing I/O
  11. Solutions to Exercises

About the Author

Jeff ""JavaJeff"" Friesen is a freelance software developer and educator specializing in Java and now Android technology. In addition to teaching Java at a local college, he's written several books on Java, with Learn Java for Android and Beginning Java SE 6 Platform: From Novice to Professional being his most recent books. Jeff has also written numerous articles for java.net, InformIT.com and JavaWorld.com. Check out his javajeff.mb.ca website to discover these articles, as well as additional material on Java, JavaFX, and other software technologies.

Jan 12, 2011

How to manually request ListView to update the content?

You can call the notifyDataSetChanged() method of the adapter of the ListView. it notifies the attached View that the underlying data has been changed and it should refresh itself.

Jan 7, 2011

Set Full Screen in AndroidManifest.xml

To set your App or any individual activity display in Full Screen mode, insert the code "@android:style/Theme.NoTitleBar.Fullscreen" in AndroidManifest.xml, under application or activity tab.

                  android:theme="@android:style/Theme.NoTitleBar.Fullscreen"


How to remove the Title Bar

In order to turning off the title at the top of the screen, simple call the requestWindowFeature(Window.FEATURE_NO_TITLE) in your code.

  requestWindowFeature(Window.FEATURE_NO_TITLE);


Jan 4, 2011

How to pass bitmap between activities

A bitmap created from R.drawable.icon will be passed from one activity (AndroidPassingBitmap) to another activity (AndroidReceiveBitmap).

How to passing bitmap between activities

Modify the activity AndroidPassingBitmap.java, simple create a bitmap and pass to the second activity.
/AndroidPassingBitmap/src/com/AndroidPassingBitmap/AndroidPassingBitmap.java
package com.AndroidPassingBitmap;

import android.app.Activity;
import android.content.Intent;
import android.graphics.Bitmap;
import android.graphics.BitmapFactory;
import android.os.Bundle;

public class AndroidPassingBitmap extends Activity {
/** Called when the activity is first created. */
@Override
public void onCreate(Bundle savedInstanceState) {
super.onCreate(savedInstanceState);
setContentView(R.layout.main);

Bitmap bitmap = BitmapFactory.decodeResource(getResources(), R.drawable.icon);

Intent intent = new Intent();
intent.setClass(AndroidPassingBitmap.this, AndroidReceiveBitmap.class);
intent.putExtra("Bitmap", bitmap);
startActivity(intent);

}
}


Create a new activity to retrieve and display the bitmap.
/workspace/AndroidPassingBitmap/src/com/AndroidPassingBitmap/AndroidReceiveBitmap.java
package com.AndroidPassingBitmap;

import android.app.Activity;
import android.graphics.Bitmap;
import android.os.Bundle;
import android.widget.ImageView;

public class AndroidReceiveBitmap extends Activity {

@Override
protected void onCreate(Bundle savedInstanceState) {
// TODO Auto-generated method stub
super.onCreate(savedInstanceState);

Bitmap bitmap = (Bitmap)this.getIntent().getParcelableExtra("Bitmap");

setContentView(R.layout.newimage);
ImageView viewBitmap = (ImageView)findViewById(R.id.bitmapview);

viewBitmap.setImageBitmap(bitmap);

}

}


Create the layout of the second activity.
/workspace/AndroidPassingBitmap/res/layout/newimage.xml
<?xml version="1.0" encoding="utf-8"?>
<LinearLayout xmlns:android="http://schemas.android.com/apk/res/android"
android:orientation="vertical"
android:layout_width="fill_parent"
android:layout_height="fill_parent"
>
<ImageView
android:id="@+id/bitmapview"
android:layout_width="wrap_content"
android:layout_height="wrap_content"
/>
</LinearLayout>


Update AndroidManifest.xml to include the second activity in the package.
/workspace/AndroidPassingBitmap/AndroidManifest.xml
<?xml version="1.0" encoding="utf-8"?>
<manifest xmlns:android="http://schemas.android.com/apk/res/android"
package="com.AndroidPassingBitmap"
android:versionCode="1"
android:versionName="1.0">
<application android:icon="@drawable/icon" android:label="@string/app_name">
<activity android:name=".AndroidPassingBitmap"
android:label="@string/app_name">
<intent-filter>
<action android:name="android.intent.action.MAIN" />
<category android:name="android.intent.category.LAUNCHER" />
</intent-filter>
</activity>
<activity android:name=".AndroidReceiveBitmap"
android:label="AndroidReceiveBitmap">
</activity>
</application>
<uses-sdk android:minSdkVersion="4" />

</manifest>


Infolinks In Text Ads