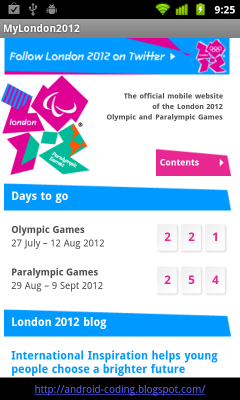
So, you can easily create your own London 2012 App for Android by embedding WebView.

Modify main.xml to embed a WebView.
<?xml version="1.0" encoding="utf-8"?>
<LinearLayout xmlns:android="http://schemas.android.com/apk/res/android"
 android:layout_width="fill_parent"
 android:layout_height="fill_parent"
 android:orientation="vertical" >
<RelativeLayout
  android:layout_width="fill_parent"
  android:layout_height="fill_parent"
  android:orientation="vertical" >
  <TextView
      android:id="@+id/myblog"
      android:layout_width="fill_parent"
      android:layout_height="wrap_content"
      android:text="@string/my_blog"
 android:padding="5dp"
 android:autoLink="web"
 android:gravity="center_horizontal"
      android:layout_alignParentBottom="true"/>
  <WebView
      android:id="@+id/webview"
      android:layout_width="fill_parent"
      android:layout_height="fill_parent"
      android:layout_alignParentTop="true"
      android:layout_above="@id/myblog"/>
</RelativeLayout>
</LinearLayout>
Modify /res/values/strings.xml to add String of "my_blog", to advertise me:)
<?xml version="1.0" encoding="utf-8"?>
<resources>

 <string name="hello">Hello World, MyLondon2012Activity!</string>
 <string name="app_name">MyLondon2012</string>
<string name="my_blog">http://android-coding.blogspot.com/</string>
</resources>
Modify main activity to handle WebView.
package android.coding.myLondon2012;

import android.app.Activity;
import android.os.Bundle;
import android.view.Window;
import android.webkit.WebChromeClient;
import android.webkit.WebView;
import android.webkit.WebViewClient;

public class MyLondon2012Activity extends Activity {

WebView webView;
final String London2012_URL = "http://www.london2012.com/";

 /** Called when the activity is first created. */
 @Override
 public void onCreate(Bundle savedInstanceState) {
     super.onCreate(savedInstanceState);
     getWindow().requestFeature(Window.FEATURE_PROGRESS);
     setContentView(R.layout.main);
     webView = (WebView)findViewById(R.id.webview);
     webView.getSettings().setJavaScriptEnabled(true);
     webView.setWebViewClient(new MyWebViewClient());
     webView.loadUrl(London2012_URL);

     final Activity activity = this;
     webView.setWebChromeClient(new WebChromeClient() {

      public void onProgressChanged(WebView view, int progress) {
       // Activities and WebViews measure progress with different scales.
       // The progress meter will automatically disappear when we reach 100%
       activity.setProgress(progress * 100);
      }});
 }

public class MyWebViewClient extends WebViewClient {

@Override
public boolean shouldOverrideUrlLoading(WebView view, String url) {
 view.loadUrl(url);
         return true;
}

}
}
Save the icon in /res/drawable/london2012.png

Modify AndroidManifest.xml to enable "android.permission.INTERNET".
<?xml version="1.0" encoding="utf-8"?>
<manifest xmlns:android="http://schemas.android.com/apk/res/android"
 package="android.coding.myLondon2012"
 android:versionCode="1"
 android:versionName="1.0" >

 <uses-sdk android:minSdkVersion="8" />
 <uses-permission android:name="android.permission.INTERNET"/>

 <application
     android:icon="@drawable/london2012"
     android:label="@string/app_name" >
     <activity
         android:name=".MyLondon2012Activity"
         android:label="@string/app_name" >
         <intent-filter>
             <action android:name="android.intent.action.MAIN" />

             <category android:name="android.intent.category.LAUNCHER" />
         </intent-filter>
     </activity>
 </application>

</manifest>
Download Eclipse project of myLondon2012: http://goo.gl/tg18O
Download Installable APK Android package of myLondon2012: http://goo.gl/28tnz
Related Post:
- android.webkit.WebView
- More on WebView, override url loading
- Enable JavaScript and built-in zoom control of WebView
- Display Progress Bar on WebView when loading
- Handle the Back button in WebView, to back in history
No comments:
Post a Comment