Dec 28, 2012

Get installed TTS engines, by calling getEngines() method.

Start from Android API level 14, List<TextToSpeech.EngineInfo> getEngines() method was provided to get a list of all installed TTS engines.

To display installed TTS Engines:

display installed TTS Engines


package com.example.androidtexttospeech;

import java.util.ArrayList;
import java.util.List;

import android.os.Bundle;
import android.speech.tts.TextToSpeech;
import android.speech.tts.TextToSpeech.OnInitListener;
import android.widget.ArrayAdapter;
import android.widget.Spinner;
import android.widget.TextView;
import android.app.Activity;

public class MainActivity extends Activity implements OnInitListener{
 
 TextView tvDefaultTTS;
 
 Spinner spInstalledEngines;
 TextToSpeech tts;
 List<TextToSpeech.EngineInfo> listInstalledEngines;
 List<String> listInstalledEnginesName;
 String defaultTTS;
 
 private ArrayAdapter<String> adapter;

 @Override
 protected void onCreate(Bundle savedInstanceState) {
  super.onCreate(savedInstanceState);
  setContentView(R.layout.activity_main);
  tvDefaultTTS = (TextView)findViewById(R.id.defaulttts);
  spInstalledEngines = (Spinner)findViewById(R.id.installedengines);

  tts = new TextToSpeech(this, this);
  listInstalledEngines = tts.getEngines();
  listInstalledEnginesName = new ArrayList<String>();

        for(int i = 0; i < listInstalledEngines.size(); i++){
         listInstalledEnginesName.add(listInstalledEngines.get(i).label);
        }
        
        adapter = new ArrayAdapter<String>(
    this, android.R.layout.simple_spinner_item, listInstalledEnginesName);
        adapter.setDropDownViewResource(android.R.layout.simple_spinner_dropdown_item);
        spInstalledEngines.setAdapter(adapter);
  
        defaultTTS = tts.getDefaultEngine();
        tvDefaultTTS.setText("Default TTS Engine: " + defaultTTS);
 }

 @Override
 public void onInit(int status) {
  // TODO Auto-generated method stub
  
 }

 @Override
 protected void onDestroy() {
  // TODO Auto-generated method stub
  super.onDestroy();
  tts.shutdown();
 }

}


<LinearLayout xmlns:android="http://schemas.android.com/apk/res/android"
    xmlns:tools="http://schemas.android.com/tools"
    android:layout_width="match_parent"
    android:layout_height="match_parent"
    android:orientation="vertical"
    tools:context=".MainActivity" >

    <TextView
        android:layout_width="wrap_content"
        android:layout_height="wrap_content"
        android:layout_centerHorizontal="true"
        android:layout_centerVertical="true"
        android:text="@string/hello_world" />
    <TextView
        android:id="@+id/defaulttts"
        android:layout_width="fill_parent"
        android:layout_height="wrap_content"/>
    <Spinner 
        android:id="@+id/installedengines"
        android:layout_width="match_parent"
        android:layout_height="wrap_content"/>

</LinearLayout>


Next:
- Get features supported by TextToSpeech Engine

Dec 27, 2012

Get device's Android ID

Secure.ANDROID_ID is a 64-bit number (as a hex string) that is randomly generated on the device's first boot and should remain constant for the lifetime of the device. (The value may change if a factory reset is performed on the device.)

device's Android ID


package com.example.androidid;

import android.os.Bundle;
import android.provider.Settings.Secure;
import android.app.Activity;
import android.widget.Toast;

public class MainActivity extends Activity {

 @Override
 protected void onCreate(Bundle savedInstanceState) {
  super.onCreate(savedInstanceState);
  setContentView(R.layout.activity_main);
  
  String id = Secure.getString(getContentResolver(), Secure.ANDROID_ID);
  Toast.makeText(getApplicationContext(), id, Toast.LENGTH_LONG).show();
 }

}


Dec 13, 2012

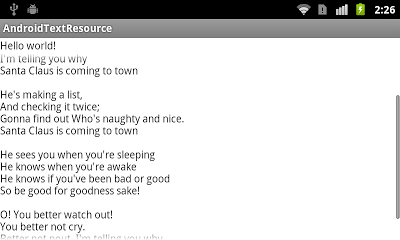
Read raw text file, and display in ScrollView.

This article demonstrate how to read raw text file from /res/raw/ folder, and display the text in a TextView inside ScrollView.

Read raw text file, and display in ScrollView.


Create raw text file at /res/raw/mytext.txt.
Santa Claus Is Coming To Town:

You better watch out
You better not cry
Better not pout
I'm telling you why
Santa Claus is coming to town

He's making a list,
And checking it twice;
Gonna find out Who's naughty and nice.
Santa Claus is coming to town

He sees you when you're sleeping
He knows when you're awake
He knows if you've been bad or good
So be good for goodness sake!

O! You better watch out!
You better not cry.
Better not pout, I'm telling you why.
Santa Claus is coming to town.


Add a ScrollView with TextView inside, to our layout.
<LinearLayout xmlns:android="http://schemas.android.com/apk/res/android"
    xmlns:tools="http://schemas.android.com/tools"
    android:layout_width="match_parent"
    android:layout_height="match_parent"
    tools:context=".MainActivity" 
    android:orientation="vertical">

    <TextView
        android:layout_width="wrap_content"
        android:layout_height="wrap_content"
        android:text="@string/hello_world" />

    <ScrollView 
        android:layout_width="match_parent"
        android:layout_height="wrap_content">
        <TextView
            android:id="@+id/mytextview"
            android:layout_width="match_parent"
            android:layout_height="wrap_content"/>
    </ScrollView>
    
</LinearLayout>


Main code:
package com.AndroidTextResource;

import java.io.ByteArrayOutputStream;
import java.io.IOException;
import java.io.InputStream;

import android.app.Activity;
import android.os.Bundle;
import android.widget.TextView;

public class MainActivity extends Activity {

 @Override
 protected void onCreate(Bundle savedInstanceState) {
  super.onCreate(savedInstanceState);
  setContentView(R.layout.activity_main);
  
  TextView myTextView = (TextView)findViewById(R.id.mytextview);
  
  InputStream inputStream = getResources().openRawResource(R.raw.mytext);
  ByteArrayOutputStream byteArrayOutputStream = new ByteArrayOutputStream();
  
  String myText = "";
  int in;
  try {
   in = inputStream.read();
   while (in != -1)
   {
    byteArrayOutputStream.write(in);
    in = inputStream.read(); 
   }
   inputStream.close();
   
   myText = byteArrayOutputStream.toString(); 
  }catch (IOException e) {
   e.printStackTrace(); 
  }

  myTextView.setText(myText); 
 }
 
}


Dec 6, 2012

Draw path on SurfaceView's canvas

Example to detect touch events and draw path on SurfaceView's canvas accordingly.

Draw path on SurfaceView's canvas


package com.TestSurefaceView;

import java.util.Random;
import android.app.Activity;
import android.content.Context;
import android.graphics.Canvas;
import android.graphics.Color;
import android.graphics.Paint;
import android.graphics.Path;
import android.os.Bundle;
import android.view.MotionEvent;
import android.view.SurfaceHolder;
import android.view.SurfaceView;

 public class MainActivity extends Activity {
  
  MySurfaceView mySurfaceView;
  
  @Override
  public void onCreate(Bundle savedInstanceState) {
   super.onCreate(savedInstanceState);
   mySurfaceView = new MySurfaceView(this);
   setContentView(mySurfaceView); 
  }
  
  class MySurfaceView extends SurfaceView{

   Path path;
   
   Thread thread = null;
   SurfaceHolder surfaceHolder;
   volatile boolean running = false;
   
   private Paint paint = new Paint(Paint.ANTI_ALIAS_FLAG);
   Random random;
   
   public MySurfaceView(Context context) {
    super(context);
    surfaceHolder = getHolder();
    paint.setStyle(Paint.Style.STROKE);
    paint.setStrokeWidth(3);
    paint.setColor(Color.WHITE);
   }

   @Override
   public boolean onTouchEvent(MotionEvent event) {
    if(event.getAction() == MotionEvent.ACTION_DOWN){
     path = new Path();
     path.moveTo(event.getX(), event.getY());
    }else if(event.getAction() == MotionEvent.ACTION_MOVE){
     path.lineTo(event.getX(), event.getY());
    }else if(event.getAction() == MotionEvent.ACTION_UP){
     path.lineTo(event.getX(), event.getY());
    }
    
    if(path != null){
     Canvas canvas = surfaceHolder.lockCanvas();
     canvas.drawPath(path, paint);
     surfaceHolder.unlockCanvasAndPost(canvas);
    }

    return true; 
   }
  }
}


Related Post:
- Detect multi-touch, on SurfaceView

Dec 5, 2012

Capture screen with getDrawingCache() repeatly

In the article "Create custom dialog with dynamic content, updated in onPrepareDialog()", it demonstrate how to capture screen with setDrawingCacheEnabled() and getDrawingCache() methods. Unfortunately, it cannot work as expected! The screen is captured in the first time only. After that, every time call getDrawingCache() return the same first screen.

To solve it call setDrawingCacheEnabled(false) and then setDrawingCacheEnabled(true) to re-load the cache bitmap.

Modify onClick() method of btnCaptureScreen's OnClickListener:
     btnCaptureScreen.setOnClickListener(new OnClickListener(){
      
      @Override
      public void onClick(View arg0) {
       screen.setDrawingCacheEnabled(false);
       screen.setDrawingCacheEnabled(true);
       bmScreen = screen.getDrawingCache();
       showDialog(ID_SCREENDIALOG);
      }});


Capture screen with getDrawingCache() repeatly

Nov 28, 2012

Display custom TrueType Font (TTF)

To display text using custom TTF; create /assets/fonts folder and save your ttf files in it. Create custom Typeface using Typeface.createFromAsset() method and apply it on views by calling setTypeface() method.

Display custom TrueType Font (TTF)


package com.example.androidttf;

import android.os.Bundle;
import android.app.Activity;
import android.graphics.Typeface;
import android.widget.Button;
import android.widget.EditText;
import android.widget.TextView;

public class MainActivity extends Activity {

 @Override
 protected void onCreate(Bundle savedInstanceState) {
  super.onCreate(savedInstanceState);
  setContentView(R.layout.activity_main);
  
  TextView testText = (TextView)findViewById(R.id.testtext);
  Button testButton = (Button)findViewById(R.id.testbutton);
  EditText testEditText = (EditText)findViewById(R.id.testedittext);
  
  Typeface typeface_Abbeyline = Typeface.createFromAsset(getAssets(), "fonts/Abbeyline.ttf");
  Typeface typeface_36daysag = Typeface.createFromAsset(getAssets(), "fonts/36daysag.ttf");
  Typeface typeface_AtomicClockRadio = Typeface.createFromAsset(getAssets(), "fonts/AtomicClockRadio.ttf");
  testText.setTypeface(typeface_Abbeyline);
  testButton.setTypeface(typeface_36daysag);
  testEditText.setTypeface(typeface_AtomicClockRadio);
 }

}


<LinearLayout xmlns:android="http://schemas.android.com/apk/res/android"
    xmlns:tools="http://schemas.android.com/tools"
    android:layout_width="match_parent"
    android:layout_height="match_parent"
    tools:context=".MainActivity" 
    android:orientation="vertical">

    <TextView
        android:layout_width="wrap_content"
        android:layout_height="wrap_content"
        android:text="@string/hello_world" />
    <TextView
        android:id="@+id/testtext"
        android:layout_width="match_parent"
        android:layout_height="wrap_content"
        android:text="I'm a TextView" />
    <Button
        android:id="@+id/testbutton"
        android:layout_width="match_parent"
        android:layout_height="wrap_content"
        android:text="I'm a Button" />
    <EditText
        android:id="@+id/testedittext"
        android:layout_width="match_parent"
        android:layout_height="wrap_content" />

</LinearLayout>


Nov 22, 2012

Monitor battery level

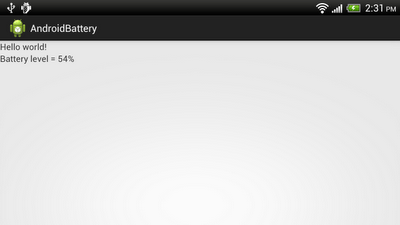
This code monitor battery level by registering our BroadcastReceiver with IntentFilter for Intent.ACTION_BATTERY_CHANGED.

Monitor battery level of Android device


package com.example.androidbattery;

import android.os.Bundle;
import android.app.Activity;
import android.content.BroadcastReceiver;
import android.content.Context;
import android.content.Intent;
import android.content.IntentFilter;
import android.widget.TextView;

public class MainActivity extends Activity {
 
 TextView batteryStatus;

 @Override
 protected void onCreate(Bundle savedInstanceState) {
  super.onCreate(savedInstanceState);
  setContentView(R.layout.activity_main);
  batteryStatus = (TextView)findViewById(R.id.batterystatus);
  
  IntentFilter batteryFilter = new IntentFilter(Intent.ACTION_BATTERY_CHANGED);
  registerReceiver(batteryMonitor, batteryFilter);
 }

 private BroadcastReceiver batteryMonitor
 = new BroadcastReceiver(){

  @Override
  public void onReceive(Context arg0, Intent arg1) {
   int batteryLevel = arg1.getIntExtra("level", 0);
   batteryStatus.setText("Battery level = " + String.valueOf(batteryLevel) + "%");
  }};

}


<LinearLayout xmlns:android="http://schemas.android.com/apk/res/android"
    xmlns:tools="http://schemas.android.com/tools"
    android:layout_width="match_parent"
    android:layout_height="match_parent"
    tools:context=".MainActivity" 
    android:orientation="vertical">

    <TextView
        android:layout_width="wrap_content"
        android:layout_height="wrap_content"
        android:text="@string/hello_world" />
    <TextView
        android:id="@+id/batterystatus"
        android:layout_width="wrap_content"
        android:layout_height="wrap_content"/>
        
</LinearLayout>


Nov 1, 2012

Remove View dynamically using Java code

Last post "Insert ImageView dynamically using Java code", by clicking on buttons. Removing function is added here to remove clicked ImageView from parent ViewGroup.

Remove View dynamically using Java code


Modify the Java code from last post, adding OnClickListener to the ImageViews to remove itself from its parent.
package com.example.androidinsertimages;

import android.os.Bundle;
import android.app.Activity;
import android.view.View;
import android.view.View.OnClickListener;
import android.view.ViewGroup;
import android.widget.Button;
import android.widget.ImageView;
import android.widget.LinearLayout;

public class MainActivity extends Activity {
 
 Button addinHorizontalScrollView, addinScrollView;
 LinearLayout inHorizontalScrollView, inScrollView;

    @Override
    public void onCreate(Bundle savedInstanceState) {
        super.onCreate(savedInstanceState);
        setContentView(R.layout.activity_main);
        
        inHorizontalScrollView = (LinearLayout)findViewById(R.id.inhorizontalscrollview);
        inScrollView = (LinearLayout)findViewById(R.id.inscrollview);
        
        addinHorizontalScrollView = (Button)findViewById(R.id.addinhorizontalscrollview);
        addinHorizontalScrollView.setOnClickListener(new OnClickListener(){

   @Override
   public void onClick(View arg0) {
    addImageView(inHorizontalScrollView);
   }});
        
        addinScrollView = (Button)findViewById(R.id.addinscrollview);
        addinScrollView.setOnClickListener(new OnClickListener(){

   @Override
   public void onClick(View arg0) {
    addImageView(inScrollView);
   }});
        
    }
    
    private void addImageView(LinearLayout layout){
     ImageView imageView = new ImageView(this);
     imageView.setImageResource(R.drawable.ic_launcher);
     layout.addView(imageView);
     
     imageView.setOnClickListener(viewOnClickListener);
    }

    OnClickListener viewOnClickListener
    = new OnClickListener(){

  @Override
  public void onClick(View v) {
   ViewGroup parent = (ViewGroup)v.getParent();
   parent.removeView(v);
  }
    };
}


The layout file refer to last post.


Oct 29, 2012

Insert ImageView dynamically using Java code

Here demonstrate how to create and add ImageView in LinearLayout (inside HorizontalScrollView/ScrollView) dynamically using Java code.

Insert ImageView dynamically using Java code


package com.example.androidinsertimages;

import android.os.Bundle;
import android.app.Activity;
import android.view.View;
import android.view.View.OnClickListener;
import android.widget.Button;
import android.widget.ImageView;
import android.widget.LinearLayout;

public class MainActivity extends Activity {
 
 Button addinHorizontalScrollView, addinScrollView;
 LinearLayout inHorizontalScrollView, inScrollView;

    @Override
    public void onCreate(Bundle savedInstanceState) {
        super.onCreate(savedInstanceState);
        setContentView(R.layout.activity_main);
        
        inHorizontalScrollView = (LinearLayout)findViewById(R.id.inhorizontalscrollview);
        inScrollView = (LinearLayout)findViewById(R.id.inscrollview);
        
        addinHorizontalScrollView = (Button)findViewById(R.id.addinhorizontalscrollview);
        addinHorizontalScrollView.setOnClickListener(new OnClickListener(){

   @Override
   public void onClick(View arg0) {
    addImageView(inHorizontalScrollView);
   }});
        
        addinScrollView = (Button)findViewById(R.id.addinscrollview);
        addinScrollView.setOnClickListener(new OnClickListener(){

   @Override
   public void onClick(View arg0) {
    addImageView(inScrollView);
   }});
        
    }
    
    private void addImageView(LinearLayout layout){
     ImageView imageView = new ImageView(this);
     imageView.setImageResource(R.drawable.ic_launcher);
     layout.addView(imageView);
    }

}


<LinearLayout xmlns:android="http://schemas.android.com/apk/res/android"
    xmlns:tools="http://schemas.android.com/tools"
    android:layout_width="match_parent"
    android:layout_height="match_parent" 
    android:orientation="vertical">

    <TextView
        android:layout_width="wrap_content"
        android:layout_height="wrap_content"
        android:text="@string/hello_world"
        tools:context=".MainActivity" />
    
    <Button
        android:id="@+id/addinhorizontalscrollview"
        android:layout_width="match_parent"
        android:layout_height="wrap_content"
        android:text="Add in HorizontalScrollView"/>
    <HorizontalScrollView
        android:layout_width="match_parent"
        android:layout_height="wrap_content">
        <LinearLayout
            android:id="@+id/inhorizontalscrollview"
            android:layout_width="wrap_content"
            android:layout_height="wrap_content"
            android:orientation="horizontal">
        </LinearLayout>
    </HorizontalScrollView>
    
    <Button
        android:id="@+id/addinscrollview"
        android:layout_width="match_parent"
        android:layout_height="wrap_content"
        android:text="Add in ScrollView"/>
    <ScrollView
        android:layout_width="match_parent"
        android:layout_height="wrap_content">
        <LinearLayout
            android:id="@+id/inscrollview"
            android:layout_width="wrap_content"
            android:layout_height="wrap_content"
            android:orientation="vertical">
        </LinearLayout>
    </ScrollView>

</LinearLayout>


We can also remove the ImageViews using Java code, refer to next post, "Remove View dynamically using Java code".


Oct 16, 2012

Get video width and height of MediaPlayer and update SurfaceView LayoutParams accordingly

Last article demonstrate how to Play Youtube 3gp video with MediaPlayer in SurfaceView. It can be noticed that the video is fill in parent view, because "fill_parent" are defined in layout.

To adjust the video fit the Youtube video width and height, we can implement our custom OnVideoSizeChangedListener(), and call myMediaPlayer.getVideoWidth() and myMediaPlayer.getVideoHeight() to get the video width and height. After then, update SurfaceView LayoutParams with correct size accordingly.

MediaPlay with true size

Modify the Java code:
package com.example.androidyoutubeplayer;

import java.io.IOException;

import android.graphics.PixelFormat;
import android.media.AudioManager;
import android.media.MediaPlayer;
import android.media.MediaPlayer.OnVideoSizeChangedListener;
import android.os.Bundle;
import android.app.Activity;
import android.view.SurfaceHolder;
import android.view.SurfaceView;
import android.view.View;
import android.view.View.OnClickListener;
import android.widget.Button;
import android.widget.LinearLayout;
import android.widget.TextView;

public class MainActivity extends Activity implements SurfaceHolder.Callback{
 
 MediaPlayer myMediaPlayer;
 SurfaceView mySurfaceView;
 SurfaceHolder mySurfaceHolder;
 
 Button btnPlay, btnStop;
 TextView textVideoSize;
 String path3gp = "rtsp://v8.cache6.c.youtube.com/CjYLENy73wIaLQkP0kiLmutogRMYDSANFEIJbXYtZ29vZ2xlSARSBXdhdGNoYKjR78WV1ZH5Tgw=/0/0/0/video.3gp";
 
    @Override
    public void onCreate(Bundle savedInstanceState) {
        super.onCreate(savedInstanceState);
        setContentView(R.layout.activity_main);

        getWindow().setFormat(PixelFormat.UNKNOWN);
        mySurfaceView = (SurfaceView)findViewById(R.id.mediasurface);        
        mySurfaceHolder = mySurfaceView.getHolder();
        mySurfaceHolder.addCallback(this);
        myMediaPlayer = new MediaPlayer();
        
        btnPlay = (Button)findViewById(R.id.play);
        btnStop = (Button)findViewById(R.id.stop);
        
        btnPlay.setOnClickListener(playOnClickListener);
        btnStop.setOnClickListener(stopOnClickListener);
        
        textVideoSize = (TextView)findViewById(R.id.size);

    }
    
    OnClickListener playOnClickListener
    = new OnClickListener(){

  @Override
  public void onClick(View v) {
   myMediaPlayer.reset();
   
   myMediaPlayer.setAudioStreamType(AudioManager.STREAM_MUSIC);
   myMediaPlayer.setDisplay(mySurfaceHolder);
   
   try {
    
    myMediaPlayer.setOnVideoSizeChangedListener(videoSizeChangedListener);
    
    myMediaPlayer.setDataSource(path3gp);
    myMediaPlayer.prepare();
    
    /*
     * if you get Video Width and Height after prepare() here, it always return 0, 0!
     */
    int videoWidth = myMediaPlayer.getVideoWidth();
    int videoHeight = myMediaPlayer.getVideoHeight();
    textVideoSize.setText(String.valueOf(videoWidth) + " x " + String.valueOf(videoHeight));
    
    myMediaPlayer.start();
   } catch (IllegalArgumentException e) {
    // TODO Auto-generated catch block
    e.printStackTrace();
   } catch (SecurityException e) {
    // TODO Auto-generated catch block
    e.printStackTrace();
   } catch (IllegalStateException e) {
    // TODO Auto-generated catch block
    e.printStackTrace();
   } catch (IOException e) {
    // TODO Auto-generated catch block
    e.printStackTrace();
   }
   
  }};
    
    OnClickListener stopOnClickListener
    = new OnClickListener(){

  @Override
  public void onClick(View v) {
   if(myMediaPlayer.isPlaying()){
    myMediaPlayer.stop(); 
   }
   
  }};

 @Override
 public void surfaceChanged(SurfaceHolder arg0, int arg1, int arg2, int arg3) {
  // TODO Auto-generated method stub
  
 }

 @Override
 public void surfaceCreated(SurfaceHolder holder) {
  // TODO Auto-generated method stub
  
 }

 @Override
 public void surfaceDestroyed(SurfaceHolder holder) {
  // TODO Auto-generated method stub
  
 }
 
 /*
  * Get Video Width and Height in OnVideoSizeChangedListener,
  * and update SurfaceView LayoutParams accordingly.
  */
 OnVideoSizeChangedListener videoSizeChangedListener
 = new OnVideoSizeChangedListener(){

  @Override
  public void onVideoSizeChanged(MediaPlayer arg0, int arg1, int arg2) {
   int videoWidth = myMediaPlayer.getVideoWidth();
   int videoHeight = myMediaPlayer.getVideoHeight();
   
   textVideoSize.setText(String.valueOf(videoWidth) + " x " + String.valueOf(videoHeight));
   
   mySurfaceView.setLayoutParams(
     new LinearLayout.LayoutParams(videoWidth, videoHeight));
  }};
}


Modify the layout file to add TextView to show the detected size.
<LinearLayout xmlns:android="http://schemas.android.com/apk/res/android"
    xmlns:tools="http://schemas.android.com/tools"
    android:layout_width="match_parent"
    android:layout_height="match_parent"
    android:orientation="vertical">
    
    <Button
        android:id="@+id/play"
        android:layout_width="fill_parent"
        android:layout_height="wrap_content"
        android:text="PLAY"/>
    <Button
        android:id="@+id/stop"
        android:layout_width="fill_parent"
        android:layout_height="wrap_content"
        android:text="STOP"/>
    <TextView
        android:id="@+id/size"
        android:layout_width="fill_parent"
        android:layout_height="wrap_content"/>
    <SurfaceView
        android:id="@+id/mediasurface"
        android:layout_width="fill_parent"
        android:layout_height="fill_parent"/>

</LinearLayout>


Modify AndroidManifest.xml to add permission of "android.permission.INTERNET".

Oct 12, 2012

Play Youtube 3gp video with MediaPlayer in SurfaceView

This example show how to play YouTube's 3gp video using MediaPlayer, in a SurfaceView.

Play Youtube 3gp video with MediaPlayer in SurfaceView


Modify layout file, /res/layout/activity_main.xml, to add two control buttons (play and stop), and a SurfaceView to hold the media window.
<LinearLayout xmlns:android="http://schemas.android.com/apk/res/android"
    xmlns:tools="http://schemas.android.com/tools"
    android:layout_width="match_parent"
    android:layout_height="match_parent"
    android:orientation="vertical">
    
    <Button
        android:id="@+id/play"
        android:layout_width="fill_parent"
        android:layout_height="wrap_content"
        android:text="PLAY"/>
    <Button
        android:id="@+id/stop"
        android:layout_width="fill_parent"
        android:layout_height="wrap_content"
        android:text="STOP"/>
    <SurfaceView
        android:id="@+id/mediasurface"
        android:layout_width="fill_parent"
        android:layout_height="fill_parent"/>


</LinearLayout>


Modify MainActivity, extends Activity and implements SurfaceHolder.Callback. In the code, path3gp is the path to the Youtube's 3gp video.
package com.example.androidyoutubeplayer;

import java.io.IOException;

import android.graphics.PixelFormat;
import android.media.AudioManager;
import android.media.MediaPlayer;
import android.os.Bundle;
import android.app.Activity;
import android.view.SurfaceHolder;
import android.view.SurfaceView;
import android.view.View;
import android.view.View.OnClickListener;
import android.widget.Button;

public class MainActivity extends Activity implements SurfaceHolder.Callback{
 
 MediaPlayer myMediaPlayer;
 SurfaceView mySurfaceView;
 SurfaceHolder mySurfaceHolder;
 
 Button btnPlay, btnStop;
 
 String path3gp = "rtsp://v8.cache6.c.youtube.com/CjYLENy73wIaLQkP0kiLmutogRMYDSANFEIJbXYtZ29vZ2xlSARSBXdhdGNoYKjR78WV1ZH5Tgw=/0/0/0/video.3gp";
 
    @Override
    public void onCreate(Bundle savedInstanceState) {
        super.onCreate(savedInstanceState);
        setContentView(R.layout.activity_main);

        getWindow().setFormat(PixelFormat.UNKNOWN);
        mySurfaceView = (SurfaceView)findViewById(R.id.mediasurface);        
        mySurfaceHolder = mySurfaceView.getHolder();
        mySurfaceHolder.addCallback(this);
        myMediaPlayer = new MediaPlayer();
        
        btnPlay = (Button)findViewById(R.id.play);
        btnStop = (Button)findViewById(R.id.stop);
        
        btnPlay.setOnClickListener(playOnClickListener);
        btnStop.setOnClickListener(stopOnClickListener);

    }
    
    OnClickListener playOnClickListener
    = new OnClickListener(){

  @Override
  public void onClick(View v) {
   myMediaPlayer.reset();
   
   myMediaPlayer.setAudioStreamType(AudioManager.STREAM_MUSIC);
   myMediaPlayer.setDisplay(mySurfaceHolder);
   
   try {
    myMediaPlayer.setDataSource(path3gp);
    myMediaPlayer.prepare();
    
    myMediaPlayer.start();
   } catch (IllegalArgumentException e) {
    // TODO Auto-generated catch block
    e.printStackTrace();
   } catch (SecurityException e) {
    // TODO Auto-generated catch block
    e.printStackTrace();
   } catch (IllegalStateException e) {
    // TODO Auto-generated catch block
    e.printStackTrace();
   } catch (IOException e) {
    // TODO Auto-generated catch block
    e.printStackTrace();
   }
   
  }};
    
    OnClickListener stopOnClickListener
    = new OnClickListener(){

  @Override
  public void onClick(View v) {
   if(myMediaPlayer.isPlaying()){
    myMediaPlayer.stop(); 
   }
   
  }};

 @Override
 public void surfaceChanged(SurfaceHolder arg0, int arg1, int arg2, int arg3) {
  // TODO Auto-generated method stub
  
 }

 @Override
 public void surfaceCreated(SurfaceHolder holder) {
  // TODO Auto-generated method stub
  
 }

 @Override
 public void surfaceDestroyed(SurfaceHolder holder) {
  // TODO Auto-generated method stub
  
 }
}


Modify AndroidManifest.xml to add permission of "android.permission.INTERNET".


Related article: Get video width and height of MediaPlayer and update SurfaceView LayoutParams accordingly.

Oct 7, 2012

My traffic drop on Oct !!!

My web site traffic suddenly dropped in Oct, what's wrong!?

My traffic drop on Oct !!!


Play RTTTL (Ring Tone Text Transfer Language) with MediaPlayer

Android platform support various media formats, include mRTTTL (Ring Tone Text Transfer Language).

Ring Tone Text Transfer Language (RTTTL) was developed by Nokia to be used to transfer ringtones to cellphone by Nokia. (source: Wikipedia - Ring Tone Transfer Language).

We are going to play the RTTTL ringtone of "Haunted House" listed in the Wikipedia article as an example.

Play RTTTL (Ring Tone Text Transfer Language) with MediaPlayer

Create /res/raw/hauntedhouse.rtttl file to define ring tone of "Haunted House".
HauntedHouse: d=4,o=5,b=108: 2a4, 2e, 2d#, 2b4, 2a4, 2c, 2d, 2a#4, 2e., e, 1f4, 1a4, 1d#, 2e., d, 2c., b4, 1a4, 1p, 2a4, 2e, 2d#, 2b4, 2a4, 2c, 2d, 2a#4, 2e., e, 1f4, 1a4, 1d#, 2e., d, 2c., b4, 1a4


Modify layout to have buttons to start and stop the ring tone.
<LinearLayout xmlns:android="http://schemas.android.com/apk/res/android"
    xmlns:tools="http://schemas.android.com/tools"
    android:layout_width="match_parent"
    android:layout_height="match_parent"
    android:orientation="vertical" >

    <TextView
        android:layout_width="wrap_content"
        android:layout_height="wrap_content"
        android:text="@string/hello_world"
        tools:context=".MainActivity" />
    <Button 
        android:id="@+id/start"
        android:layout_width="match_parent"
        android:layout_height="wrap_content"
        android:text="Start" />
    <Button 
        android:id="@+id/stop"
        android:layout_width="match_parent"
        android:layout_height="wrap_content"
        android:text="Stop" />

</LinearLayout>


The Java code of the activity.
package com.example.androidrtttl;

import android.media.MediaPlayer;
import android.media.MediaPlayer.OnCompletionListener;
import android.os.Bundle;
import android.app.Activity;
import android.view.View;
import android.view.View.OnClickListener;
import android.widget.Button;
import android.widget.Toast;

public class MainActivity extends Activity {
 
 Button buttonStart, buttonStop;
 MediaPlayer mediaPlayer;

    @Override
    public void onCreate(Bundle savedInstanceState) {
        super.onCreate(savedInstanceState);
        setContentView(R.layout.activity_main);
        buttonStart = (Button)findViewById(R.id.start);
        buttonStart.setOnClickListener(buttonStartOnClickListener);
        buttonStop = (Button)findViewById(R.id.stop);
        buttonStop.setOnClickListener(buttonStopOnClickListener);

    }

    OnClickListener buttonStartOnClickListener
    = new OnClickListener(){

  @Override
  public void onClick(View v) {
   if (mediaPlayer != null){
    mediaPlayer.release();
   }
   
   mediaPlayer = MediaPlayer.create(getApplicationContext(), R.raw.hauntedhouse);
   mediaPlayer.setOnCompletionListener(mediaplayerCompletionListener);
   mediaPlayer.start();
  }
     
    };
    
    OnClickListener buttonStopOnClickListener
    = new OnClickListener(){

  @Override
  public void onClick(View v) {
   if (mediaPlayer != null){
    mediaPlayer.stop();
    mediaPlayer.release();
   }
   
  }};
  
 OnCompletionListener mediaplayerCompletionListener
 = new OnCompletionListener(){

  @Override
  public void onCompletion(MediaPlayer arg0) {

   mediaPlayer.release();
   
   Toast.makeText(getApplicationContext(), 
     "onCompletion", 
     Toast.LENGTH_LONG).show();
  }};

}


Oct 5, 2012

Save and Restore Instance State

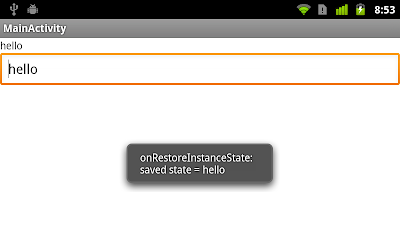
The methods onSaveInstanceState(Bundle outState) and onRestoreInstanceState(Bundle savedInstanceState) are the good place to Save and Restore Instance State.
  • onSaveInstanceState (Bundle outState)

    Called to retrieve per-instance state from an activity before being killed so that the state can be restored in onCreate(Bundle) or onRestoreInstanceState(Bundle) (the Bundle populated by this method will be passed to both).

    This method is called before an activity may be killed so that when it comes back some time in the future it can restore its state. For example, if activity B is launched in front of activity A, and at some point activity A is killed to reclaim resources, activity A will have a chance to save the current state of its user interface via this method so that when the user returns to activity A, the state of the user interface can be restored via onCreate(Bundle) or onRestoreInstanceState(Bundle).

    Do not confuse this method with activity lifecycle callbacks such as onPause(), which is always called when an activity is being placed in the background or on its way to destruction, or onStop() which is called before destruction. One example of when onPause() and onStop() is called and not this method is when a user navigates back from activity B to activity A: there is no need to call onSaveInstanceState(Bundle) on B because that particular instance will never be restored, so the system avoids calling it. An example when onPause() is called and not onSaveInstanceState(Bundle) is when activity B is launched in front of activity A: the system may avoid calling onSaveInstanceState(Bundle) on activity A if it isn't killed during the lifetime of B since the state of the user interface of A will stay intact.

    The default implementation takes care of most of the UI per-instance state for you by calling onSaveInstanceState() on each view in the hierarchy that has an id, and by saving the id of the currently focused view (all of which is restored by the default implementation of onRestoreInstanceState(Bundle)). If you override this method to save additional information not captured by each individual view, you will likely want to call through to the default implementation, otherwise be prepared to save all of the state of each view yourself.

    If called, this method will occur before onStop(). There are no guarantees about whether it will occur before or after onPause().

  • onRestoreInstanceState (Bundle savedInstanceState)

    This method is called after onStart() when the activity is being re-initialized from a previously saved state, given here in savedInstanceState. Most implementations will simply use onCreate(Bundle) to restore their state, but it is sometimes convenient to do it here after all of the initialization has been done or to allow subclasses to decide whether to use your default implementation. The default implementation of this method performs a restore of any view state that had previously been frozen by onSaveInstanceState(Bundle).

    This method is called between onStart() and onPostCreate(Bundle).

Example:
package com.example.androidsavestate;

import android.os.Bundle;
import android.app.Activity;
import android.view.Menu;
import android.widget.EditText;
import android.widget.TextView;
import android.widget.Toast;

public class MainActivity extends Activity {
 
 TextView textviewSavedState;
 EditText edittextEditState;

    @Override
    public void onCreate(Bundle savedInstanceState) {
        super.onCreate(savedInstanceState);
        setContentView(R.layout.activity_main);
        
        textviewSavedState = (TextView)findViewById(R.id.savedstate);
     edittextEditState = (EditText)findViewById(R.id.editstate);
    }

 @Override
 protected void onRestoreInstanceState(Bundle savedInstanceState) {
  // TODO Auto-generated method stub
  super.onRestoreInstanceState(savedInstanceState);
  
  String stateSaved = savedInstanceState.getString("saved_state");
  
  if(stateSaved == null){
   Toast.makeText(MainActivity.this, 
     "onRestoreInstanceState:\n" +
     "NO state saved!", 
     Toast.LENGTH_LONG).show();
  }else{
   Toast.makeText(MainActivity.this, 
     "onRestoreInstanceState:\n" +
     "saved state = " + stateSaved, 
     Toast.LENGTH_LONG).show();
   textviewSavedState.setText(stateSaved);
   edittextEditState.setText(stateSaved);
  }

 }

 @Override
 protected void onSaveInstanceState(Bundle outState) {
  // TODO Auto-generated method stub
  super.onSaveInstanceState(outState);
  
  String stateToSave = edittextEditState.getText().toString();
  outState.putString("saved_state", stateToSave);
  
  Toast.makeText(MainActivity.this, 
    "onSaveInstanceState:\n" +
    "saved_state = " + stateToSave, 
    Toast.LENGTH_LONG).show();
 }

}


Save and Restore Instance State

Oct 4, 2012

Create scaled bitmap using Bitmap.createScaledBitmap() method

To create a scaled bitmap from a source bitmap, we can call the static method Bitmap.createScaledBitmap().
  • public static Bitmap createScaledBitmap (Bitmap src, int dstWidth, int dstHeight, boolean filter)
    Creates a new bitmap, scaled from an existing bitmap, when possible. If the specified width and height are the same as the current width and height of the source btimap, the source bitmap is returned and now new bitmap is created.

    src: The source bitmap.
    dstWidth: The new bitmap's desired width.
    dstHeight: The new bitmap's desired height.
    filter: true if the source should be filtered.

    Returns: The new scaled bitmap or the source bitmap if no scaling is required.

Example to create scaled bitmap with 1/2 width and height:
   Bitmap scaledBitmap =  Bitmap.createScaledBitmap(
     srcBitmap, 
     srcBitmap.getWidth()/2, 
     srcBitmap.getHeight()/2, 
     false);


Sep 22, 2012

Get color-int from alpha, red, green, blue components

Android system's android.graphics.Color class provide methods for creating and converting color ints.


Sep 20, 2012

Create Spinner from String array

To create Spinner from String array:

Create Spinner from String array


package com.example.androidspinner;

import android.os.Bundle;
import android.app.Activity;
import android.view.View;
import android.widget.AdapterView;
import android.widget.AdapterView.OnItemSelectedListener;
import android.widget.ArrayAdapter;
import android.widget.Spinner;
import android.widget.Toast;

public class MainActivity extends Activity {
 
 Spinner mySpinner;
 
 String[] spinnerArray ={ "One", "Two", "Three", "Four", "Five"};

    @Override
    public void onCreate(Bundle savedInstanceState) {
        super.onCreate(savedInstanceState);
        setContentView(R.layout.activity_main);
        
        mySpinner = (Spinner)findViewById(R.id.myspinner);

        ArrayAdapter<String> myArrayAdapter = new ArrayAdapter<String>(
          this, 
          android.R.layout.simple_spinner_item, 
          spinnerArray);
        myArrayAdapter.setDropDownViewResource(android.R.layout.simple_spinner_dropdown_item );

        mySpinner.setAdapter(myArrayAdapter);
        
        mySpinner.setOnItemSelectedListener(myOnItemSelectedListener);
    }

    OnItemSelectedListener myOnItemSelectedListener
    = new OnItemSelectedListener(){

  @Override
  public void onItemSelected(AdapterView<?> parent, View view, int position,
    long id) {
   String selectedItem = (String) parent.getItemAtPosition(position);
   Toast.makeText(
     getApplicationContext(), 
     selectedItem, 
     Toast.LENGTH_LONG)
     .show();
   
  }

  @Override
  public void onNothingSelected(AdapterView<?> arg0) {
   // TODO Auto-generated method stub
   
  }};

}


Sep 10, 2012

Home Screen Widget step-by-step - Implement OnClick PendingIntent for Widget

It's part of the Home Screen Widgets step-by-step series.

We can cureat PendingIntent, and register it to widget's RemoteViews by setOnClickPendingIntent() method. As a result, when user click on the assigned view in the widgets, the PendingIntent will be trigged and to do something.

In the example, my blog (http://android-coding.blogspot.com/) will be opened once user click on the ID in widgets.

Implement OnClick PendingIntent for Widget


Modify configure activity (ConfigureWidgetActivity.java) and App Widget Provider (WidgetProvider.java) to Prepare PendingIntent for remoteViews OnClickListener.

ConfigureWidgetActivity.java
package com.example.androidhomewidget;

import android.app.Activity;
import android.app.PendingIntent;
import android.appwidget.AppWidgetManager;
import android.content.Intent;
import android.net.Uri;
import android.os.Bundle;
import android.view.View;
import android.view.View.OnClickListener;
import android.widget.Button;
import android.widget.RemoteViews;
import android.widget.TextView;

public class ConfigureWidgetActivity extends Activity {
 
 int appWidgetId;
 Button configureOkButton;
 TextView wId;

 @Override
 protected void onCreate(Bundle savedInstanceState) {
  // TODO Auto-generated method stub
  super.onCreate(savedInstanceState);
  setContentView(R.layout.configure_layout);
  wId = (TextView)findViewById(R.id.wid);
  configureOkButton = (Button)findViewById(R.id.confighreok);
  configureOkButton.setOnClickListener(configureOkButtonOnClickListener);
  
  Intent intent = getIntent();
  Bundle extras = intent.getExtras();
  
  if (extras != null) {
   appWidgetId = extras.getInt(
     AppWidgetManager.EXTRA_APPWIDGET_ID,
     AppWidgetManager.INVALID_APPWIDGET_ID);
   
   wId.setText("appWidgetId = " + appWidgetId);
   
  }else{
   finish();
  }
      
 }
 
 OnClickListener configureOkButtonOnClickListener
 = new OnClickListener(){

  @Override
  public void onClick(View v) {

    AppWidgetManager appWidgetManager = AppWidgetManager.getInstance(getApplicationContext());

    RemoteViews remoteViews = new RemoteViews(
      getApplicationContext().getPackageName(), 
      R.layout.widget_layout);
    
    remoteViews.setTextViewText(R.id.widget_id, String.valueOf(appWidgetId));
    remoteViews.setTextViewText(R.id.widget_status, "Waiting...");
    
    //--- Prepare PendingIntent for remoteViews OnClickListener
    String myBlog = "http://android-coding.blogspot.com/";
    Uri Uri_myBlog = Uri.parse(myBlog);
    Intent clickIntent = new Intent(Intent.ACTION_VIEW, Uri_myBlog);
    
    int pendingRequestCode = 0;
    int pendingFlag = 0;
    PendingIntent pendingIntent
     = PendingIntent.getActivity(
       getApplicationContext(), 
       pendingRequestCode, 
       clickIntent, 
       pendingFlag);
    remoteViews.setOnClickPendingIntent(R.id.widget_id, pendingIntent);
    //--- End of Prepare PendingIntent
    
    appWidgetManager.updateAppWidget(appWidgetId, remoteViews);

    Intent intent = new Intent();
    intent.putExtra(AppWidgetManager.EXTRA_APPWIDGET_ID, appWidgetId);
    setResult(RESULT_OK, intent);
    finish();
   
  }};

}


WidgetProvider.java
package com.example.androidhomewidget;

import java.text.SimpleDateFormat;
import java.util.Date;

import android.app.PendingIntent;
import android.appwidget.AppWidgetManager;
import android.appwidget.AppWidgetProvider;
import android.content.Context;
import android.content.Intent;
import android.net.Uri;
import android.widget.RemoteViews;
import android.widget.Toast;

public class WidgetProvider extends AppWidgetProvider {

 @Override
 public void onDeleted(Context context, int[] appWidgetIds) {
  // TODO Auto-generated method stub
  super.onDeleted(context, appWidgetIds);
 }

 @Override
 public void onDisabled(Context context) {
  // TODO Auto-generated method stub
  super.onDisabled(context);
 }

 @Override
 public void onEnabled(Context context) {
  // TODO Auto-generated method stub
  super.onEnabled(context);
 }

 @Override
 public void onReceive(Context context, Intent intent) {
  // TODO Auto-generated method stub
  super.onReceive(context, intent);
 }

 @Override
 public void onUpdate(Context context, AppWidgetManager appWidgetManager,
   int[] appWidgetIds) {
  
  for(int i = 0; i < appWidgetIds.length; i++){
   
   int id = appWidgetIds[i];
   
   Toast.makeText(context, 
     "onUpdate: " + String.valueOf(id), 
     Toast.LENGTH_LONG).show();
   
   RemoteViews remoteViews = new RemoteViews(context.getPackageName(), R.layout.widget_layout);
   
   remoteViews.setTextViewText(R.id.widget_id, String.valueOf(id));
   
   SimpleDateFormat simpleDateFormat = new SimpleDateFormat("hh:mm:ss");
   String now = simpleDateFormat.format(new Date());
   remoteViews.setTextViewText(R.id.widget_status, now);
   
   //--- Prepare PendingIntent for remoteViews OnClickListener
    String myBlog = "http://android-coding.blogspot.com/";
    Uri Uri_myBlog = Uri.parse(myBlog);
    Intent clickIntent = new Intent(Intent.ACTION_VIEW, Uri_myBlog);
    
    int pendingRequestCode = 0;
    int pendingFlag = 0;
    PendingIntent pendingIntent
     = PendingIntent.getActivity(
       context, 
       pendingRequestCode, 
       clickIntent, 
       pendingFlag);
    remoteViews.setOnClickPendingIntent(R.id.widget_id, pendingIntent);
    //--- End of Prepare PendingIntent
   
   appWidgetManager.updateAppWidget(id, remoteViews);
   
   super.onUpdate(context, appWidgetManager, appWidgetIds);
  }
 }

}


Sep 9, 2012

Home Screen Widget step-by-step - custom background shape of Widget

It's part of the Home Screen Widgets step-by-step series.

To custom background shape of Home Screen Widget, we can create custom background shape XML file, then apply it to the widget layout. (Actually it's same as define custom background in normal layouts.)

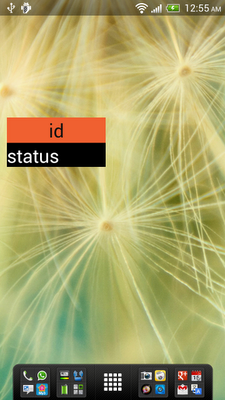
custom background shape of Widget


Create /res/drawable/round_rect.xml to define custom background shape.
<shape xmlns:android="http://schemas.android.com/apk/res/android">
    <stroke
        android:width="5dp"
        android:color="#000000"/>
    <padding 
        android:left="5dp"
        android:top="5dp"
        android:right="5dp"
        android:bottom="5dp"/>
    <corners 
        android:radius="10dp"/>
</shape>


Modify the widget layout, /res/layout/widget_layout.xml, to apply android:background="@drawable/round_rect".
<?xml version="1.0" encoding="utf-8"?>
<LinearLayout xmlns:android="http://schemas.android.com/apk/res/android"
    android:orientation="vertical"
    android:layout_width="fill_parent"
    android:layout_height="fill_parent"
    android:background="@drawable/round_rect">
    <TextView
        android:id="@+id/widget_id"
        android:layout_width="fill_parent"
        android:layout_height="wrap_content"
        android:gravity="center"
        android:background="#F06030"
        android:textColor="#101010"
        android:textSize="30sp"
        android:text="id"/>
    <TextView
        android:id="@+id/widget_status"
        android:layout_width="fill_parent"
        android:layout_height="wrap_content"
        android:background="@android:color/background_dark"
        android:textColor="@android:color/white"
        android:textSize="30sp"
        android:text="status"/>
</LinearLayout>


Sep 4, 2012

Home Screen Widget step-by-step - resizeable home screen widget

It's part of the Home Screen Widgets step-by-step series.

Start from Android 3.1, API Level 12, support resizeable home screen widget. To specify a Home Screen Widget as resizeable, include android:resizeMode in App widget provider XML, /res/xml/widgetproviderinfo.xml in our example.

<appwidget-provider xmlns:android="http://schemas.android.com/apk/res/android"
    android:minWidth="146dp"
    android:minHeight="72dp"
    android:updatePeriodMillis="1800000"
    android:initialLayout="@layout/widget_layout"
    android:configure="com.example.androidhomewidget.ConfigureWidgetActivity"
    android:resizeMode="horizontal|vertical">
</appwidget-provider>


Resizeable Home Screen Widget


To resize the widget, touch-hold it to show its resize handles, then drag the horizontal and/or vertical handles to change the size on the layout grid.


Sep 3, 2012

Home Screen Widget step-by-step - implement configure activity

It's part of the Home Screen Widgets step-by-step series.

In the previous articles, we have NO android:configure defined in our App widget provider XML, /res/xml/widgetproviderinfo.xml. So, the App Widget Provider will be called when user add our widget. Optionally we can implement our Configure Activity, it will be called at the first time user add the Widget, instead of App Widget Provider. Such that user can do something when he add the widget.

Configure Activity


Modify /res/xml/widgetproviderinfo.xml to add android:configure="com.example.androidhomewidget.ConfigureWidgetActivity".
<appwidget-provider xmlns:android="http://schemas.android.com/apk/res/android"
    android:minWidth="146dp"
    android:minHeight="72dp"
    android:updatePeriodMillis="1800000"
    android:initialLayout="@layout/widget_layout"
    android:configure="com.example.androidhomewidget.ConfigureWidgetActivity">
</appwidget-provider>


ConfigureWidgetActivity.java
package com.example.androidhomewidget;

import android.app.Activity;
import android.appwidget.AppWidgetManager;
import android.content.Intent;
import android.os.Bundle;
import android.view.View;
import android.view.View.OnClickListener;
import android.widget.Button;
import android.widget.RemoteViews;
import android.widget.TextView;

public class ConfigureWidgetActivity extends Activity {
 
 int appWidgetId;
 Button configureOkButton;
 TextView wId;

 @Override
 protected void onCreate(Bundle savedInstanceState) {
  // TODO Auto-generated method stub
  super.onCreate(savedInstanceState);
  setContentView(R.layout.configure_layout);
  wId = (TextView)findViewById(R.id.wid);
  configureOkButton = (Button)findViewById(R.id.confighreok);
  configureOkButton.setOnClickListener(configureOkButtonOnClickListener);
  
  Intent intent = getIntent();
  Bundle extras = intent.getExtras();
  
  if (extras != null) {
   appWidgetId = extras.getInt(
     AppWidgetManager.EXTRA_APPWIDGET_ID,
     AppWidgetManager.INVALID_APPWIDGET_ID);
   
   wId.setText("appWidgetId = " + appWidgetId);
   
  }else{
   finish();
  }
      
 }
 
 OnClickListener configureOkButtonOnClickListener
 = new OnClickListener(){

  @Override
  public void onClick(View v) {

    AppWidgetManager appWidgetManager = AppWidgetManager.getInstance(getApplicationContext());

    RemoteViews remoteViews = new RemoteViews(
      getApplicationContext().getPackageName(), 
      R.layout.widget_layout);
    
    remoteViews.setTextViewText(R.id.widget_id, String.valueOf(appWidgetId));
    remoteViews.setTextViewText(R.id.widget_status, "Waiting...");
    
    appWidgetManager.updateAppWidget(appWidgetId, remoteViews);

    Intent intent = new Intent();
    intent.putExtra(AppWidgetManager.EXTRA_APPWIDGET_ID, appWidgetId);
    setResult(RESULT_OK, intent);
    finish();
   
  }};

}


Create /res/layout/configure_layout.xml to define the layout of the configure activity.
<LinearLayout xmlns:android="http://schemas.android.com/apk/res/android"
    xmlns:tools="http://schemas.android.com/tools"
    android:layout_width="match_parent"
    android:layout_height="match_parent" 
    android:orientation="vertical">

    <TextView
        android:layout_width="match_parent"
        android:layout_height="wrap_content"
        android:text="Widget Configure Activity" />
    <TextView
        android:id="@+id/wid"
        android:layout_width="match_parent"
        android:layout_height="wrap_content"/>
    <Button
        android:id="@+id/confighreok"
        android:layout_width="match_parent"
        android:layout_height="wrap_content"
        android:text="OK" />

</LinearLayout>


Modify AndroidManifest.xml to add <activity> of ConfigureWidgetActivity.java.
<manifest xmlns:android="http://schemas.android.com/apk/res/android"
    package="com.example.androidhomewidget"
    android:versionCode="1"
    android:versionName="1.0" >

    <uses-sdk
        android:minSdkVersion="8"
        android:targetSdkVersion="15" />

    <application
        android:icon="@drawable/ic_launcher"
        android:label="@string/app_name"
        android:theme="@style/AppTheme" >
        <activity
            android:name=".MainActivity"
            android:label="@string/title_activity_main" >
            <intent-filter>
                <action android:name="android.intent.action.MAIN" />

                <category android:name="android.intent.category.LAUNCHER" />
            </intent-filter>
        </activity>
        
<!-- define Widget Provider Receiver -->        
        <receiver android:name=".WidgetProvider" >
            <intent-filter>
                <action android:name="android.appwidget.action.APPWIDGET_UPDATE" />
            </intent-filter>
        <meta-data android:name="android.appwidget.provider"
            android:resource="@xml/widgetproviderinfo" />
        </receiver>

<!--  define Configure Activity -->
        <activity android:name=".ConfigureWidgetActivity">
            <intent-filter>
                <action android:name="android.appwidget.action.APPWIDGET_CONFIGURE" />
            </intent-filter>
        </activity>
        
    </application>

</manifest>


Aug 30, 2012

Home Screen Widget step-by-step - modify our App Widget Provider (AppWidgetProvider) to update widget RemoteViews

It's part of the Home Screen Widgets step-by-step series.

Up to last post, we have a dummy home screen widget without any function. In this step, we are going to modify WidgetProvider.java, override onUpdate() method to updateAppWidget() with RemoteViews.

override onUpdate() method to updateAppWidget() with RemoteViews.

WidgetProvider.java
package com.example.androidhomewidget;

import java.text.SimpleDateFormat;
import java.util.Date;

import android.appwidget.AppWidgetManager;
import android.appwidget.AppWidgetProvider;
import android.content.Context;
import android.content.Intent;
import android.widget.RemoteViews;
import android.widget.Toast;

public class WidgetProvider extends AppWidgetProvider {

 @Override
 public void onDeleted(Context context, int[] appWidgetIds) {
  // TODO Auto-generated method stub
  super.onDeleted(context, appWidgetIds);
 }

 @Override
 public void onDisabled(Context context) {
  // TODO Auto-generated method stub
  super.onDisabled(context);
 }

 @Override
 public void onEnabled(Context context) {
  // TODO Auto-generated method stub
  super.onEnabled(context);
 }

 @Override
 public void onReceive(Context context, Intent intent) {
  // TODO Auto-generated method stub
  super.onReceive(context, intent);
 }

 @Override
 public void onUpdate(Context context, AppWidgetManager appWidgetManager,
   int[] appWidgetIds) {
  
  for(int i = 0; i < appWidgetIds.length; i++){
   
   int id = appWidgetIds[i];
   
   Toast.makeText(context, 
     "onUpdate: " + String.valueOf(id), 
     Toast.LENGTH_LONG).show();
   
   RemoteViews remoteViews = new RemoteViews(context.getPackageName(), R.layout.widget_layout);
   
   remoteViews.setTextViewText(R.id.widget_id, String.valueOf(id));
   
   SimpleDateFormat simpleDateFormat = new SimpleDateFormat("hh:mm:ss");
   String now = simpleDateFormat.format(new Date());
   remoteViews.setTextViewText(R.id.widget_status, now);
   
   appWidgetManager.updateAppWidget(id, remoteViews);
   
   super.onUpdate(context, appWidgetManager, appWidgetIds);
  }
 }

}


Refer to our app widget provider, onUpdate() will be call every 30 minutes (1800000 millisecond). It's a approximated reference, no guarantee how accurate is it.

Aug 29, 2012

Home Screen Widget step-by-step - define Widget Provider Receiver in AndroidManifest.xml

It's part of the Home Screen Widgets step-by-step series.

In this step, modify AndroidManifest.xml to add <receiver> to define Widget Provider Receiver.

<manifest xmlns:android="http://schemas.android.com/apk/res/android"
    package="com.example.androidhomewidget"
    android:versionCode="1"
    android:versionName="1.0" >

    <uses-sdk
        android:minSdkVersion="8"
        android:targetSdkVersion="15" />

    <application
        android:icon="@drawable/ic_launcher"
        android:label="@string/app_name"
        android:theme="@style/AppTheme" >
        <activity
            android:name=".MainActivity"
            android:label="@string/title_activity_main" >
            <intent-filter>
                <action android:name="android.intent.action.MAIN" />

                <category android:name="android.intent.category.LAUNCHER" />
            </intent-filter>
        </activity>
        
<!-- define Widget Provider Receiver -->        
        <receiver android:name=".WidgetProvider" >
            <intent-filter>
                <action android:name="android.appwidget.action.APPWIDGET_UPDATE" />
            </intent-filter>
        <meta-data android:name="android.appwidget.provider"
            android:resource="@xml/widgetproviderinfo" />
        </receiver>
        
    </application>

</manifest>


Pay attention how android:name=".WidgetProvider" and android:resource="@xml/widgetproviderinfo" correspond to WidgetProvider.java and /res/xml/widgetproviderinfo.xml respectively.

After modified AndroidManifest.xml to define Widget Provider Receiver, we can add our dummy Widget on Home Screen. Up to here, the widget do nothing actually!

The dummy Home Screen Widget

Aug 28, 2012

Home Screen Widget step-by-step - create our AppWidget Provider by extending AppWidgetProvider.

It's part of the Home Screen Widgets step-by-step series.

android.appwidget.AppWidgetProvider is a convenience class to aid in implementing an AppWidget provider. Everything you can do with AppWidgetProvider, you can do with a regular BroadcastReceiver. AppWidgetProvider merely parses the relevant fields out of the Intent that is received in onReceive(Context,Intent), and calls hook methods with the received extras.

Extend this class and override one or more of the onUpdate(Context, AppWidgetManager, int[]), onDeleted(Context, int[]), onEnabled(Context) or onDisabled(Context) methods to implement your own AppWidget functionality.


At this moment, just implement our dummy AppWidgetProvider class, WidgetProvider.java. We will include it in our AndroidManifest.xml later.

package com.example.androidhomewidget;

import android.appwidget.AppWidgetManager;
import android.appwidget.AppWidgetProvider;
import android.content.Context;
import android.content.Intent;

public class WidgetProvider extends AppWidgetProvider {

 @Override
 public void onDeleted(Context context, int[] appWidgetIds) {
  // TODO Auto-generated method stub
  super.onDeleted(context, appWidgetIds);
 }

 @Override
 public void onDisabled(Context context) {
  // TODO Auto-generated method stub
  super.onDisabled(context);
 }

 @Override
 public void onEnabled(Context context) {
  // TODO Auto-generated method stub
  super.onEnabled(context);
 }

 @Override
 public void onReceive(Context context, Intent intent) {
  // TODO Auto-generated method stub
  super.onReceive(context, intent);
 }

 @Override
 public void onUpdate(Context context, AppWidgetManager appWidgetManager,
   int[] appWidgetIds) {
  // TODO Auto-generated method stub
  super.onUpdate(context, appWidgetManager, appWidgetIds);
 }

}

Aug 24, 2012

Get 3gp link of Youtube video

The post "A simple example using VideoView to play 3gp from YouTube" describe how to play Youtube video in 3gp format on Android. But how can you get the 3gp link of Youtube video?

For example, you want to embed the 3gp video of "Google I/O 2012 - What's New in Android?" in your app.

Right click the video to copy Video URL.


Paste and open the link, replace the leading "www.youtube.com" with "m.youtube.com" to get the mobile version.


Corresponding mobile version of the video will be loaded. Right click on the video to Copy Link Address. It's the 3gp link of the video:

rtsp://v4.cache7.c.youtube.com/CjYLENy73wIaLQky7ThXrRjPYRMYDSANFEIJbXYtZ29vZ2xlSARSBXdhdGNoYKjR78WV1ZH5Tgw=/0/0/0/video.3gp

You can copy this link to replace SrcPath in the example "A simple example using VideoView to play 3gp from YouTube".


Aug 23, 2012

Home Screen Widget step-by-step - define widget layout

It's the second step to create Home Screen Widgets.

Refer to the last article to "Define app widget provider in XML". It's specified android:initialLayout="@layout/widget_layout", means we have a xml file named widget_layout.xml in /res/layout/ folder, to define our widget layout.

/res/layout/widget_layout.xml
<?xml version="1.0" encoding="utf-8"?>
<LinearLayout xmlns:android="http://schemas.android.com/apk/res/android"
    android:orientation="vertical"
    android:layout_width="fill_parent"
    android:layout_height="fill_parent">
    <TextView
        android:id="@+id/widget_id"
        android:layout_width="fill_parent"
        android:layout_height="wrap_content"
        android:gravity="center"
        android:background="#F06030"
        android:textColor="#101010"
        android:textSize="30sp"
        android:text="id"/>
    <TextView
        android:id="@+id/widget_status"
        android:layout_width="fill_parent"
        android:layout_height="wrap_content"
        android:background="@android:color/background_dark"
        android:textColor="@android:color/white"
        android:textSize="30sp"
        android:text="status"/>
</LinearLayout>

Home Screen Widget step-by-step - define app widget provider in XML

It's the first step of Home Screen Widgets: create a XML file, /res/xml/widgetproviderinfo.xml, to define  a minimal app widget provider info.

<appwidget-provider xmlns:android="http://schemas.android.com/apk/res/android"
    android:minWidth="146dp"
    android:minHeight="72dp"
    android:updatePeriodMillis="1800000"
    android:initialLayout="@layout/widget_layout">
</appwidget-provider>

Where:
  • android:minWidth and android:minHeight specify the minimum amount of space the App Widget consumes by default. The default Home screen positions App Widgets in its window based on a grid of cells that have a defined height and width. If the values for an App Widget's minimum width or height don't match the dimensions of the cells, then the App Widget dimensions round up to the nearest cell size.
  • android:updatePeriodMillis specify how often, in milliseconds, that this AppWidget wants to be updated. The AppWidget manager may place a limit on how often a AppWidget is updated.

    Note: Updates requested with updatePeriodMillis will not be delivered more than once every 30 minutes.
  • android:initialLayout specify the resource id of the initial layout for this AppWidget. We will implement it later.


Next Step >> Define widget layout.

Aug 19, 2012

Home Screen Widgets

"Home Screen Widgets" is widget that people can drop onto their home screen and interact with. It can provide a quick glimpse into full-featured apps, such as showing upcoming calendar events, or viewing details about a song playing in the background.

When widgets are dropped onto the home screen, they are given a reserved space to display custom content provided by your app. Users can also interact with your app through the widget, for example pausing or switching music tracks. If you have a background service, you can push widget updates on your own schedule, or the AppWidget framework provides an automatic update mechanism.


In the coming articles, I will show how to create Home Screen Widgets step-by-step.

Notes:
  • Starting in Android 3.1, developers can make their homescreen widgets resizeable — horizontally, vertically, or on both axes. Users touch-hold a widget to show its resize handles, then drag the horizontal and/or vertical handles to change the size on the layout grid.
  • Starting from Android 4.0, home screen widgets should no longer include their own padding. Instead, the system now automatically adds padding for each widget, based the characteristics of the current screen. This leads to a more uniform, consistent presentation of widgets in a grid.


Step-by-step to create Home Screen Widget:


Aug 3, 2012

Apply translate effect in activity transition

Create XML files to define shift in/shift out effect:

/res/anim/shift_in.xml
<?xml version="1.0" encoding="utf-8"?>
<translate xmlns:android="http://schemas.android.com/apk/res/android"
    android:interpolator="@android:anim/accelerate_interpolator"
    android:fromXDelta="-100%"
    android:toXDelta="0.0"
    android:duration="1000" />


/res/anim/shift_out.xml
<?xml version="1.0" encoding="utf-8"?>
<translate xmlns:android="http://schemas.android.com/apk/res/android"
    android:interpolator="@android:anim/accelerate_interpolator"
    android:fromXDelta="0.0"
    android:toXDelta="100%"
    android:duration="1000" />


Apply the effect to activity by calling overridePendingTransition(R.anim.shift_in, R.anim.shift_out).
    @Override
    public void onCreate(Bundle savedInstanceState) {
        super.onCreate(savedInstanceState);
        setContentView(R.layout.activity_main);
        
        overridePendingTransition(R.anim.shift_in, R.anim.shift_out);
    }


Aug 2, 2012

Apply fade-in, fade-out effect in activity transition

Create XML files to define fadein/fadeout effect:

/res/anim/fadein.xml
<?xml version="1.0" encoding="utf-8"?>
<alpha xmlns:android="http://schemas.android.com/apk/res/android"
    android:interpolator="@android:anim/accelerate_interpolator"
    android:fromAlpha="0.0" 
    android:toAlpha="1.0" 
    android:duration="3000" />


/anim/fadeout.xml
<?xml version="1.0" encoding="utf-8"?>
<alpha xmlns:android="http://schemas.android.com/apk/res/android"
    android:interpolator="@android:anim/accelerate_interpolator"
    android:fromAlpha="1.0" 
    android:toAlpha="0.0" 
    android:duration="3000" />


Apply the effect to activity by calling overridePendingTransition(R.anim.fadein, R.anim.fadeout).
package com.example.androidfadein;

import android.os.Bundle;
import android.app.Activity;
import android.view.Menu;

public class MainActivity extends Activity {

    @Override
    public void onCreate(Bundle savedInstanceState) {
        super.onCreate(savedInstanceState);
        setContentView(R.layout.activity_main);
        
        overridePendingTransition(R.anim.fadein, R.anim.fadeout);
        
    }

 @Override
    public boolean onCreateOptionsMenu(Menu menu) {
        getMenuInflater().inflate(R.menu.activity_main, menu);
        return true;
    }
    
}


Jul 30, 2012

Force MediaScannerConnection to rescan updated media file

MediaScannerConnection provides a way for applications to pass a newly created or downloaded media file to the media scanner service. The media scanner service will read metadata from the file and add the file to the media content provider. The MediaScannerConnectionClient provides an interface for the media scanner service to return the Uri for a newly scanned file to the client of the MediaScannerConnection class.

MediaScannerConnectionClient provide an interface for notifying clients of MediaScannerConnection when a connection to the MediaScanner service has been established and when the scanning of a file has completed.


In the article "Set latitude and longitude in Exif, setAttribute() and saveAttributes()", the updated GPS Tags in Exif cannot be recognized by build-in Gallery app after updated, untill system system re-boot! It's because the system MediaStore not yet known it. In order to force MediaStore to re-scan the updated file, we can call pass the updated media file to MediaScannerConnection.

 public static void scanFile(Context context, String path, String mimeType ) {
  Client client = new Client(path, mimeType);
     MediaScannerConnection connection = new MediaScannerConnection(context, client);
     
     client.connection = connection;
     connection.connect();
 }

 private static final class Client implements MediaScannerConnectionClient {
     private final String path;
     private final String mimeType;
     MediaScannerConnection connection;

     public Client(String path, String mimeType) {
         this.path = path;
         this.mimeType = mimeType;
     }
     
     @Override
     public void onMediaScannerConnected() {
         connection.scanFile(path, mimeType);
     }

     @Override
     public void onScanCompleted(String path, Uri uri) {
         connection.disconnect();    
     }
 }


Call scanFile(<context>, <path>, null) to scan the file.
If mimeType is null, then the mimeType will be inferred from the file extension.

Reference: http://stackoverflow.com/questions/5107823/force-scan-files-after-taking-photo


Jul 25, 2012

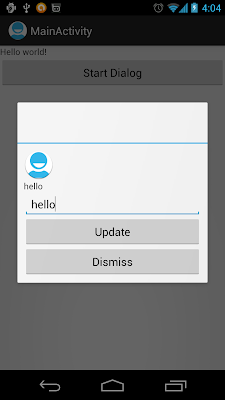
DialogFragment with interface to pass data back to activity

The articles "Create custom dialog with EditText" and "Pass back data from dialog to activity" introduced custom Dialog in pre-Honeycomb way.

Honeycomb introduced Fragments to support reusing portions of UI and logic across multiple activities in an app. In parallel, the showDialog / dismissDialog methods in Activity are being deprecated in favor of DialogFragments. (reference: http://android-developers.blogspot.hk/2012/05/using-dialogfragments.html)

This article show how to modify last article "Pass back data from dialog to activity" to do the same function in DialogFragment way, with interface to pass data from DialogFragment to main activity.

DialogFragment with interface to pass data back to activity

DialogFragment with interface to pass data back to activity


To use android.app.DialogFragment, android:minSdkVersion="11" is needed to be specified in AndroidManifest.xml.

MyDialogFragment.java
package com.AndroidCustomDialog;

import android.app.DialogFragment;
import android.os.Bundle;
import android.view.LayoutInflater;
import android.view.View;
import android.view.ViewGroup;
import android.widget.Button;
import android.widget.EditText;
import android.widget.TextView;

/*
 *  To use android.app.DialogFragment, 
 *  android:minSdkVersion="11" is needed to be specified in AndroidManifest.xml
 */
public class MyDialogFragment extends DialogFragment{
 
 TextView customDialog_TextView;
 EditText customDialog_EditText;
 Button customDialog_Update, customDialog_Dismiss;
 
 static MyDialogFragment newInstance() {
  return new MyDialogFragment(); 
 }

 @Override
 public View onCreateView(LayoutInflater inflater, ViewGroup container,
   Bundle savedInstanceState) {
  View dialogView = inflater.inflate(R.layout.customlayout, container, false);
  
  customDialog_TextView = (TextView)dialogView.findViewById(R.id.dialogtextview);
  customDialog_Update = (Button)dialogView.findViewById(R.id.dialogupdate);
  customDialog_Dismiss = (Button)dialogView.findViewById(R.id.dialogdismiss);
  customDialog_Update.setOnClickListener(customDialog_UpdateOnClickListener);
  customDialog_Dismiss.setOnClickListener(customDialog_DismissOnClickListener);
  
  customDialog_EditText = (EditText)dialogView.findViewById(R.id.dialogedittext);
  
  return dialogView;
 }
 
 
 private Button.OnClickListener customDialog_UpdateOnClickListener
  = new Button.OnClickListener(){
 
  @Override
  public void onClick(View arg0) {
   // TODO Auto-generated method stub
   customDialog_TextView.setText(customDialog_EditText.getText().toString());
  }  
 };

 private Button.OnClickListener customDialog_DismissOnClickListener
  = new Button.OnClickListener(){
 
  @Override
  public void onClick(View arg0) {
   // TODO Auto-generated method stub
   EditDialogListener activity = (EditDialogListener) getActivity();
            activity.updateResult(customDialog_EditText.getText().toString());
            
   dismiss(); 
  } 
 };
 
 public interface EditDialogListener {
        void updateResult(String inputText);
    }

}


/res/layout/customlayout.xml.
<LinearLayout xmlns:android="http://schemas.android.com/apk/res/android"
    android:id="@+id/customdialog"
    android:orientation="vertical"
    android:layout_width="fill_parent"
    android:layout_height="fill_parent"
    android:padding="10dp">
<ImageView
    android:layout_width="wrap_content"
    android:layout_height="wrap_content"
    android:src="@drawable/ic_launcher"/>
<TextView
    android:id="@+id/dialogtextview"
    android:layout_width="wrap_content"
    android:layout_height="wrap_content"/>
<EditText
    android:id="@+id/dialogedittext"
    android:layout_width="fill_parent"
    android:layout_height="wrap_content"/>
<Button
    android:id="@+id/dialogupdate"
    android:layout_width="fill_parent"
    android:layout_height="wrap_content"
    android:text="Update"/>
<Button
    android:id="@+id/dialogdismiss"
    android:layout_width="fill_parent"
    android:layout_height="wrap_content"
    android:text="Dismiss"/>
</LinearLayout>


MainActivity.java
package com.AndroidCustomDialog;

import com.AndroidCustomDialog.MyDialogFragment.EditDialogListener;
import android.os.Bundle;
import android.app.Activity;
import android.app.DialogFragment;
import android.view.View;
import android.widget.Button;
import android.widget.TextView;

public class MainActivity extends Activity implements EditDialogListener{
 
 String result = "";
 TextView textReturned;

    @Override
    public void onCreate(Bundle savedInstanceState) {
        super.onCreate(savedInstanceState);
        setContentView(R.layout.activity_main);
        
        textReturned = (TextView)findViewById(R.id.textreturned);
        
        Button buttonStartDialog = (Button)findViewById(R.id.startdialog);
        buttonStartDialog.setOnClickListener(new Button.OnClickListener(){
         
         @Override
         public void onClick(View arg0) {
          // TODO Auto-generated method stub
          //showDialog(CUSTOM_DIALOG_ID); 
          
          DialogFragment newFragment = MyDialogFragment.newInstance();
             newFragment.show(getFragmentManager(), "dialog");
             
         }});
    }

 public void updateResult(String inputText) {
  result = inputText;
  textReturned.setText(result);
  
 }
    
}


/res/layout/activity_main.xml
<?xml version="1.0" encoding="utf-8"?>
<LinearLayout xmlns:android="http://schemas.android.com/apk/res/android"
    android:orientation="vertical"
    android:layout_width="fill_parent"
    android:layout_height="fill_parent">
<TextView
    android:layout_width="fill_parent"
    android:layout_height="wrap_content"
    android:text="@string/hello_world"/>
<Button
    android:id="@+id/startdialog"
    android:layout_width="fill_parent"
    android:layout_height="wrap_content"
    android:text=" Start Dialog "/>
<TextView
    android:id="@+id/textreturned"
    android:layout_width="fill_parent"
    android:layout_height="wrap_content"/>
</LinearLayout>


Infolinks In Text Ads