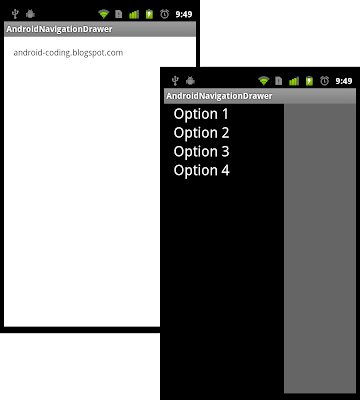
It is a simple example of Navigation Drawer:
 |
| Simple example of Navigation Drawer |
Modify layout to add <android.support.v4.widget.DrawerLayout > as root.
<android.support.v4.widget.DrawerLayout
    xmlns:android="http://schemas.android.com/apk/res/android"
    android:id="@+id/drawer_layout"
    android:layout_width="match_parent"
    android:layout_height="match_parent" >

    <RelativeLayout
        xmlns:android="http://schemas.android.com/apk/res/android"
        xmlns:tools="http://schemas.android.com/tools"
        android:layout_width="match_parent"
        android:layout_height="match_parent"
        android:paddingBottom="@dimen/activity_vertical_margin"
        android:paddingLeft="@dimen/activity_horizontal_margin"
        android:paddingRight="@dimen/activity_horizontal_margin"
        android:paddingTop="@dimen/activity_vertical_margin"
        tools:context=".MainActivity" >

        <TextView
            android:layout_width="wrap_content"
            android:layout_height="wrap_content"
            android:text="android-coding.blogspot.com" />
    </RelativeLayout>

    <ListView
        android:id="@+id/drawer"
        android:layout_width="200dp"
        android:layout_height="match_parent"
        android:layout_gravity="start"
        android:background="@android:color/background_dark"
        android:choiceMode="singleChoice"
        android:divider="@android:color/transparent"
        android:dividerHeight="0dp" />

</android.support.v4.widget.DrawerLayout>
Create /res/layout/drawer_list_item.xml to define row layout of the ListView in our drawer.
<TextView xmlns:android="http://schemas.android.com/apk/res/android"
    android:id="@android:id/text1"
    android:layout_width="match_parent"
    android:layout_height="wrap_content"
    android:gravity="center_vertical"
    android:paddingLeft="16dp"
    android:paddingRight="16dp"
    android:textColor="@android:color/white"
    android:textSize="24sp"/>
MainActivity.java
package com.example.androidnavigationdrawer;

import android.os.Bundle;
import android.app.Activity;
import android.support.v4.widget.DrawerLayout;
import android.view.Menu;
import android.view.View;
import android.widget.AdapterView;
import android.widget.AdapterView.OnItemClickListener;
import android.widget.ArrayAdapter;
import android.widget.ListView;
import android.widget.Toast;

public class MainActivity extends Activity {

 private String[] optsArray = {
   "Option 1",
   "Option 2",
   "Option 3",
   "Option 4"
 };
    private DrawerLayout drawer;
    private ListView drawerList;
    ArrayAdapter<String> optionArrayAdapter;

 @Override
 protected void onCreate(Bundle savedInstanceState) {
  super.onCreate(savedInstanceState);
  setContentView(R.layout.activity_main);

  drawer = (DrawerLayout) findViewById(R.id.drawer_layout);
        drawerList = (ListView) findViewById(R.id.drawer);

        optionArrayAdapter = new ArrayAdapter<String>(this,
          R.layout.drawer_list_item,
          optsArray);
        drawerList.setAdapter(optionArrayAdapter);

        drawerList.setOnItemClickListener(new OnItemClickListener(){

   @Override
   public void onItemClick(AdapterView<?> parent, View view,
     int position, long id) {
    Toast.makeText(MainActivity.this,
      optsArray[position],
      Toast.LENGTH_LONG).show();
   }});
 }

 @Override
 public boolean onCreateOptionsMenu(Menu menu) {
  // Inflate the menu; this adds items to the action bar if it is present.
  getMenuInflater().inflate(R.menu.main, menu);
  return true;
 }

}
/res/menu/main.xml, it's the auto generated menu resources by Eclipse. You can ignore it by removing onCreateOptionsMenu() in MainActivity.java if you don't need it.
<menu xmlns:android="http://schemas.android.com/apk/res/android" >

    <item
        android:id="@+id/action_settings"
        android:orderInCategory="100"
        android:showAsAction="never"
        android:title="@string/action_settings"/>

</menu>
more: DrawerLayout with custom Layout/View
Can you post the main.xml menu?
ReplyDeleteadded back.
DeleteActually it's the auto generated menu resources by Eclipse. You can ignore it by removing onCreateOptionsMenu() in MainActivity.java if you don't need it.