Apr 30, 2011

Detect Multi-Touch Event

It's a testing app for multi-touch event, target API level 8, Android 2.2. In my test on Nexus One running 2.2.1, only two points can be recognized.

Detect Multi-Touch Event

package com.TestMultiTouch;

import android.app.Activity;
import android.os.Bundle;
import android.view.MotionEvent;
import android.view.View;
import android.widget.LinearLayout;
import android.widget.TextView;

public class TestMultiTouch extends Activity {

//In this test, handle maximum of 2 pointer
final int MAX_POINT_CNT = 2;

String[] pointerAction = new String[MAX_POINT_CNT];
float[] x = new float[MAX_POINT_CNT];
float[] y = new float[MAX_POINT_CNT];
TextView currentPointer;
TextView pointerStatus_01, pointerStatus_02;
TextView textDistance;

/** Called when the activity is first created. */
@Override
public void onCreate(Bundle savedInstanceState) {
super.onCreate(savedInstanceState);
setContentView(R.layout.main);
LinearLayout MainLayout = (LinearLayout)findViewById(R.id.mainlayout);
MainLayout.setOnTouchListener(OnTouchListener);

currentPointer = (TextView)findViewById(R.id.currentpointer);
pointerStatus_01 = (TextView)findViewById(R.id.pointstatus_01);
pointerStatus_02 = (TextView)findViewById(R.id.pointstatus_02);
textDistance = (TextView)findViewById(R.id.distance);
}

private View.OnTouchListener OnTouchListener
= new View.OnTouchListener(){

@Override
public boolean onTouch(View view, MotionEvent motionEvent) {
// TODO Auto-generated method stub

int pointerIndex = ((motionEvent.getAction() & MotionEvent.ACTION_POINTER_ID_MASK)
>> MotionEvent.ACTION_POINTER_ID_SHIFT);
int pointerId = motionEvent.getPointerId(pointerIndex);
int action = (motionEvent.getAction() & MotionEvent.ACTION_MASK);
int pointCnt = motionEvent.getPointerCount();

if (pointCnt <= MAX_POINT_CNT){
if (pointerIndex <= MAX_POINT_CNT - 1){

for (int i = 0; i < pointCnt; i++) {
int id = motionEvent.getPointerId(i);
x[id] = (int)motionEvent.getX(i);
y[id] = (int)motionEvent.getY(i);
}

switch (action){
case MotionEvent.ACTION_DOWN:
pointerAction[pointerId] = "ACTION_DOWN";
break;
case MotionEvent.ACTION_POINTER_DOWN:
pointerAction[pointerId] = "ACTION_POINTER_DOWN";
break;
case MotionEvent.ACTION_MOVE:
pointerAction[pointerId] = "ACTION_MOVE";

int distance = (int) Math.sqrt(
(x[0] - x[1]) * (x[0] - x[1]) +
(y[0] - y[1]) * (y[0] - y[1]));
textDistance.setText("distance: " + String.valueOf(distance));

break;
case MotionEvent.ACTION_UP:
pointerAction[pointerId] = "ACTION_UP";
break;
case MotionEvent.ACTION_POINTER_UP:
pointerAction[pointerId] = "ACTION_POINTER_UP";
break;
case MotionEvent.ACTION_CANCEL:
pointerAction[pointerId] = "ACTION_CANCEL";
break;
default:
pointerAction[pointerId] = "Unknown!";
}

currentPointer.setText(
"action = " + pointerAction[pointerId] + "\n"
+ "pointerIndex = " + String.valueOf(pointerIndex) + "\n"
+ "pointerId = " + String.valueOf(pointerId) + "\n"
+ "getPointerCount() = " + motionEvent.getPointerCount() + "\n");

pointerStatus_01.setText("[0] : "
+ String.valueOf(x[0]) + " : "
+ String.valueOf(y[0]));

pointerStatus_02.setText("[1] : "
+ String.valueOf(x[1]) + " : "
+ String.valueOf(y[1]));
}
}

return true; //means event have been processed
}};
}


<?xml version="1.0" encoding="utf-8"?>
<LinearLayout xmlns:android="http://schemas.android.com/apk/res/android"
android:orientation="vertical"
android:layout_width="fill_parent"
android:layout_height="fill_parent"
android:id="@+id/mainlayout"
>
<TextView
android:layout_width="fill_parent"
android:layout_height="wrap_content"
android:text="@string/hello"
/>
<TextView
android:id="@+id/currentpointer"
android:layout_width="fill_parent"
android:layout_height="wrap_content"
/>
<TextView
android:id="@+id/pointstatus_01"
android:layout_width="fill_parent"
android:layout_height="wrap_content"
/>
<TextView
android:id="@+id/pointstatus_02"
android:layout_width="fill_parent"
android:layout_height="wrap_content"
/>
<TextView
android:id="@+id/distance"
android:layout_width="fill_parent"
android:layout_height="wrap_content"
/>
</LinearLayout>


Refer Android Document for more details about android.view.MotionEvent

Related Post:
- Detect Touch Event
- Detect Touch Event, test on Custom View
- Detect Multi-Touch Event, test on Custom View

Apr 29, 2011

Detect Touch Event, test on Custom View

Detect Touch Event, test on Custom View

package com.TestSingleTouch;

import android.app.Activity;
import android.content.Context;
import android.graphics.Canvas;
import android.graphics.Color;
import android.graphics.Paint;
import android.os.Bundle;
import android.view.MotionEvent;
import android.view.View;

public class TestSingleTouch extends Activity {

public class TouchView extends View {

private Paint paint = new Paint(Paint.ANTI_ALIAS_FLAG);
private float x, y;
boolean touching = false;

public TouchView(Context context) {
super(context);
// TODO Auto-generated constructor stub
}

@Override
protected void onDraw(Canvas canvas) {
// TODO Auto-generated method stub
if(touching){
paint.setStyle(Paint.Style.STROKE);
paint.setStrokeWidth(1);
paint.setColor(Color.WHITE);
canvas.drawCircle(x, y, 50f, paint);
}
}

@Override
protected void onMeasure(int widthMeasureSpec, int heightMeasureSpec) {
// TODO Auto-generated method stub
setMeasuredDimension(MeasureSpec.getSize(widthMeasureSpec),
MeasureSpec.getSize(heightMeasureSpec));
}

@Override
public boolean onTouchEvent(MotionEvent event) {
// TODO Auto-generated method stub

int action = event.getAction();
switch(action){
case MotionEvent.ACTION_MOVE:
x = event.getX();
y = event.getY();
touching = true;
break;
case MotionEvent.ACTION_DOWN:
x = event.getX();
y = event.getY();
touching = true;
break;
case MotionEvent.ACTION_UP:
touching = false;
break;
default:
touching = false;
}
invalidate();
return true;
}

}

/** Called when the activity is first created. */
@Override
public void onCreate(Bundle savedInstanceState) {
super.onCreate(savedInstanceState);
setContentView(new TouchView(this));

}

}


Related Post:
- Detect Touch Event, test on Custom View; part II
- Detect Touch Event
- Detect Multi-Touch Event
- Detect Multi-Touch Event, test on Custom View

- Touch to move Bitmap inside a custom View

Apr 28, 2011

Detect Touch Event

package com.TestSingleTouch;

import android.app.Activity;
import android.os.Bundle;
import android.view.MotionEvent;
import android.view.View;
import android.widget.LinearLayout;
import android.widget.TextView;

public class TestSingleTouch extends Activity {

TextView textEvent, textX, textY;

/** Called when the activity is first created. */
@Override
public void onCreate(Bundle savedInstanceState) {
super.onCreate(savedInstanceState);
setContentView(R.layout.main);
LinearLayout MainLayout = (LinearLayout)findViewById(R.id.mainlayout);
textEvent = (TextView)findViewById(R.id.event);
textX = (TextView)findViewById(R.id.x);
textY = (TextView)findViewById(R.id.y);

MainLayout.setOnTouchListener(OnTouchListener);
}

private View.OnTouchListener OnTouchListener
= new View.OnTouchListener(){

@Override
public boolean onTouch(View view, MotionEvent motionEvent) {
// TODO Auto-generated method stub

textX.setText("x: " + String.valueOf(motionEvent.getX()));
textY.setText("y: " + String.valueOf(motionEvent.getY()));

int action = motionEvent.getAction();

switch (action){
case MotionEvent.ACTION_DOWN:
textEvent.setText("ACTION_DOWN");
break;
case MotionEvent.ACTION_MOVE:
textEvent.setText("ACTION_MOVE");
break;
case MotionEvent.ACTION_UP:
textEvent.setText("ACTION_UP");
break;
case MotionEvent.ACTION_CANCEL:
textEvent.setText("ACTION_CANCEL");
break;
default:
textEvent.setText("Unknown!");
}

return true; //means event have been processed
}

};
}


<?xml version="1.0" encoding="utf-8"?>
<LinearLayout xmlns:android="http://schemas.android.com/apk/res/android"
android:orientation="vertical"
android:layout_width="fill_parent"
android:layout_height="fill_parent"
android:id="@+id/mainlayout"
>
<TextView
android:layout_width="fill_parent"
android:layout_height="wrap_content"
android:text="@string/hello"
/>
<TextView
android:id="@+id/event"
android:layout_width="fill_parent"
android:layout_height="wrap_content"
/>
<TextView
android:id="@+id/x"
android:layout_width="fill_parent"
android:layout_height="wrap_content"
/>
<TextView
android:id="@+id/y"
android:layout_width="fill_parent"
android:layout_height="wrap_content"
/>
</LinearLayout>


Detect Touch Event


Related Post:
- Detect Touch Event, test on Custom View
- Detect Multi-Touch Event
- Detect Multi-Touch Event, test on Custom View
Apr 27, 2011

Set EditText horizontally scrollable

It can be define in XML using the statement:

 android:scrollHorizontally="true"


or using Java code:

 setHorizontallyScrolling(true);


scrollHorizontally

Apr 25, 2011

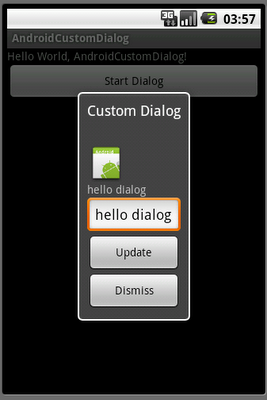
Create custom dialog with EditText

Create custom dialog with EditText

Create a XML in /res/layout/ folder to define the layout of the custom dialog.
eg. customlayout.xml
<LinearLayout xmlns:android="http://schemas.android.com/apk/res/android"
android:id="@+id/customdialog"
android:orientation="vertical"
android:layout_width="fill_parent"
android:layout_height="fill_parent"
android:padding="10dp"
>
<ImageView
android:layout_width="wrap_content"
android:layout_height="wrap_content"
android:src="@drawable/icon"
/>
<TextView
android:id="@+id/dialogtextview"
android:layout_width="wrap_content"
android:layout_height="wrap_content"
/>
<EditText
android:id="@+id/dialogedittext"
android:layout_width="fill_parent"
android:layout_height="wrap_content"
/>
<Button
android:id="@+id/dialogupdate"
android:layout_width="fill_parent"
android:layout_height="wrap_content"
android:text="Update"
/>
<Button
android:id="@+id/dialogdismiss"
android:layout_width="fill_parent"
android:layout_height="wrap_content"
android:text="Dismiss"
/>
</LinearLayout>


Java code, eg. AndroidCustomDialog.java
package com.AndroidCustomDialog;

import android.app.Activity;
import android.app.Dialog;
import android.os.Bundle;
import android.view.View;
import android.widget.Button;
import android.widget.EditText;
import android.widget.TextView;

public class AndroidCustomDialog extends Activity {

static final int CUSTOM_DIALOG_ID = 0;

TextView customDialog_TextView;
EditText customDialog_EditText;
Button customDialog_Update, customDialog_Dismiss;
;

   /** Called when the activity is first created. */
   @Override
   public void onCreate(Bundle savedInstanceState) {
       super.onCreate(savedInstanceState);
       setContentView(R.layout.main);
      
       Button buttonStartDialog = (Button)findViewById(R.id.startdialog);
       buttonStartDialog.setOnClickListener(new Button.OnClickListener(){

  @Override
  public void onClick(View arg0) {
   // TODO Auto-generated method stub
   showDialog(CUSTOM_DIALOG_ID);
  }
       });
   }
  
   private Button.OnClickListener customDialog_UpdateOnClickListener
   = new Button.OnClickListener(){

 @Override
 public void onClick(View arg0) {
  // TODO Auto-generated method stub
  customDialog_TextView.setText(customDialog_EditText.getText().toString());
 }
   
   };
  
   private Button.OnClickListener customDialog_DismissOnClickListener
   = new Button.OnClickListener(){

 @Override
 public void onClick(View arg0) {
  // TODO Auto-generated method stub
  dismissDialog(CUSTOM_DIALOG_ID);
 }
   
   };
  
@Override
protected Dialog onCreateDialog(int id) {
 // TODO Auto-generated method stub
 Dialog dialog = null;;
    switch(id) {
    case CUSTOM_DIALOG_ID:
     dialog = new Dialog(AndroidCustomDialog.this);

     dialog.setContentView(R.layout.customlayout);
     dialog.setTitle("Custom Dialog");
    
     customDialog_EditText = (EditText)dialog.findViewById(R.id.dialogedittext);
     customDialog_TextView = (TextView)dialog.findViewById(R.id.dialogtextview);
     customDialog_Update = (Button)dialog.findViewById(R.id.dialogupdate);
     customDialog_Dismiss = (Button)dialog.findViewById(R.id.dialogdismiss);
    
     customDialog_Update.setOnClickListener(customDialog_UpdateOnClickListener);
     customDialog_Dismiss.setOnClickListener(customDialog_DismissOnClickListener);
    
        break;
    }
    return dialog;
}  
}


main.xml, simple with a button to start the custom dialog.
<?xml version="1.0" encoding="utf-8"?>
<LinearLayout xmlns:android="http://schemas.android.com/apk/res/android"
   android:orientation="vertical"
   android:layout_width="fill_parent"
   android:layout_height="fill_parent"
   >
<TextView
   android:layout_width="fill_parent"
   android:layout_height="wrap_content"
   android:text="@string/hello"
   />
<Button
   android:id="@+id/startdialog"
   android:layout_width="fill_parent"
   android:layout_height="wrap_content"
   android:text=" Start Dialog "
   />
</LinearLayout>


Please notice that the call-back function onCreateDialog() will be called when a dialog is requested for the first time, such that the content defined in onCreateDialog() will not be updated next time.

If you have some dynamic content changed in runtime, you can override the call-back method onPrepareDialog(), it will be called every time a dialog is opened. Override this method if you want to change any properties of the dialog each time it is opened. Refer to the post: Create custom dialog with dynamic content, updated in onPrepareDialog().

Next:
- Pass back data from dialog to activity


Create Dialog with options, using AlertDialog.Builder

Dialog with options

package com.AndroidAlertDialog;

import android.app.Activity;
import android.app.AlertDialog;
import android.content.DialogInterface;
import android.os.Bundle;
import android.view.View;
import android.widget.Button;
import android.widget.Toast;

public class AndroidAlertDialog extends Activity {
/** Called when the activity is first created. */
@Override
public void onCreate(Bundle savedInstanceState) {
super.onCreate(savedInstanceState);
setContentView(R.layout.main);

Button buttonStartDialog = (Button)findViewById(R.id.startdialog);
buttonStartDialog.setOnClickListener(new Button.OnClickListener(){

@Override
public void onClick(View arg0) {
// TODO Auto-generated method stub
StartDialog();
}});
}

private void StartDialog(){
AlertDialog.Builder myAlertDialog = new AlertDialog.Builder(this);
myAlertDialog.setTitle("My Alert Dialog");
myAlertDialog.setMessage("It provide options for user to select");
myAlertDialog.setPositiveButton("Yes", new DialogInterface.OnClickListener() {

// do something when the button is clicked
public void onClick(DialogInterface arg0, int arg1) {
Toast.makeText(getApplicationContext(), "'Yes' button clicked", Toast.LENGTH_LONG).show();
}
});
myAlertDialog.setNeutralButton("Option 1", new DialogInterface.OnClickListener() {

// do something when the button is clicked
public void onClick(DialogInterface arg0, int arg1) {
Toast.makeText(getApplicationContext(), "'Option 1' button clicked", Toast.LENGTH_LONG).show();
}
});
myAlertDialog.setNegativeButton("NO", new DialogInterface.OnClickListener() {

// do something when the button is clicked
public void onClick(DialogInterface arg0, int arg1) {
Toast.makeText(getApplicationContext(), "'No' button clicked", Toast.LENGTH_LONG).show();
}
});
myAlertDialog.show();
}
}


TimePickerDialog - how to set 24 hour view, or AM/PM.

TimePickerDialog is a dialog that prompts the user for the time of day using a TimePicker. Refer the post "TimePickerDialog" for working example.

TimePicker - how to set 24 hour view, or AM/PM.

TimePickerDialog provide two Constructors:

TimePickerDialog(Context context, TimePickerDialog.OnTimeSetListener callBack, int hourOfDay, int minute, boolean is24HourView)

TimePickerDialog(Context context, int theme, TimePickerDialog.OnTimeSetListener callBack, int hourOfDay, int minute, boolean is24HourView)


In both version of the Constructors, the last parameter, boolean is24HourView, define whether this is a 24 hour view, or AM/PM.

To select 24 hour view, set it true.
To select AM/PM view, set it false.


Apr 23, 2011

AutoCompleteTextView

AutoCompleteTextView is an editable text view that shows completion suggestions automatically while the user is typing. The list of suggestions is displayed in a drop down menu from which the user can choose an item to replace the content of the edit box with.

Ex.
AutoCompleteTextView

create a xml file, /res/values/myvalues.xml, to hold the suggestions.
<?xml version="1.0" encoding="UTF-8"?>
<resources>
<array name="month">
<item>January</item>
<item>February</item>
<item>March</item>
<item>April</item>
<item>May</item>
<item>June</item>
<item>July</item>
<item>August</item>
<item>September</item>
<item>October</item>
<item>November</item>
<item>December</item>
</array>
</resources>


Main Java code
package com.ExAutoCompleteTextView;

import android.app.Activity;
import android.os.Bundle;
import android.text.Editable;
import android.text.TextWatcher;
import android.widget.ArrayAdapter;
import android.widget.AutoCompleteTextView;

public class ExAutoCompleteTextView extends Activity implements TextWatcher {

AutoCompleteTextView autoCompleteTextView;

/** Called when the activity is first created. */
@Override
public void onCreate(Bundle savedInstanceState) {
super.onCreate(savedInstanceState);
setContentView(R.layout.main);
autoCompleteTextView = (AutoCompleteTextView)findViewById(R.id.input);
String[] month = getResources().getStringArray(R.array.month);
autoCompleteTextView.addTextChangedListener(this);
autoCompleteTextView.setAdapter(new ArrayAdapter<String>(this, android.R.layout.simple_dropdown_item_1line, month));
}

@Override
public void afterTextChanged(Editable arg0) {
// TODO Auto-generated method stub

}

@Override
public void beforeTextChanged(CharSequence arg0, int arg1, int arg2,
int arg3) {
// TODO Auto-generated method stub

}

@Override
public void onTextChanged(CharSequence arg0, int arg1, int arg2, int arg3) {
// TODO Auto-generated method stub

}
}


main.xml
<?xml version="1.0" encoding="utf-8"?>
<LinearLayout xmlns:android="http://schemas.android.com/apk/res/android"
android:orientation="vertical"
android:layout_width="fill_parent"
android:layout_height="fill_parent"
>
<TextView
android:layout_width="fill_parent"
android:layout_height="wrap_content"
android:text="@string/hello"
/>
<AutoCompleteTextView
android:id="@+id/input"
android:layout_width="fill_parent"
android:layout_height="wrap_content"
android:completionThreshold="1"
/>
</LinearLayout>

Apr 22, 2011

Load Array from XML Resources

To load array contents from XML resources:
 String[] month = getResources().getStringArray(R.array.xxx);

where xxx is the name of the array.

Here is a example of ListActivity, using ArrayAdapter<String> with array contents loaded from XML resources.

create a xml file, /res/values/myvalues.xml
<?xml version="1.0" encoding="UTF-8"?>
<resources>
<array name="month">
<item>January</item>
<item>February</item>
<item>March</item>
<item>April</item>
<item>May</item>
<item>June</item>
<item>July</item>
<item>August</item>
<item>September</item>
<item>October</item>
<item>November</item>
<item>December</item>
</array>
</resources>


package com.ExMyList;

import android.app.ListActivity;
import android.os.Bundle;
import android.widget.ArrayAdapter;

public class ExMyList extends ListActivity {
/** Called when the activity is first created. */
@Override
public void onCreate(Bundle savedInstanceState) {
super.onCreate(savedInstanceState);

String[] month = getResources().getStringArray(R.array.month);
setListAdapter(new ArrayAdapter<String>(this, android.R.layout.simple_list_item_1, month));
}
}


Apr 15, 2011

ViewFlipper with Animation

ViewFlipper is a simple ViewAnimator that will animate between two or more views that have been added to it. Only one child is shown at a time. If requested, can automatically flip between each child at a regular interval.

ViewFlipper with Animation

create four XML file for the animation in /res/anim folder

/res/anim/flipinnext.xml
<?xml version="1.0" encoding="utf-8"?>
<set xmlns:android="http://schemas.android.com/apk/res/android"
android:interpolator="@android:anim/decelerate_interpolator">
<translate
android:fromXDelta="-100%"
android:toXDelta="0%"
android:duration="500" />
</set>


/res/anim/flipoutnext.xml
<?xml version="1.0" encoding="utf-8"?>
<set xmlns:android="http://schemas.android.com/apk/res/android"
android:interpolator="@android:anim/decelerate_interpolator">
<translate
android:fromXDelta="0%"
android:toXDelta="100%"
android:duration="500" />
</set>


/res/anim/flipinprevious.xml
<?xml version="1.0" encoding="utf-8"?>
<set xmlns:android="http://schemas.android.com/apk/res/android"
android:interpolator="@android:anim/decelerate_interpolator">
<translate
android:fromXDelta="100%"
android:toXDelta="0%"
android:duration="500" />
</set>


/res/anim/flipoutprevious.xml
<?xml version="1.0" encoding="utf-8"?>
<set xmlns:android="http://schemas.android.com/apk/res/android"
android:interpolator="@android:anim/decelerate_interpolator">
<translate
android:fromXDelta="0%"
android:toXDelta="-100%"
android:duration="500" />
</set>


/res/layout/main.xml
<?xml version="1.0" encoding="utf-8"?>
<LinearLayout xmlns:android="http://schemas.android.com/apk/res/android"
android:orientation="vertical"
android:layout_width="fill_parent"
android:layout_height="fill_parent"
>
<TextView
android:layout_width="fill_parent"
android:layout_height="wrap_content"
android:text="@string/hello"
/>
<Button
android:id="@+id/flipnext"
android:layout_width="fill_parent"
android:layout_height="wrap_content"
android:text="Flip Next"
/>
<Button
android:id="@+id/flipprevious"
android:layout_width="fill_parent"
android:layout_height="wrap_content"
android:text="Flip Previous"
/>
<ViewFlipper
android:id="@+id/viewflipper"
android:layout_width="fill_parent"
android:layout_height="fill_parent">
<LinearLayout
android:layout_width="fill_parent"
android:layout_height="fill_parent"
android:orientation="vertical">
<TextView
android:layout_width="fill_parent"
android:layout_height="wrap_content"
android:text="First Screen"/>
<ImageView
android:layout_width="fill_parent"
android:layout_height="fill_parent"
android:src="@drawable/icon"/>
</LinearLayout>
<LinearLayout
android:layout_width="fill_parent"
android:layout_height="fill_parent"
android:orientation="vertical">
<TextView
android:layout_width="fill_parent"
android:layout_height="wrap_content"
android:text="Second Screen"/>
<Button
android:layout_width="fill_parent"
android:layout_height="fill_parent"
android:text="Big Big Button"/>
</LinearLayout>
<LinearLayout
android:layout_width="fill_parent"
android:layout_height="fill_parent"
android:orientation="vertical">
<TextView
android:layout_width="fill_parent"
android:layout_height="wrap_content"
android:text="Third Screen"/>
<Button
android:layout_width="fill_parent"
android:layout_height="wrap_content"
android:text="Normal Button"/>
<Button
android:layout_width="fill_parent"
android:layout_height="wrap_content"
android:text="Normal Button"/>
<Button
android:layout_width="fill_parent"
android:layout_height="wrap_content"
android:text="Normal Button"/>
</LinearLayout>
</ViewFlipper>
</LinearLayout>


main java code
package com.MyViewFlipper;

import android.app.Activity;
import android.os.Bundle;
import android.view.View;
import android.view.animation.Animation;
import android.view.animation.AnimationUtils;
import android.widget.Button;
import android.widget.ViewFlipper;

public class MyViewFlipper extends Activity {

/** Called when the activity is first created. */
@Override
public void onCreate(Bundle savedInstanceState) {
super.onCreate(savedInstanceState);
setContentView(R.layout.main);
Button buttonFlipNext = (Button)findViewById(R.id.flipnext);
Button buttonFlipPrevious = (Button)findViewById(R.id.flipprevious);

final ViewFlipper viewFlipper = (ViewFlipper)findViewById(R.id.viewflipper);
final Animation animFlipInNext = AnimationUtils.loadAnimation(this, R.anim.flipinnext);
final Animation animFlipOutNext = AnimationUtils.loadAnimation(this, R.anim.flipoutnext);
final Animation animFlipInPrevious = AnimationUtils.loadAnimation(this, R.anim.flipinprevious);
final Animation animFlipOutPrevious = AnimationUtils.loadAnimation(this, R.anim.flipoutprevious);

buttonFlipNext.setOnClickListener(new Button.OnClickListener(){

@Override
public void onClick(View arg0) {
// TODO Auto-generated method stub
viewFlipper.setInAnimation(animFlipInNext);
viewFlipper.setOutAnimation(animFlipOutNext);
viewFlipper.showNext();
}});

buttonFlipPrevious.setOnClickListener(new Button.OnClickListener(){

@Override
public void onClick(View arg0) {
// TODO Auto-generated method stub
viewFlipper.setInAnimation(animFlipInPrevious);
viewFlipper.setOutAnimation(animFlipOutPrevious);
viewFlipper.showPrevious();
}});
}
}

Apr 14, 2011

Example to implement SlidingDrawer in XML

SlidingDrawer hides content out of the screen and allows the user to drag a handle to bring the content on screen.

<?xml version="1.0" encoding="utf-8"?>
<LinearLayout xmlns:android="http://schemas.android.com/apk/res/android"
android:orientation="vertical"
android:layout_width="fill_parent"
android:layout_height="fill_parent"
>
<TextView
android:layout_width="fill_parent"
android:layout_height="wrap_content"
android:text="@string/hello"
/>
<SlidingDrawer
android:id="@+id/drawer"
android:layout_width="fill_parent"
android:layout_height="wrap_content"
android:orientation="vertical"
android:handle="@+id/handle"
android:content="@+id/content">
<ImageView
android:id="@id/handle"
android:layout_width="fill_parent"
android:layout_height="wrap_content"
android:src="@drawable/icon"/>
<LinearLayout
android:id="@id/content"
android:layout_width="fill_parent"
android:layout_height="fill_parent"
android:orientation="vertical">
<Button
android:layout_width="fill_parent"
android:layout_height="fill_parent"
android:text="Big Big Button"/>
</LinearLayout>

</SlidingDrawer>
</LinearLayout>


Example of SlidingDrawer

Apr 13, 2011

getExternalStoragePublicDirectory(String type): Get a top-level public external storage directory for particular type

Start from API Level 8 (Android 2.2), android.os.Environment class provide getExternalStoragePublicDirectory(String type) method, to get a top-level public external storage directory for placing files of a particular type. This is where the user will typically place and manage their own files, so you should be careful about what you put here to ensure you don't erase their files or get in the way of their own organization.

getExternalStoragePublicDirectory(String type)

package com.AndroidExternalStoragePublicDirectory;

import android.app.Activity;
import android.os.Bundle;
import android.os.Environment;
import android.widget.TextView;

public class AndroidExternalStoragePublicDirectory extends Activity {
/** Called when the activity is first created. */
@Override
public void onCreate(Bundle savedInstanceState) {
super.onCreate(savedInstanceState);
setContentView(R.layout.main);

TextView textDIRECTORY_MUSIC = (TextView)findViewById(R.id.textDIRECTORY_MUSIC);
TextView textDIRECTORY_PODCASTS = (TextView)findViewById(R.id.textDIRECTORY_PODCASTS);
TextView textDIRECTORY_RINGTONES = (TextView)findViewById(R.id.textDIRECTORY_RINGTONES);
TextView textDIRECTORY_ALARMS = (TextView)findViewById(R.id.textDIRECTORY_ALARMS);
TextView textDIRECTORY_NOTIFICATIONS = (TextView)findViewById(R.id.textDIRECTORY_NOTIFICATIONS);
TextView textDIRECTORY_PICTURES = (TextView)findViewById(R.id.textDIRECTORY_PICTURES);
TextView textDIRECTORY_MOVIES = (TextView)findViewById(R.id.textDIRECTORY_MOVIES);
TextView textDIRECTORY_DOWNLOADS = (TextView)findViewById(R.id.textDIRECTORY_DOWNLOADS);
TextView textDIRECTORY_DCIM = (TextView)findViewById(R.id.textDIRECTORY_DCIM);


textDIRECTORY_MUSIC.setText(
"DIRECTORY_MUSIC: " +
Environment.getExternalStoragePublicDirectory(Environment.DIRECTORY_MUSIC)
.getPath());

textDIRECTORY_PODCASTS.setText(
"DIRECTORY_PODCASTS: " +
Environment.getExternalStoragePublicDirectory(Environment.DIRECTORY_PODCASTS)
.getPath());
textDIRECTORY_RINGTONES.setText(
"DIRECTORY_RINGTONES: " +
Environment.getExternalStoragePublicDirectory(Environment.DIRECTORY_RINGTONES)
.getPath());
textDIRECTORY_ALARMS.setText(
"DIRECTORY_ALARMS: " +
Environment.getExternalStoragePublicDirectory(Environment.DIRECTORY_ALARMS)
.getPath());
textDIRECTORY_NOTIFICATIONS.setText(
"DIRECTORY_NOTIFICATIONS: " +
Environment.getExternalStoragePublicDirectory(Environment.DIRECTORY_NOTIFICATIONS)
.getPath());
textDIRECTORY_PICTURES.setText(
"DIRECTORY_PICTURES: " +
Environment.getExternalStoragePublicDirectory(Environment.DIRECTORY_PICTURES)
.getPath());
textDIRECTORY_MOVIES.setText(
"DIRECTORY_MOVIES: " +
Environment.getExternalStoragePublicDirectory(Environment.DIRECTORY_MOVIES)
.getPath());
textDIRECTORY_DOWNLOADS.setText(
"DIRECTORY_DOWNLOADS: " +
Environment.getExternalStoragePublicDirectory(Environment.DIRECTORY_DOWNLOADS)
.getPath());
textDIRECTORY_DCIM.setText(
"DIRECTORY_DCIM: " +
Environment.getExternalStoragePublicDirectory(Environment.DIRECTORY_DCIM)
.getPath());
}
}


<?xml version="1.0" encoding="utf-8"?>
<LinearLayout xmlns:android="http://schemas.android.com/apk/res/android"
android:orientation="vertical"
android:layout_width="fill_parent"
android:layout_height="fill_parent"
>
<TextView
android:layout_width="fill_parent"
android:layout_height="wrap_content"
android:text="@string/hello"
/>
<TextView
android:id="@+id/textDIRECTORY_MUSIC"
android:layout_width="fill_parent"
android:layout_height="wrap_content"
/>
<TextView
android:id="@+id/textDIRECTORY_PODCASTS"
android:layout_width="fill_parent"
android:layout_height="wrap_content"
/>
<TextView
android:id="@+id/textDIRECTORY_RINGTONES"
android:layout_width="fill_parent"
android:layout_height="wrap_content"
/>
<TextView
android:id="@+id/textDIRECTORY_ALARMS"
android:layout_width="fill_parent"
android:layout_height="wrap_content"
/>
<TextView
android:id="@+id/textDIRECTORY_NOTIFICATIONS"
android:layout_width="fill_parent"
android:layout_height="wrap_content"
/>
<TextView
android:id="@+id/textDIRECTORY_PICTURES"
android:layout_width="fill_parent"
android:layout_height="wrap_content"
/>
<TextView
android:id="@+id/textDIRECTORY_MOVIES"
android:layout_width="fill_parent"
android:layout_height="wrap_content"
/>
<TextView
android:id="@+id/textDIRECTORY_DOWNLOADS"
android:layout_width="fill_parent"
android:layout_height="wrap_content"
/>
<TextView
android:id="@+id/textDIRECTORY_DCIM"
android:layout_width="fill_parent"
android:layout_height="wrap_content"
/>
</LinearLayout>

Apr 12, 2011

Detect GPS ON/OFF status using android.provider.Settings.Secure

android.provider.Settings.Secure is secure system settings, containing system preferences that applications can read but are not allowed to write. These are for preferences that the user must explicitly modify through the system UI or specialized APIs for those values, not modified directly by applications.

Start from API level 8, Android 2.2, Settings.Secure.isLocationProviderEnabled() is added as helper method for determining if a location provider is enabled.

Detect GPS ON/OFF status using android.provider.Settings.Secure

package com.AndroidGPS;

import android.app.Activity;
import android.content.ContentResolver;
import android.location.LocationManager;
import android.os.Bundle;
import android.provider.Settings;
import android.widget.TextView;

public class AndroidGPS extends Activity {

TextView textGpsStatus;

/** Called when the activity is first created. */
@Override
public void onCreate(Bundle savedInstanceState) {
super.onCreate(savedInstanceState);
setContentView(R.layout.main);
textGpsStatus = (TextView)findViewById(R.id.gpsstatus);

}

@Override
protected void onResume() {
// TODO Auto-generated method stub
super.onResume();
displayGpsStatus();
}

private void displayGpsStatus(){
ContentResolver contentResolver = getBaseContext().getContentResolver();
boolean gpsStatus = Settings.Secure.isLocationProviderEnabled(contentResolver, LocationManager.GPS_PROVIDER);
if(gpsStatus){
textGpsStatus.setText("GPS: ON");
}else{
textGpsStatus.setText("GPS: OFF");
}
}
}


Remark:
Another method setLocationProviderEnabled() is also provided to enable or disable a single location provider. But up to this writing, I can't make it work! Also, according to Settings.Secure document, secure system settings can be read by applications but cannot be write. I don't know what is the purpose of the method setLocationProviderEnabled()!

Related:
- How to check if GPS is currently enabled or disabled
- Start Location setting if GPS disabled

Apr 8, 2011

How to set orientation of activity/application in AndroidManifest.xml

To set orientation in AndroidManifest.xml, add the following code under <activity> or <application>.

 android:screenOrientation="landscape"


Related: Change the desired orientation of activity: setRequestedOrientation()

Apr 5, 2011

How to send SMS using android.telephony.SmsManager

android.telephony.SmsManager manages SMS operations such as sending data, text, and pdu SMS messages. Get this object by calling the static method SmsManager.getDefault(). It supports both GSM and CDMA; please don't mix up with deprecated android.telephony.gsm.SmsManager.

  SmsManager MySmsManager = SmsManager.getDefault();
String PhoneNumber = "123....67"; //fil with the receiver's phone number
String SMSText = "Hello Android";
MySmsManager.sendTextMessage(PhoneNumber, null, SMSText, null, null);


Apr 4, 2011

Get ANDROID_ID

ANDROID_ID is 64-bit number (as a hex string) that is randomly generated on the device's first boot and should remain constant for the lifetime of the device. (The value may change if a factory reset is performed on the device.)

 String Id = Settings.Secure.getString(getContentResolver(), Settings.Secure.ANDROID_ID);


Related Post:
- Get phone type using android.telephony.TelephonyManager


Apr 3, 2011

Check and Gets the Android external storage directory

The class android.os.Environment provides access to environment variables.

The method getExternalStorageDirectory() can be used to get the Android external storage directory. This directory may not currently be accessible if it has been mounted by the user on their computer, has been removed from the device, or some other problem has happened. You can determine its current state with getExternalStorageState().

        TextView textInfo = (TextView)findViewById(R.id.info);

String stringInfo;
String state = Environment.getExternalStorageState();
if(state.equals(Environment.MEDIA_MOUNTED)){
stringInfo = "Media Mounted:\n"
+ Environment.getExternalStorageDirectory().getPath();
}else if(state.equals(Environment.MEDIA_MOUNTED_READ_ONLY)){
stringInfo = "Media (Read Only) Mounted:\n"
+ Environment.getExternalStorageDirectory().getPath();
}else{
stringInfo = "No Media Mounted!\n";
}

textInfo.setText(stringInfo);


Check and Gets the Android external storage directory

Apr 1, 2011

How to get application context

To get the context, the method Context.getApplicationContext() or Activity.getApplication() can be used.

        
textContext1.setText("using getApplicationContext():\n" + getApplicationContext());
textContext2.setText("using getApplication():\n" + getApplication());


Context

Infolinks In Text Ads