Jan 28, 2012

Create transparent foreground SurfaceView

Start reading here: Create a SurfaceView Game step-by-step

In previoud posts, we have created a custom SurfaceView(MyGameSurfaceView.java) with background thread. Now we are going to create another MyForeground class by extending our MyGameSurfaceView, with overriding code. Base on the existing MyGameSurfaceView class, it's easy to implement the new MyForeground class.

Create transparent foreground SurfaceView

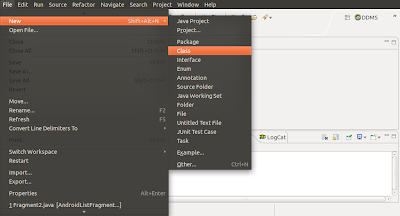
- Create a new class: Right click to select our package (com.MyGame) in Package Explorer, select File -> New -> Class in Eclipse Menu.
Create a new class

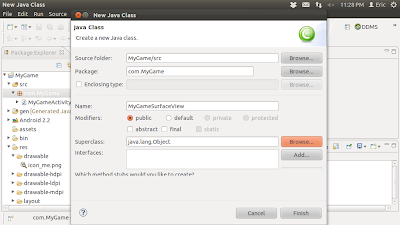
- Enter class name, MyForeground, in Name field. And click Browse...
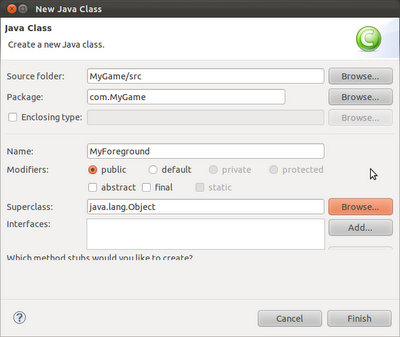
New a MyForeground class

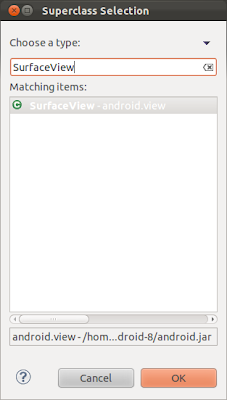
- Type MyGameSurfaceView in Choose a type box, and select MyGameSurfaceView - com.MyGame, click OK.
Choose MyGameSurfaceView - com.MyGame

- Scroll down in New Java Class dialog, click to check Constructors from superclass. Click Finish.
Create Constructors from superclass

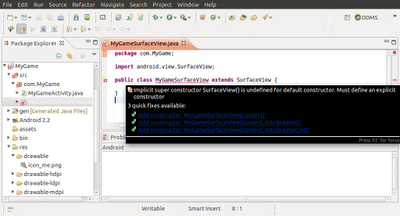
- Now, we have a new class MyForeground.java under com.MyGame.
MyForeground.java

- Modify MyForeground.java to override onDraw(Canvas canvas). We are going to draw each pixel on foreground, so we need not to handle the "Flickering problems". For now, we simple draw a icon on a fixed location on foreground.
package com.MyGame;

import android.content.Context;
import android.graphics.Bitmap;
import android.graphics.BitmapFactory;
import android.graphics.Canvas;
import android.util.AttributeSet;

public class MyForeground extends MyGameSurfaceView {

public MyForeground(Context context) {
super(context);
// TODO Auto-generated constructor stub
}

public MyForeground(Context context, AttributeSet attrs) {
super(context, attrs);
// TODO Auto-generated constructor stub
}

public MyForeground(Context context, AttributeSet attrs, int defStyle) {
super(context, attrs, defStyle);
// TODO Auto-generated constructor stub
}

@Override
protected void onDraw(Canvas canvas) {
Bitmap me = BitmapFactory.decodeResource(getResources(), R.drawable.icon_me);
int loc_x = canvas.getWidth()/2;
int loc_y = canvas.getHeight()/2;
canvas.drawBitmap(me, loc_x, loc_y, null);
}

}


- Modify main.xml to add a new MyForeground, overlape with original MyGameSurfaceView inside a FrameLayout.
<?xml version="1.0" encoding="utf-8"?>
<LinearLayout xmlns:android="http://schemas.android.com/apk/res/android"
android:layout_width="fill_parent"
android:layout_height="fill_parent"
android:orientation="vertical" >

<TextView
android:layout_width="fill_parent"
android:layout_height="wrap_content"
android:text="@string/hello" />
<FrameLayout
android:layout_width="fill_parent"
android:layout_height="fill_parent"
>
<com.MyGame.MyGameSurfaceView
android:id="@+id/myview1"
android:layout_width="fill_parent"
android:layout_height="fill_parent" />
<com.MyGame.MyForeground
android:id="@+id/myforeground"
android:layout_width="fill_parent"
android:layout_height="fill_parent" />
</FrameLayout>
</LinearLayout>


- Modify MyGameActivity.java to handle MyForeground. Please note that in order to make the MyForeground transparency, we have to add the code:
myForeground.setZOrderOnTop(true);
myForeground.getHolder().setFormat(PixelFormat.TRANSPARENT);

package com.MyGame;

import android.app.Activity;
import android.graphics.PixelFormat;
import android.os.Bundle;

public class MyGameActivity extends Activity {

MyGameSurfaceView myGameSurfaceView1;
MyForeground myForeground;

/** Called when the activity is first created. */
@Override
public void onCreate(Bundle savedInstanceState) {
super.onCreate(savedInstanceState);
setContentView(R.layout.main);
myGameSurfaceView1 = (MyGameSurfaceView)findViewById(R.id.myview1);
myForeground = (MyForeground)findViewById(R.id.myforeground);

//Set myForeground using transparent background
myForeground.setZOrderOnTop(true);
myForeground.getHolder().setFormat(PixelFormat.TRANSPARENT);

}

@Override
protected void onResume() {
// TODO Auto-generated method stub
super.onResume();
myGameSurfaceView1.MyGameSurfaceView_OnResume();
myForeground.MyGameSurfaceView_OnResume();

}

@Override
protected void onPause() {
// TODO Auto-generated method stub
super.onPause();
myGameSurfaceView1.MyGameSurfaceView_OnPause();
myForeground.MyGameSurfaceView_OnPause();
}

}

Jan 25, 2012

Flickering problems due to double buffer of SurfaceView

If you try the code in last post Link SurfaceView and Background Thread work together, you can note that the screen seem to flicker between two bitmap! It's due to double buffer of Android's SurfaceView: When you draw on Buffer A, Buffer B is being displayed; then you draw on Buffer B, Buffer A is being displayed. Such that you draw random points on Buffer A and B alternatively, not a single bitmap. This feature can solve some problem of display performance - but not in our case.

In order to solve the problem, you can:
- Draw each pixel on each buffer (It's not practical in our case), OR
- Draw on a single bitmap, then draw the bitmap on canvas.

Here is how to solve the double buffer problem using the second approach:

Modify the SurfaceView - MyGameSurfaceView.java

In surfaceCreated(), create a bitmap(myCanvasBitmap) accroading to the dimension of the SurfaceView. (Please note that not in MyGameSurfaceView_OnResume() - because the SurfaceView may be not yet ready when MyGameSurfaceView_OnResume() is called.) Create a new canvas(myCanvas). Then specify the bitmap(myCanvasBitmap) for the canvas(myCanvas) to draw into, by calling myCanvas.setBitmap(myCanvasBitmap) - Everything draw on myCanvas will draw on myCanvasBitmap.

In onDraw(), we draw on myCanvas, NOT canvas from the method argument. So everything will be draw on myCanvasBitmap. Then, draw the bitmap on canvas (from the method argument) using identity matrix, by calling canvas.drawBitmap(myCanvasBitmap, identityMatrix, null).

Such that, all we draw are draw on a single bitmap; to make both buffer consistance.

MyGameSurfaceView.java
package com.MyGame;

import java.util.Random;

import android.content.Context;
import android.graphics.Bitmap;
import android.graphics.Canvas;
import android.graphics.Matrix;
import android.graphics.Paint;
import android.util.AttributeSet;
import android.view.SurfaceHolder;
import android.view.SurfaceView;

public class MyGameSurfaceView extends SurfaceView implements SurfaceHolder.Callback{

SurfaceHolder surfaceHolder;

MyGameThread myGameThread = null;

int myCanvas_w, myCanvas_h;
Bitmap myCanvasBitmap = null;
Canvas myCanvas = null;
Matrix identityMatrix;

private Paint paint = new Paint(Paint.ANTI_ALIAS_FLAG);
Random random;

public MyGameSurfaceView(Context context) {
super(context);
// TODO Auto-generated constructor stub
}

public MyGameSurfaceView(Context context, AttributeSet attrs) {
super(context, attrs);
// TODO Auto-generated constructor stub
}

public MyGameSurfaceView(Context context, AttributeSet attrs, int defStyle) {
super(context, attrs, defStyle);
// TODO Auto-generated constructor stub
}

@Override
public void surfaceChanged(SurfaceHolder holder, int format, int width, int height) {
// TODO Auto-generated method stub

}

@Override
public void surfaceCreated(SurfaceHolder holder) {

myCanvas_w = getWidth();
myCanvas_h = getHeight();
myCanvasBitmap = Bitmap.createBitmap(myCanvas_w, myCanvas_h, Bitmap.Config.ARGB_8888);
myCanvas = new Canvas();
myCanvas.setBitmap(myCanvasBitmap);

identityMatrix = new Matrix();
}

@Override
public void surfaceDestroyed(SurfaceHolder holder) {
// TODO Auto-generated method stub

}

public void MyGameSurfaceView_OnResume(){

random = new Random();
surfaceHolder = getHolder();
getHolder().addCallback(this);

//Create and start background Thread
myGameThread = new MyGameThread(this, 200);
myGameThread.setRunning(true);
myGameThread.start();

}

public void MyGameSurfaceView_OnPause(){
//Kill the background Thread
boolean retry = true;
myGameThread.setRunning(false);

while(retry){
try {
myGameThread.join();
retry = false;
} catch (InterruptedException e) {
e.printStackTrace();
}
}
}

@Override
protected void onDraw(Canvas canvas) {

paint.setStyle(Paint.Style.STROKE);
paint.setStrokeWidth(3);

//int w = myCanvas.getWidth();
//int h = myCanvas.getHeight();
int x = random.nextInt(myCanvas_w-1);
int y = random.nextInt(myCanvas_h-1);
int r = random.nextInt(255);
int g = random.nextInt(255);
int b = random.nextInt(255);

paint.setColor(0xff000000 + (r << 16) + (g << 8) + b);
myCanvas.drawPoint(x, y, paint);

canvas.drawBitmap(myCanvasBitmap, identityMatrix, null);

}

public void updateStates(){
//Dummy method() to handle the States
}

public void updateSurfaceView(){
//The function run in background thread, not ui thread.

Canvas canvas = null;

try{
canvas = surfaceHolder.lockCanvas();

synchronized (surfaceHolder) {
updateStates();
onDraw(canvas);
}
}finally{
if(canvas != null){
surfaceHolder.unlockCanvasAndPost(canvas);
}
}
}

}


next:
- Create transparent foreground SurfaceView

Jan 24, 2012

Link SurfaceView and Background Thread work together

In previous posts "Create SurfaceView for our game" and "Implement background thread for our game", we have created DUMMY MyGameSurfaceView and MyGameThread classes, without any function, and without any interaction. In this step, we are going to modify the Java code to make them work together.


Modify main.xml to include MyGameSurfaceView in the layout.
<?xml version="1.0" encoding="utf-8"?>
<LinearLayout xmlns:android="http://schemas.android.com/apk/res/android"
android:layout_width="fill_parent"
android:layout_height="fill_parent"
android:orientation="vertical" >

<TextView
android:layout_width="fill_parent"
android:layout_height="wrap_content"
android:text="@string/hello" />
<com.MyGame.MyGameSurfaceView
android:id="@+id/myview1"
android:layout_width="fill_parent"
android:layout_height="fill_parent" />
</LinearLayout>


Modify the main activity (MyGameActivity), call myGameSurfaceView1.MyGameSurfaceView_OnResume() in onResume() and call myGameSurfaceView1.MyGameSurfaceView_OnPause() in onPause(); to start and stop the background thread.
package com.MyGame;

import android.app.Activity;
import android.os.Bundle;

public class MyGameActivity extends Activity {

MyGameSurfaceView myGameSurfaceView1;

/** Called when the activity is first created. */
@Override
public void onCreate(Bundle savedInstanceState) {
super.onCreate(savedInstanceState);
setContentView(R.layout.main);
myGameSurfaceView1 = (MyGameSurfaceView)findViewById(R.id.myview1);

}

@Override
protected void onResume() {
// TODO Auto-generated method stub
super.onResume();
myGameSurfaceView1.MyGameSurfaceView_OnResume();
}

@Override
protected void onPause() {
// TODO Auto-generated method stub
super.onPause();
myGameSurfaceView1.MyGameSurfaceView_OnPause();
}

}


Modify MyGameThread.java. It's a classic structure of backgraound thread. One thing have to note is the statement parent.updateSurfaceView() in run(), it will call back the function updateSurfaceView() in it's parent object.
package com.MyGame;

public class MyGameThread extends Thread {

volatile boolean running = false;

MyGameSurfaceView parent;
long sleepTime;

MyGameThread(MyGameSurfaceView sv, long st){
super();
parent = sv;
sleepTime = st;
}

public void setRunning(boolean r){
running = r;
}

@Override
public void run() {
// TODO Auto-generated method stub
while(running){

try {
sleep(sleepTime);
parent.updateSurfaceView();
} catch (InterruptedException e) {
// TODO Auto-generated catch block
e.printStackTrace();
}

}
}

}


Modify MyGameSurfaceView.java. It's the main part in the code. updateSurfaceView() is a call back function from background thread (MyGameThread.java) in pre-defined duration reached. In-directly, it call updateStates() and onDraw(canvas) to update states (not yet implemented) and draw something on screen (some random drawing is implemented). Please note that updateSurfaceView() is called from background thread, that means it run in background thread, not in UI thread. That's why we need something like surfaceHolder.lockCanvas(), surfaceHolder.unlockCanvasAndPost(canvas) and synchronized (surfaceHolder).
package com.MyGame;

import java.util.Random;

import android.content.Context;
import android.graphics.Canvas;
import android.graphics.Paint;
import android.util.AttributeSet;
import android.view.SurfaceHolder;
import android.view.SurfaceView;

public class MyGameSurfaceView extends SurfaceView implements SurfaceHolder.Callback{

SurfaceHolder surfaceHolder;

MyGameThread myGameThread = null;

private Paint paint = new Paint(Paint.ANTI_ALIAS_FLAG);
Random random;

public MyGameSurfaceView(Context context) {
super(context);
// TODO Auto-generated constructor stub
}

public MyGameSurfaceView(Context context, AttributeSet attrs) {
super(context, attrs);
// TODO Auto-generated constructor stub
}

public MyGameSurfaceView(Context context, AttributeSet attrs, int defStyle) {
super(context, attrs, defStyle);
// TODO Auto-generated constructor stub
}

@Override
public void surfaceChanged(SurfaceHolder holder, int format, int width, int height) {
// TODO Auto-generated method stub

}

@Override
public void surfaceCreated(SurfaceHolder holder) {
// TODO Auto-generated method stub

}

@Override
public void surfaceDestroyed(SurfaceHolder holder) {
// TODO Auto-generated method stub

}

public void MyGameSurfaceView_OnResume(){

random = new Random();
surfaceHolder = getHolder();
getHolder().addCallback(this);

//Create and start background Thread
myGameThread = new MyGameThread(this, 500);
myGameThread.setRunning(true);
myGameThread.start();

}

public void MyGameSurfaceView_OnPause(){
//Kill the background Thread
boolean retry = true;
myGameThread.setRunning(false);

while(retry){
try {
myGameThread.join();
retry = false;
} catch (InterruptedException e) {
e.printStackTrace();
}
}
}

@Override
protected void onDraw(Canvas canvas) {
paint.setStyle(Paint.Style.STROKE);
paint.setStrokeWidth(3);

int w = canvas.getWidth();
int h = canvas.getHeight();
int x = random.nextInt(w-1);
int y = random.nextInt(h-1);
int r = random.nextInt(255);
int g = random.nextInt(255);
int b = random.nextInt(255);

paint.setColor(0xff000000 + (r << 16) + (g << 8) + b);
canvas.drawPoint(x, y, paint);
}

public void updateStates(){
//Dummy method() to handle the States
}

public void updateSurfaceView(){
//The function run in background thread, not ui thread.

Canvas canvas = null;

try{
canvas = surfaceHolder.lockCanvas();

synchronized (surfaceHolder) {
updateStates();
onDraw(canvas);
}
}finally{
if(canvas != null){
surfaceHolder.unlockCanvasAndPost(canvas);
}
}
}

}


The idea is:
  • The main.xml layout define MyGameSurfaceView.
  • MyGameSurfaceView start background thread.
  • When background thread reach the pre-defined duration, it call back updateSurfaceView() function of
  • MyGameSurfaceView to do and draw something.


Next:
- Flickering problems due to double buffer of SurfaceView

Jan 21, 2012

Implement background thread for our game

Start reading here: Create a SurfaceView Game step-by-step

- Click to select our package (com.MyGame) in Package Explorer. Then click File of Eclipse, -> New -> Class


- Enter "MyGameThread" in the Name field, then click Browse... to select Superclass.


- Enter Thread in the search box to choice Thread - java.lang, then click OK.


- Then click Finish in the New Java Class dialog.

- In the Edit Windows (with MyGameThread.java), right click on any blank space, select Source -> Override/Implement Methods...


- Type "run" on In Override/Implement Methods dialog, it will search the matched method for you: the run() will be listed. Click to select run(), and click Ok.


- It's the basic of our Thread. We will add/modify more methods later.

Jan 15, 2012

Create SurfaceView for our game

Start reading here: Create a SurfaceView Game step-by-step

In this step, we are going to create our dummy SurfaceView:

- Click to select our package (com.MyGame) in Package Explorer. Then click File of Eclipse, -> New -> Class
New a class, MyGameSurfaceView.java

- Enter "MyGameSurfaceView" in the Name field, then click Browse... to select Superclass.
select Superclass

- Enter SurfaceView in the search box to choice SurfaceView - android.view, then click OK.
Choice superclass of SurfaceView - android.view

- Then click Finish in the New Java Class dialog.

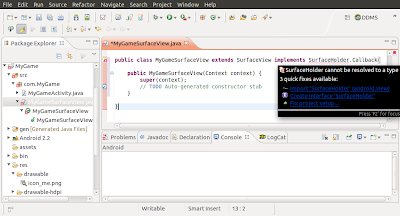
- A new class of MyGameSurfaceView.java extends SurfaceView will be generated for you. But, you will be prompted with error of undefined default constructor. Move mouse over the word with error, MyGameSurfaceView. A hints box will open for you, click to Add constructor 'MyGameSurfaceView(Context)'.
Add constructor 'MyGameSurfaceView(Context)'

- Modify the code of MyGameSurfaceView class declaration from:

public class MyGameSurfaceView extends SurfaceView

to:

public class MyGameSurfaceView extends SurfaceView implements SurfaceHolder.Callback

- You will be prompt for error again: SurfaceHolder cannot be resolved! Move mouse over the word with error, SurfaceHolder. And select Import 'SurfaceHolder'(android.view).
Import 'SurfaceHolder'(android.view)

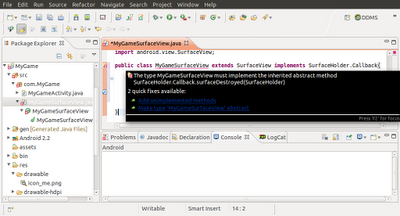
- MyGameSurfaceView will be prompt with error again: The type MyGameSurfaceView must implement the inherited abstract method SurfaceHolder.Callback.surfaceDestroyed(SurfaceHolder). Move mouse over the word with error, MyGameSurfaceView, select Add unimplemented methods.
Add unimplemented methods

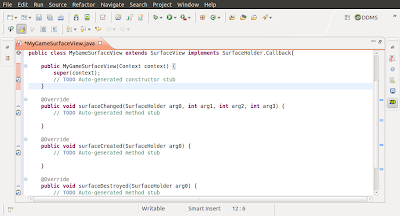
- Now three Auto-generated method will be added:
surfaceChanged(SurfaceHolder arg0, int arg1, int arg2, int arg3)
surfaceCreated(SurfaceHolder arg0)
surfaceDestroyed(SurfaceHolder arg0)
Three Auto-generated method will be added

- In order to make our code more human readable, modify arg(s) with meaningful words:
package com.MyGame;

import android.content.Context;
import android.view.SurfaceHolder;
import android.view.SurfaceView;

public class MyGameSurfaceView extends SurfaceView implements SurfaceHolder.Callback{

public MyGameSurfaceView(Context context) {
super(context);
// TODO Auto-generated constructor stub
}

@Override
public void surfaceChanged(SurfaceHolder holder, int format, int width, int height) {
// TODO Auto-generated method stub

}

@Override
public void surfaceCreated(SurfaceHolder holder) {
// TODO Auto-generated method stub

}

@Override
public void surfaceDestroyed(SurfaceHolder holder) {
// TODO Auto-generated method stub

}

}


- Save it in this moment.

Jan 11, 2012

Create a SurfaceView Game step-by-step

In the coming posts, I will TRY to create a basic game, a VERY BASIC GAME: base on SurfaceView implements SurfaceHolder, display something as Sprites, running in backgroud Thread.

New a project MyGame of package com.MyGame, target Android 2.2, API Level 8.

Prepare my character

Creating graph is my weakest. As a example, I decide to copy my character from Android build-in icon.
- Create a /res/drawable folder.

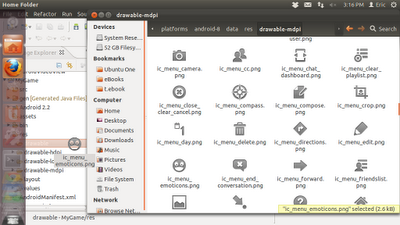
- Open a file explorer and browse to any Android build-in platform drawable folder (ex. /android-sdks/platforms/android-8/data/res/drawable-mdpi/), drag any icon you want to /res/drawable folder under your project.
Drag any icon

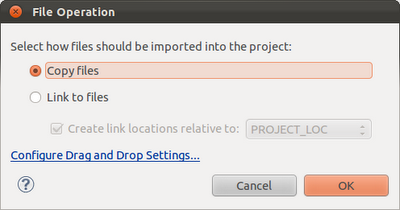
- Select Copy files in the coming File Operation dialog.
Copy files

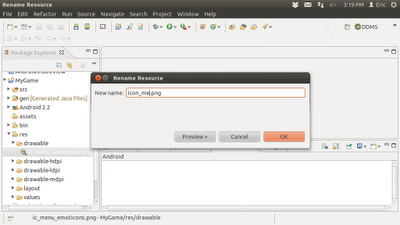
- Rename the drawable to icon_me.png: Click to select the copied icon, click File from Eclipse menu, and Rename...
Rename...

In the coming posts, I will show more in step-by-step.


Jan 3, 2012

Create custom Theme inheriting properties from build-in Theme

Refer from the previous posts:
- Create style using Android Resources Tools
- Create style inheriting properties from another style
- Apply style on whole application/activity as theme
- Using Android build-in theme

We can create our custom Theme, by inheriting properties from build-in Theme.
Create custom Theme inheriting properties from build-in Theme

Create(or modify from previous post) /res/values/mystyle.xml, create our custom style (MyStyle) from build-in "@android:style/Theme.Dialog".
<?xml version="1.0" encoding="utf-8"?>
<resources>
<style name="MyStyle"
parent="@android:style/Theme.Dialog">
<item name="android:layout_width">wrap_content</item>
<item name="android:layout_height">wrap_content</item>
<item name="android:textColor">#AAA</item>
<item name="android:textSize">18dip</item>
<item name="android:background">#222</item>
<item name="android:padding">5dip</item>
</style>
<style name="MyStyle.GreenBold">
<item name="android:textColor">#00FF00</item>
<item name="android:textStyle">bold</item>
</style>
</resources>


Modify AndroidManifest.xml using theme of our custom style, "@style/MyStyle.GreenBold".
<?xml version="1.0" encoding="utf-8"?>
<manifest xmlns:android="http://schemas.android.com/apk/res/android"
package="com.AndroidStyle"
android:versionCode="1"
android:versionName="1.0" >

<uses-sdk android:minSdkVersion="8" />

<application
android:icon="@drawable/ic_launcher"
android:label="@string/app_name"
android:theme="@style/MyStyle.GreenBold" >
<activity
android:name=".AndroidStyleActivity"
android:label="@string/app_name" >
<intent-filter>
<action android:name="android.intent.action.MAIN" />

<category android:name="android.intent.category.LAUNCHER" />
</intent-filter>
</activity>
</application>

</manifest>


Main.xml
<?xml version="1.0" encoding="utf-8"?>
<LinearLayout xmlns:android="http://schemas.android.com/apk/res/android"
android:layout_width="fill_parent"
android:layout_height="fill_parent"
android:orientation="vertical" >

<TextView
android:layout_width="fill_parent"
android:layout_height="wrap_content"
android:text="@string/hello" />
<TextView
android:layout_width="fill_parent"
android:layout_height="wrap_content"
android:text="using Style inherit from Android's build-in theme" />

</LinearLayout>

Jan 2, 2012

Using Android build-in theme

We can apply Android build-in theme on our app. It's a example using Theme.Dialog.

Using Android build-in theme of Theme.Dialog

Modify AndroidManifest.xml using android:theme="@android:style/Theme.Dialog".
<?xml version="1.0" encoding="utf-8"?>
<manifest xmlns:android="http://schemas.android.com/apk/res/android"
package="com.AndroidStyle"
android:versionCode="1"
android:versionName="1.0" >

<uses-sdk android:minSdkVersion="8" />

<application
android:icon="@drawable/ic_launcher"
android:label="@string/app_name"
android:theme="@android:style/Theme.Dialog" >
<activity
android:name=".AndroidStyleActivity"
android:label="@string/app_name" >
<intent-filter>
<action android:name="android.intent.action.MAIN" />

<category android:name="android.intent.category.LAUNCHER" />
</intent-filter>
</activity>
</application>

</manifest>


Modify main.xml
<?xml version="1.0" encoding="utf-8"?>
<LinearLayout xmlns:android="http://schemas.android.com/apk/res/android"
android:layout_width="fill_parent"
android:layout_height="fill_parent"
android:orientation="vertical" >

<TextView
android:layout_width="fill_parent"
android:layout_height="wrap_content"
android:text="@string/hello" />
<TextView
android:layout_width="fill_parent"
android:layout_height="wrap_content"
android:text="using Android's Theme.Dialog" />

</LinearLayout>


Related:
- Apply style on whole application/activity as theme

Next:
- Create custom Theme inheriting properties from build-in Theme


Jan 1, 2012

Apply style on whole application/activity as theme

The custome style create in last posts Create style using Android Resources Tools and Create style inheriting properties from another style can be apply on whole application/activity as theme.

Apply style on whole application/activity as theme

Modify AndroidManifest.xml to add android:theme="@style/MyStyle.GreenBold" property inside <application> to apply the style as theme on whole application, or inside <activity> to apply on individual activity only.
<?xml version="1.0" encoding="utf-8"?>
<manifest xmlns:android="http://schemas.android.com/apk/res/android"
package="com.AndroidStyle"
android:versionCode="1"
android:versionName="1.0" >

<uses-sdk android:minSdkVersion="8" />

<application
android:icon="@drawable/ic_launcher"
android:label="@string/app_name"
android:theme="@style/MyStyle.GreenBold" >
<activity
android:name=".AndroidStyleActivity"
android:label="@string/app_name" >
<intent-filter>
<action android:name="android.intent.action.MAIN" />

<category android:name="android.intent.category.LAUNCHER" />
</intent-filter>
</activity>
</application>

</manifest>


Modify main.xml, change TextView using application/activity theme.
<?xml version="1.0" encoding="utf-8"?>
<LinearLayout xmlns:android="http://schemas.android.com/apk/res/android"
android:layout_width="fill_parent"
android:layout_height="fill_parent"
android:orientation="vertical" >

<TextView
android:layout_width="fill_parent"
android:layout_height="wrap_content"
android:text="@string/hello" />
<TextView
android:layout_width="fill_parent"
android:text="Default, using style of MyStyle.GreenBold defined in AndroidManifest.xml" />

</LinearLayout>


Related:
- Using Android build-in theme

Create style inheriting properties from another style

Refer to the style of last post Create style using Android Resources Tools, we can create a new style(MyStyle.GreenBold) inheriting properties from another existing style (MyStyle).

Modify /res/values/strings.xml, add a new style "MyStyle.GreenBold" inherit properties from "MyStyle", change and add properties of "android:textColor" and "android:textStyle".
<?xml version="1.0" encoding="utf-8"?>
<resources>
<style name="MyStyle">
<item name="android:layout_width">wrap_content</item>
<item name="android:layout_height">wrap_content</item>
<item name="android:textColor">#AAA</item>
<item name="android:textSize">18dip</item>
<item name="android:background">#222</item>
<item name="android:padding">5dip</item>
</style>
<style name="MyStyle.GreenBold">
<item name="android:textColor">#00FF00</item>
<item name="android:textStyle">bold</item>
</style>
</resources>


Modify main.xml adding TextView using new style of "MyStyle.GreenBold".
<?xml version="1.0" encoding="utf-8"?>
<LinearLayout xmlns:android="http://schemas.android.com/apk/res/android"
android:layout_width="fill_parent"
android:layout_height="fill_parent"
android:orientation="vertical" >

<TextView
android:layout_width="fill_parent"
android:layout_height="wrap_content"
android:text="@string/hello" />
<TextView
style="@style/MyStyle"
android:layout_width="fill_parent"
android:text="it's text using style" />
<TextView
style="@style/MyStyle.GreenBold"
android:layout_width="fill_parent"
android:text="it's text using style of MyStyle.GreenBold" />
</LinearLayout>


Create style inheriting properties from another style


next:
- Apply style on whole application/activity as theme

Infolinks In Text Ads