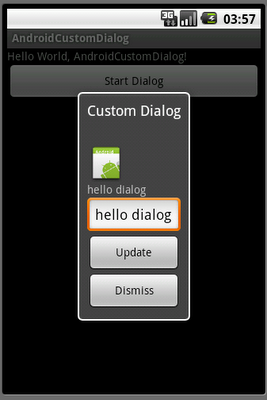
Create a XML in /res/layout/ folder to define the layout of the custom dialog.
eg. customlayout.xml
<LinearLayout xmlns:android="http://schemas.android.com/apk/res/android"
android:id="@+id/customdialog"
android:orientation="vertical"
android:layout_width="fill_parent"
android:layout_height="fill_parent"
android:padding="10dp"
>
<ImageView
android:layout_width="wrap_content"
android:layout_height="wrap_content"
android:src="@drawable/icon"
/>
<TextView
android:id="@+id/dialogtextview"
android:layout_width="wrap_content"
android:layout_height="wrap_content"
/>
<EditText
android:id="@+id/dialogedittext"
android:layout_width="fill_parent"
android:layout_height="wrap_content"
/>
<Button
android:id="@+id/dialogupdate"
android:layout_width="fill_parent"
android:layout_height="wrap_content"
android:text="Update"
/>
<Button
android:id="@+id/dialogdismiss"
android:layout_width="fill_parent"
android:layout_height="wrap_content"
android:text="Dismiss"
/>
</LinearLayout>
Java code, eg. AndroidCustomDialog.java
package com.AndroidCustomDialog;

import android.app.Activity;
import android.app.Dialog;
import android.os.Bundle;
import android.view.View;
import android.widget.Button;
import android.widget.EditText;
import android.widget.TextView;

public class AndroidCustomDialog extends Activity {

static final int CUSTOM_DIALOG_ID = 0;

TextView customDialog_TextView;
EditText customDialog_EditText;
Button customDialog_Update, customDialog_Dismiss;
;

   /** Called when the activity is first created. */
   @Override
   public void onCreate(Bundle savedInstanceState) {
       super.onCreate(savedInstanceState);
       setContentView(R.layout.main);

       Button buttonStartDialog = (Button)findViewById(R.id.startdialog);
       buttonStartDialog.setOnClickListener(new Button.OnClickListener(){

  @Override
  public void onClick(View arg0) {
   // TODO Auto-generated method stub
   showDialog(CUSTOM_DIALOG_ID);
  }
       });
   }

   private Button.OnClickListener customDialog_UpdateOnClickListener
   = new Button.OnClickListener(){

 @Override
 public void onClick(View arg0) {
  // TODO Auto-generated method stub
  customDialog_TextView.setText(customDialog_EditText.getText().toString());
 }

   };

   private Button.OnClickListener customDialog_DismissOnClickListener
   = new Button.OnClickListener(){

 @Override
 public void onClick(View arg0) {
  // TODO Auto-generated method stub
  dismissDialog(CUSTOM_DIALOG_ID);
 }

   };

@Override
protected Dialog onCreateDialog(int id) {
 // TODO Auto-generated method stub
 Dialog dialog = null;;
    switch(id) {
    case CUSTOM_DIALOG_ID:
     dialog = new Dialog(AndroidCustomDialog.this);

     dialog.setContentView(R.layout.customlayout);
     dialog.setTitle("Custom Dialog");

     customDialog_EditText = (EditText)dialog.findViewById(R.id.dialogedittext);
     customDialog_TextView = (TextView)dialog.findViewById(R.id.dialogtextview);
     customDialog_Update = (Button)dialog.findViewById(R.id.dialogupdate);
     customDialog_Dismiss = (Button)dialog.findViewById(R.id.dialogdismiss);

     customDialog_Update.setOnClickListener(customDialog_UpdateOnClickListener);
     customDialog_Dismiss.setOnClickListener(customDialog_DismissOnClickListener);

        break;
    }
    return dialog;
}
}
main.xml, simple with a button to start the custom dialog.
<?xml version="1.0" encoding="utf-8"?>
<LinearLayout xmlns:android="http://schemas.android.com/apk/res/android"
   android:orientation="vertical"
   android:layout_width="fill_parent"
   android:layout_height="fill_parent"
   >
<TextView
   android:layout_width="fill_parent"
   android:layout_height="wrap_content"
   android:text="@string/hello"
   />
<Button
   android:id="@+id/startdialog"
   android:layout_width="fill_parent"
   android:layout_height="wrap_content"
   android:text=" Start Dialog "
   />
</LinearLayout>
Please notice that the call-back function onCreateDialog() will be called when a dialog is requested for the first time, such that the content defined in onCreateDialog() will not be updated next time.
If you have some dynamic content changed in runtime, you can override the call-back method onPrepareDialog(), it will be called every time a dialog is opened. Override this method if you want to change any properties of the dialog each time it is opened. Refer to the post: Create custom dialog with dynamic content, updated in onPrepareDialog().
Next:
- Pass back data from dialog to activity
my android application taking more time to run..have any solutions
ReplyDeleteInstall "Intel x86 Atom System image" and "Intel x86 Emulator Accelerator(HAXM)" using android SDK manager. Make an avd with intel atom processor and start using it. It will be much faster than the previous state.
Deleteim using eclipse editor to run android application..each time im creating & deleting AVD..plz give me any solution
ReplyDeleteDo you means the Android Emulator boot-up and run in very slow?
ReplyDeleteYes, it's normal:(
Hai see emulator setting it target ill be in manual change to Automatic
ReplyDeleteHi its working good can you say how to send the edit text value to previous screen from Dialog activity
ReplyDeleteIn this example, both the main activity and the dialog are in the same class. You can create a global variable, it can be accessed by both the main activity and the dialog directlt.
DeleteRefer: Pass back data from dialog to activity.