Dec 27, 2013

android:spinnerMode="dialog"

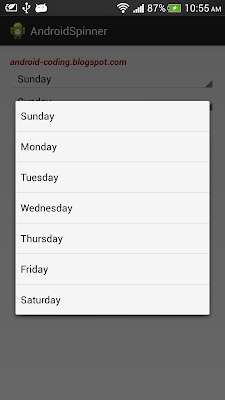
Example of Android Spinner without and with android:spinnerMode="dialog":

Normal Spinner without android:spinnerMode="dialog"

Spinner with android:spinnerMode="dialog"

<LinearLayout xmlns:android="http://schemas.android.com/apk/res/android"
    xmlns:tools="http://schemas.android.com/tools"
    android:layout_width="match_parent"
    android:layout_height="match_parent"
    android:orientation="vertical"
    android:paddingBottom="@dimen/activity_vertical_margin"
    android:paddingLeft="@dimen/activity_horizontal_margin"
    android:paddingRight="@dimen/activity_horizontal_margin"
    android:paddingTop="@dimen/activity_vertical_margin"
    tools:context=".MainActivity" >

    <TextView
        android:layout_width="wrap_content"
        android:layout_height="wrap_content"
        android:text="android-coding.blogspot.com"
        android:textColor="#A00000"
        android:textStyle="bold|italic" />

    <Spinner
        android:id="@+id/myspinner1"
        android:layout_width="fill_parent"
        android:layout_height="wrap_content" />
    <Spinner
        android:id="@+id/myspinner2"
        android:layout_width="fill_parent"
        android:layout_height="wrap_content"
        android:spinnerMode="dialog" />

</LinearLayout>

package com.example.androidspinner;

import android.os.Bundle;
import android.widget.ArrayAdapter;
import android.widget.Spinner;
import android.app.Activity;

public class MainActivity extends Activity {
 
 String[] dayOfWeek = {"Sunday", "Monday", "Tuesday",
   "Wednesday", "Thursday", "Friday", "Saturday"};

 @Override
 protected void onCreate(Bundle savedInstanceState) {
  super.onCreate(savedInstanceState);
  setContentView(R.layout.activity_main);

        Spinner MySpinner1 = (Spinner)findViewById(R.id.myspinner1);
  ArrayAdapter<String> myAdapter1 = new 
    ArrayAdapter<String>(this, android.R.layout.simple_spinner_item, dayOfWeek);
        myAdapter1.setDropDownViewResource(android.R.layout.simple_spinner_dropdown_item);
        MySpinner1.setAdapter(myAdapter1);
        
        Spinner MySpinner2 = (Spinner)findViewById(R.id.myspinner2);
  ArrayAdapter<String> myAdapter2 = new 
    ArrayAdapter<String>(this, android.R.layout.simple_spinner_item, dayOfWeek);
        myAdapter2.setDropDownViewResource(android.R.layout.simple_spinner_dropdown_item);
        MySpinner2.setAdapter(myAdapter2);
 }

}

Dec 23, 2013

Google Maps Android API Utility Library

Google Maps Android API Utility Library is an open-source library of classes that are useful for a range of applications, to add advanced features to your maps.

The source of the Google Maps Android API Utility Library is available on GitHub. The GitHub repository includes the utility classes and a demonstration application that illustrates the use of each class. To get started, follow the setup guide for Eclipse. Alternatively, the project's website includes a getting-started guide for Android Studio/Gradle and Maven. The reference documentation is also available on GitHub. Below is an overview of the utilities in the library.

This video discusses the utility library, with a focus on polyline decoding, spherical geometry, and bubble icons:

Dec 16, 2013

Example of using TextWatcher

Example of using TextWatcher


package com.example.androidtextwatcher;

import android.os.Bundle;
import android.app.Activity;
import android.text.Editable;
import android.text.TextWatcher;
import android.widget.EditText;
import android.widget.TextView;

public class MainActivity extends Activity {
 
 EditText input;
 TextView info, cont;

 @Override
 protected void onCreate(Bundle savedInstanceState) {
  super.onCreate(savedInstanceState);
  setContentView(R.layout.activity_main);
  
  input = (EditText)findViewById(R.id.input);
  info = (TextView)findViewById(R.id.info);
  cont = (TextView)findViewById(R.id.cont);
  input.addTextChangedListener(myTextWatcher);
 }

 TextWatcher myTextWatcher =
   new TextWatcher(){

    @Override
    public void afterTextChanged(Editable s) {
     /* 
      * This method is called to notify you that, 
      * somewhere within s, the text has been changed.
      */
     //info.setText("");
     //cont.setText(s.toString());
    }

    @Override
    public void beforeTextChanged(CharSequence s, 
      int start, int count, int after) {
     /*
      * This method is called to notify you that, 
      * within s, the count characters beginning at 
      * start are about to be replaced by new text 
      * with length after.
      */
     info.setText("beforeTextChanged - " + start + " " + count + " " + after);
     cont.setText(s.toString());
    }

    @Override
    public void onTextChanged(CharSequence s, 
      int start, int before, int count) {
     /*
      * This method is called to notify you that, 
      * within s, the count characters beginning 
      * at start have just replaced old text that 
      * had length before.
      */
     info.setText("onTextChanged - " + start + " " + before + " " + count);
     cont.setText(s.toString());
    }};

}


<LinearLayout xmlns:android="http://schemas.android.com/apk/res/android"
    xmlns:tools="http://schemas.android.com/tools"
    android:layout_width="match_parent"
    android:layout_height="match_parent"
    android:orientation="vertical"
    android:paddingBottom="@dimen/activity_vertical_margin"
    android:paddingLeft="@dimen/activity_horizontal_margin"
    android:paddingRight="@dimen/activity_horizontal_margin"
    android:paddingTop="@dimen/activity_vertical_margin"
    tools:context=".MainActivity" >

    <TextView
        android:layout_width="wrap_content"
        android:layout_height="wrap_content"
        android:text="android-coding.blogspot.com"
        android:textColor="#A00000"
        android:textStyle="bold|italic" />
    <EditText
        android:id="@+id/input"
        android:layout_width="match_parent"
        android:layout_height="wrap_content"/>
    <TextView
        android:id="@+id/info"
        android:layout_width="wrap_content"
        android:layout_height="wrap_content"/>
    <TextView
        android:id="@+id/cont"
        android:layout_width="wrap_content"
        android:layout_height="wrap_content"/>

</LinearLayout>

Dec 15, 2013

Set layout programmatically

This example show how to set paddings and margins programmatically with Java code.

set paddings and margins programmatically

package com.example.androidadjlayout;

import android.os.Bundle;
import android.app.Activity;
import android.widget.ImageView;
import android.widget.LinearLayout;
import android.widget.LinearLayout.LayoutParams;
import android.widget.SeekBar;
import android.widget.SeekBar.OnSeekBarChangeListener;

public class MainActivity extends Activity {
 
 LinearLayout mainLayout;
 SeekBar settingPadding, settingMargin2;
 ImageView image1, image2;

 @Override
 protected void onCreate(Bundle savedInstanceState) {
  super.onCreate(savedInstanceState);
  setContentView(R.layout.activity_main);
  mainLayout = (LinearLayout)findViewById(R.id.mainlayout);
  settingPadding = (SeekBar)findViewById(R.id.setmainpadding);
  settingMargin2 = (SeekBar)findViewById(R.id.setimage2margin);
  image1 = (ImageView)findViewById(R.id.image1);
  image2 = (ImageView)findViewById(R.id.image2);
  
  settingPadding.setOnSeekBarChangeListener(new OnSeekBarChangeListener(){

   @Override
   public void onProgressChanged(SeekBar seekBar, int progress, 
     boolean fromUser) {
    mainLayout.setPadding(progress, progress, progress, progress);
   }

   @Override
   public void onStartTrackingTouch(SeekBar arg0) {
   }

   @Override
   public void onStopTrackingTouch(SeekBar arg0) {
   }});
  
  settingMargin2.setOnSeekBarChangeListener(new OnSeekBarChangeListener(){
   
   @Override
   public void onProgressChanged(SeekBar seekBar, int progress,
     boolean fromUser) {
    LinearLayout.LayoutParams layoutParams = (LayoutParams) image2.getLayoutParams();
    layoutParams.setMargins(progress, progress, progress, progress);
    image2.setLayoutParams(layoutParams);
   }

   @Override
   public void onStartTrackingTouch(SeekBar seekBar) {
   }

   @Override
   public void onStopTrackingTouch(SeekBar seekBar) {
   }});
 }

}


<LinearLayout xmlns:android="http://schemas.android.com/apk/res/android"
    xmlns:tools="http://schemas.android.com/tools"
    android:id="@+id/mainlayout"
    android:layout_width="match_parent"
    android:layout_height="match_parent"
    android:paddingBottom="5dp"
    android:paddingLeft="5dp"
    android:paddingRight="5dp"
    android:paddingTop="5dp"
    android:orientation="vertical"
    tools:context=".MainActivity"
    android:background="#303030" >

    <TextView
        android:layout_width="wrap_content"
        android:layout_height="wrap_content"
        android:textColor="#A00000"
        android:textStyle="bold|italic"
        android:text="android-coding.blogspot.com" />
    <SeekBar 
        android:id="@+id/setmainpadding"
        android:layout_width="match_parent"
        android:layout_height="wrap_content"
        android:max="100"
        android:progress="5"/>
    <SeekBar 
        android:id="@+id/setimage2margin"
        android:layout_width="match_parent"
        android:layout_height="wrap_content"
        android:max="100"
        android:progress="5"/>
    <ImageView
        android:id="@+id/image1"
        android:layout_width="wrap_content"
        android:layout_height="wrap_content"
        android:src="@drawable/ic_launcher"
        android:background="#505050"/>
    <ImageView
        android:id="@+id/image2"
        android:layout_width="match_parent"
        android:layout_height="match_parent"
        android:layout_margin="5dp"
        android:src="@drawable/ic_launcher"
        android:background="#808080" />

</LinearLayout>

Dec 12, 2013

Game Physics with Liquid Fun

Game On!: Game Physics with Liquid Fun

Todd Kerpelman and Wolff Dobson share some of the exciting new details on the open-source release of LiquidFun, a new C++ 2D physics library that makes it easier for developers to add realistic physics to their games.

Based on Box2D, LiquidFun features particle-based fluid simulation. Game developers can use it for new game mechanics and add realistic physics to game play. Designers can use the library to create beautiful fluid interactive experiences.

For more information:
http://android-developers.blogspot.com/

To get the library:
http://google.github.io/liquidfun/

Build mobile apps with Chrome WebView

Build mobile apps with Chrome WebView - Chrome Dev Summit 2013 (Matt Gaunt)

Learn how to create mobile UIs with a mix of the latest HTML5 features and native UIs and features.

Slides: http://gauntface.co.uk/presentations/chrome-dev-summit-2013/chrome-webview/

Dec 10, 2013

setImageDrawable vs setImageResource vs setBackground

Example show usage of setImageDrawable(), setImageResource(), setBackgroundDrawable(), setBackgroundResource and setBackground().

package com.example.androidsetimage;

import android.os.Bundle;
import android.app.Activity;
import android.widget.Button;
import android.widget.EditText;
import android.widget.ImageView;
import android.widget.TextView;

public class MainActivity extends Activity {

 @Override
 protected void onCreate(Bundle savedInstanceState) {
  super.onCreate(savedInstanceState);
  setContentView(R.layout.activity_main);
  
  ImageView image1 = (ImageView)findViewById(R.id.image1);
  ImageView image2 = (ImageView)findViewById(R.id.image2);
  ImageView image3 = (ImageView)findViewById(R.id.image3);
  TextView text4 = (TextView)findViewById(R.id.textview4);
  Button button5 = (Button)findViewById(R.id.button5);
  EditText edittext6 = (EditText)findViewById(R.id.edittext6);
  
  image1.setImageDrawable(getResources().getDrawable(R.drawable.ic_launcher));
  image2.setImageResource(R.drawable.ic_launcher);
  
  //Requires API 16
  image3.setBackground(getResources().getDrawable(R.drawable.ic_launcher));
  
  //deprecated
  text4.setBackgroundDrawable(getResources().getDrawable(R.drawable.ic_launcher));
  
  button5.setBackgroundResource(R.drawable.ic_launcher);
  
  //Requires API 16
  edittext6.setBackground(getResources().getDrawable(R.drawable.ic_launcher));
 }

}


<LinearLayout xmlns:android="http://schemas.android.com/apk/res/android"
    xmlns:tools="http://schemas.android.com/tools"
    android:layout_width="match_parent"
    android:layout_height="match_parent"
    android:paddingBottom="@dimen/activity_vertical_margin"
    android:paddingLeft="@dimen/activity_horizontal_margin"
    android:paddingRight="@dimen/activity_horizontal_margin"
    android:paddingTop="@dimen/activity_vertical_margin"
    android:orientation="vertical"
    tools:context=".MainActivity" >

    <TextView
        android:layout_width="wrap_content"
        android:layout_height="wrap_content"
        android:textColor="#303030"
        android:textStyle="bold|italic"
        android:text="android-coding.blogspot.com" />
    <ImageView
        android:id="@+id/image1"
        android:layout_width="wrap_content"
        android:layout_height="wrap_content"/>
    <ImageView
        android:id="@+id/image2"
        android:layout_width="wrap_content"
        android:layout_height="wrap_content"/>
    <ImageView
        android:id="@+id/image3"
        android:layout_width="wrap_content"
        android:layout_height="wrap_content"/>
    <TextView
        android:id="@+id/textview4"
        android:layout_width="wrap_content"
        android:layout_height="wrap_content"
        android:text="TextView 4"/>
 <Button
        android:id="@+id/button5"
        android:layout_width="wrap_content"
        android:layout_height="wrap_content"
        android:text="Button 5"/>
 <EditText
        android:id="@+id/edittext6"
        android:layout_width="match_parent"
        android:layout_height="wrap_content"
        android:hint="Hello android-coding"/>

</LinearLayout>


Oct 17, 2013

Add View programmatically, using addView() and addContentView()

This example demonstrate how to add View programmatically:

Add View Programmatically, using addView() and addContentView()

newButton ("Hello") is added to the existing layout using Layout.addView(). anotherLayout and anotherButton ("I'm another button") are added using addContentView().

package com.example.androidview;

import android.os.Bundle;
import android.app.Activity;
import android.widget.Button;
import android.widget.LinearLayout;

public class MainActivity extends Activity {

 @Override
 protected void onCreate(Bundle savedInstanceState) {
  super.onCreate(savedInstanceState);
  setContentView(R.layout.activity_main);
  
  LinearLayout mainLayout = 
    (LinearLayout)findViewById(R.id.mainlayout);
  
  //newButton added to the existing layout
  Button newButton = new Button(this);
  newButton.setText("Hello");
  mainLayout.addView(newButton);
  
  //anotherLayout and anotherButton added 
  //using addContentView()
  LinearLayout anotherLayout = new LinearLayout(this);
  LinearLayout.LayoutParams linearLayoutParams = 
    new LinearLayout.LayoutParams(
      LinearLayout.LayoutParams.WRAP_CONTENT,
      LinearLayout.LayoutParams.WRAP_CONTENT);
  
  Button anotherButton = new Button(this);
  anotherButton.setText("I'm another button");
  anotherLayout.addView(anotherButton);
  
  addContentView(anotherLayout, linearLayoutParams);
 }

}


<LinearLayout xmlns:android="http://schemas.android.com/apk/res/android"
    xmlns:tools="http://schemas.android.com/tools"
    android:layout_width="match_parent"
    android:layout_height="match_parent"
    android:paddingBottom="@dimen/activity_vertical_margin"
    android:paddingLeft="@dimen/activity_horizontal_margin"
    android:paddingRight="@dimen/activity_horizontal_margin"
    android:paddingTop="@dimen/activity_vertical_margin"
    android:orientation="vertical"
    tools:context=".MainActivity"
    android:background="#000080"
    android:id="@+id/mainlayout">

    <TextView
        android:layout_width="wrap_content"
        android:layout_height="wrap_content"
        android:textColor="#ffffff"
        android:textStyle="bold|italic"
        android:textSize="50sp"
        android:text="android-coding.blogspot.com" />

</LinearLayout>


Oct 9, 2013

Example of using HandlerThread

android.os.HandlerThread is a handy class for starting a new thread that has a looper. The looper can then be used to create handler classes. Note that start() must still be called.

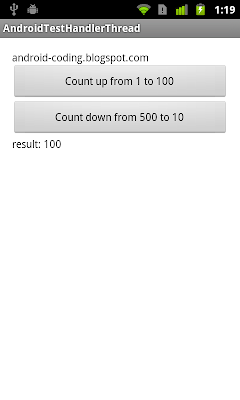
This is a example to implement our custom HandlerThread class, CustomHandlerThread. Start it in onResume() and stop it in onPause().

Example of using HandlerThread

package com.example.androidtesthandlerthread;

import android.os.Bundle;
import android.os.Handler;
import android.os.HandlerThread;
import android.os.Message;
import android.view.View;
import android.view.View.OnClickListener;
import android.widget.Button;
import android.widget.TextView;
import android.app.Activity;

public class MainActivity extends Activity implements Handler.Callback{

 public class CustomHandlerThread extends HandlerThread implements Handler.Callback{
  
  public static final int MSG_FINISHED = 100;
  public static final int MSG_COUNT_UP = 101;
  public static final int MSG_COUNT_DOWN = 102;

  private Handler handler, callback;

  public CustomHandlerThread(String name) {
   super(name);
   // TODO Auto-generated constructor stub
  }

  public CustomHandlerThread(String name, int priority) {
   super(name, priority);
   // TODO Auto-generated constructor stub
  }
  
  public void setCallback(Handler cb){
   callback = cb;
  }

  @Override
  protected void onLooperPrepared() {
   handler = new Handler(getLooper(), this);
  }

  @Override
  public boolean handleMessage(Message msg) {
   
   int data1 = msg.arg1;
   int data2 = msg.arg2;
   int counter;
   
   switch(msg.what){
   case MSG_COUNT_UP:
    for(counter=data1; counter < data2; counter++){
     //...
    }
    callback.sendMessage(Message.obtain(null, MSG_FINISHED, counter));
    break;
   case MSG_COUNT_DOWN:
    for(counter=data1; counter > data2; counter--){
     //...
    }
    callback.sendMessage(Message.obtain(null, MSG_FINISHED, counter));
    break;
   }
   return true;
  }
  
  public void querySomething(int start, int end){
   if(start > end){
    Message msg = Message.obtain(
      null,   //Handler h 
      MSG_COUNT_DOWN, //int what 
      start,   //int arg1 
      end);   //int arg2
    handler.sendMessage(msg);
   }else if(start < end){
    Message msg = Message.obtain(
      null,   //Handler h 
      MSG_COUNT_UP, //int what 
      start,   //int arg1 
      end);   //int arg2
    handler.sendMessage(msg);
   }
  }
 }
 
 private final static String MyName = "My CustomHandlerThread";
 private CustomHandlerThread myCustomHandlerThread;
 private Handler myHandler;
 
 Button btnUp, btnDown;
 TextView textResult;

 @Override
 protected void onCreate(Bundle savedInstanceState) {
  super.onCreate(savedInstanceState);
  setContentView(R.layout.activity_main);
  btnUp = (Button)findViewById(R.id.buttonup);
  btnDown = (Button)findViewById(R.id.buttondown);
  textResult = (TextView)findViewById(R.id.result);
  
  btnUp.setOnClickListener(new OnClickListener(){

   @Override
   public void onClick(View arg0) {
    myCustomHandlerThread.querySomething(1, 100);
   }});
  
  btnDown.setOnClickListener(new OnClickListener(){

   @Override
   public void onClick(View arg0) {
    myCustomHandlerThread.querySomething(500, 10);
   }});
  
  myHandler = new Handler(this);
 }
 
 @Override
 protected void onResume() {
  super.onResume();
  
  myCustomHandlerThread = new CustomHandlerThread(MyName);
  myCustomHandlerThread.setCallback(myHandler);
  myCustomHandlerThread.start();
 }

 @Override
 protected void onPause() {
  super.onPause();
  
  myCustomHandlerThread.setCallback(null);
  myCustomHandlerThread.quit();
  myCustomHandlerThread = null;
 }

 @Override
 public boolean handleMessage(Message arg0) {
  int result = (Integer)arg0.obj;
  textResult.setText("result: " + result);
  return false;
 }

}


<LinearLayout xmlns:android="http://schemas.android.com/apk/res/android"
    xmlns:tools="http://schemas.android.com/tools"
    android:layout_width="match_parent"
    android:layout_height="match_parent"
    android:paddingBottom="@dimen/activity_vertical_margin"
    android:paddingLeft="@dimen/activity_horizontal_margin"
    android:paddingRight="@dimen/activity_horizontal_margin"
    android:paddingTop="@dimen/activity_vertical_margin"
    android:orientation="vertical"
    tools:context=".MainActivity" >

    <TextView
        android:layout_width="wrap_content"
        android:layout_height="wrap_content"
        android:text="android-coding.blogspot.com" />
    
    <Button
        android:id="@+id/buttonup"
        android:layout_width="match_parent"
        android:layout_height="wrap_content"
        android:text="Count up from 1 to 100" />
    <Button
        android:id="@+id/buttondown"
        android:layout_width="match_parent"
        android:layout_height="wrap_content"
        android:text="Count down from 500 to 10" />
    <TextView
        android:id="@+id/result"
        android:layout_width="match_parent"
        android:layout_height="wrap_content" />

</LinearLayout>


Oct 5, 2013

ToggleButton and Switch

android.widget.ToggleButton is a button allows the user to change a setting between two states, ON and OFF. Android 4.0 (API level 14) introduces another kind of toggle button, android.widget.Switch, that provides a slider control. The ToggleButton and Switch controls are subclasses of CompoundButton and function in the same manner, so you can implement their behavior the same way. ~ reference: Toggle Buttons guide.

Example:
ToggleButton and Switch


<LinearLayout xmlns:android="http://schemas.android.com/apk/res/android"
    xmlns:tools="http://schemas.android.com/tools"
    android:layout_width="match_parent"
    android:layout_height="match_parent"
    android:orientation="vertical"
    android:paddingBottom="@dimen/activity_vertical_margin"
    android:paddingLeft="@dimen/activity_horizontal_margin"
    android:paddingRight="@dimen/activity_horizontal_margin"
    android:paddingTop="@dimen/activity_vertical_margin"
    tools:context=".MainActivity" >

    <TextView
        android:layout_width="wrap_content"
        android:layout_height="wrap_content"
        android:text="android-coding.blogspot.com" />
    
    <TextView
        android:layout_width="wrap_content"
        android:layout_height="wrap_content"
        android:text="ToogleSwitch" />
    <ToggleButton
        android:id="@+id/mytogglebutton"
        android:layout_width="wrap_content"
        android:layout_height="wrap_content"
        android:textOn="ToggleButton On"
        android:textOff="ToggleButton Off" />
    
    <TextView
        android:layout_width="wrap_content"
        android:layout_height="wrap_content"
        android:text="Switch" />
    <!-- Switch require API Level 14 -->
    <Switch
        android:id="@+id/myswitch"
        android:layout_width="wrap_content"
        android:layout_height="wrap_content"
        android:textOn="Switch On"
        android:textOff="Switch Off" />
    
    <TextView
        android:id="@+id/info"
        android:layout_width="wrap_content"
        android:layout_height="wrap_content" />

</LinearLayout>


package com.example.androidswitch;

import android.os.Bundle;
import android.widget.CompoundButton;
import android.widget.Switch;
import android.widget.TextView;
import android.widget.ToggleButton;
import android.app.Activity;

public class MainActivity extends Activity {
 
 ToggleButton myToggleButton;
 Switch mySwitch;
 TextView info;

 @Override
 protected void onCreate(Bundle savedInstanceState) {
  super.onCreate(savedInstanceState);
  setContentView(R.layout.activity_main);
  
  info = (TextView)findViewById(R.id.info);
  myToggleButton = (ToggleButton)findViewById(R.id.mytogglebutton);
  myToggleButton.setOnCheckedChangeListener(myOnCheckedChangeListener);
  
  
  mySwitch = (Switch)findViewById(R.id.myswitch);
  mySwitch.setOnCheckedChangeListener(myOnCheckedChangeListener);
 }
 
 CompoundButton.OnCheckedChangeListener myOnCheckedChangeListener =
   new CompoundButton.OnCheckedChangeListener(){

    @Override
    public void onCheckedChanged(CompoundButton buttonView, boolean isChecked) {
     info.setText(
       "Button: " + buttonView.toString() + "\n" +
       "icChecked: " + String.valueOf(isChecked));
    }
  
 };
}


Oct 2, 2013

Change color of View by applying ColorFilter

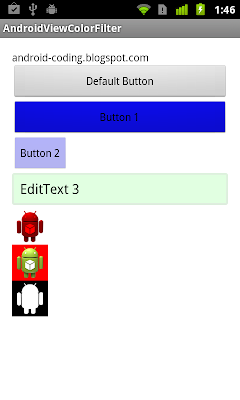
The example change color of Views (Button, EditText and ImageView) by applying ColorFilter of various PorterDuffColorFilter.

Views with ColorFilter of various PorterDuffColorFilter
Change color of View by applying ColorFilter


package com.example.androidviewcolorfilter;

import android.os.Bundle;
import android.widget.Button;
import android.widget.EditText;
import android.widget.ImageView;
import android.app.Activity;
import android.graphics.Color;
import android.graphics.ColorFilter;
import android.graphics.PorterDuff;
import android.graphics.PorterDuffColorFilter;

public class MainActivity extends Activity {
 
 @Override
 protected void onCreate(Bundle savedInstanceState) {
  super.onCreate(savedInstanceState);
  setContentView(R.layout.activity_main);
  
  Button button1 = (Button)findViewById(R.id.button1);
  Button button2 = (Button)findViewById(R.id.button2);
  EditText edittext3 = (EditText)findViewById(R.id.edittext3);
  ImageView imageview4 = (ImageView)findViewById(R.id.imageview4);
  ImageView imageview5 = (ImageView)findViewById(R.id.imageview5);
  ImageView imageview6 = (ImageView)findViewById(R.id.imageview6);
  
  //Solid Blue
  ColorFilter filter1 = new PorterDuffColorFilter(
    Color.BLUE, PorterDuff.Mode.MULTIPLY);
  //Transparency Blue
  ColorFilter filter2 = new PorterDuffColorFilter(
    Color.BLUE & 0x00ffffff | 0x50000000, 
    PorterDuff.Mode.MULTIPLY);
  
  ColorFilter filter3 = new PorterDuffColorFilter(
    0x2000FF00, 
    PorterDuff.Mode.MULTIPLY);
  
  ColorFilter filter4 = new PorterDuffColorFilter(
    Color.RED, 
    PorterDuff.Mode.MULTIPLY);
  ColorFilter filter5 = new PorterDuffColorFilter(
    Color.RED, 
    PorterDuff.Mode.DST_ATOP);
  ColorFilter filter6 = new PorterDuffColorFilter(
    Color.BLACK, 
    PorterDuff.Mode.XOR);
  
  button1.getBackground().setColorFilter(filter1);
  button2.getBackground().setColorFilter(filter2);
  edittext3.getBackground().setColorFilter(filter3);
  imageview4.setColorFilter(filter4);
  imageview5.setColorFilter(filter5);
  imageview6.setColorFilter(filter6);
 }

}


<LinearLayout xmlns:android="http://schemas.android.com/apk/res/android"
    xmlns:tools="http://schemas.android.com/tools"
    android:layout_width="match_parent"
    android:layout_height="match_parent"
    android:paddingBottom="@dimen/activity_vertical_margin"
    android:paddingLeft="@dimen/activity_horizontal_margin"
    android:paddingRight="@dimen/activity_horizontal_margin"
    android:paddingTop="@dimen/activity_vertical_margin"
    android:orientation="vertical"
    tools:context=".MainActivity" >

    <TextView
        android:layout_width="wrap_content"
        android:layout_height="wrap_content"
        android:text="android-coding.blogspot.com" />
    <Button
        android:id="@+id/button0"
        android:layout_width="match_parent"
        android:layout_height="wrap_content"
        android:text="Default Button" />
    <Button
        android:id="@+id/button1"
        android:layout_width="match_parent"
        android:layout_height="wrap_content"
        android:text="Button 1" />
    <Button
        android:id="@+id/button2"
        android:layout_width="wrap_content"
        android:layout_height="wrap_content"
        android:text="Button 2" />
 <EditText
        android:id="@+id/edittext3"
        android:layout_width="match_parent"
        android:layout_height="wrap_content"
        android:text="EditText 3" />
 <ImageView
     android:id="@+id/imageview4"
        android:layout_width="wrap_content"
        android:layout_height="wrap_content"
        android:src="@drawable/ic_launcher"/>
 <ImageView
     android:id="@+id/imageview5"
        android:layout_width="wrap_content"
        android:layout_height="wrap_content"
        android:src="@drawable/ic_launcher"/>
 <ImageView
     android:id="@+id/imageview6"
        android:layout_width="wrap_content"
        android:layout_height="wrap_content"
        android:src="@drawable/ic_launcher"/>
    
</LinearLayout>


Sep 29, 2013

Request focus on a specified EditText view in startup, in XML

Last example show Java code to "Request focus on a specified EditText view in startup, by calling requestFocus()". Alternative, it can be achieve by specifying <requestFocus /> in XML.

It's a example to request focus on edittext3, modify layout from last example.

    <EditText
        android:id="@+id/edittext3"
        android:layout_width="match_parent"
        android:layout_height="wrap_content" >
        <requestFocus />
    </EditText>


focus on edittext3
Focus on edittext3, defined in XML.

Request focus on a specified EditText view in startup, by calling requestFocus()

The example force a specified EditText, editText2, to be focused when the app start-up, by calling its requestFocus().

Remark: somebody advise to specify android:focusable="true" and android:focusableInTouchMode="true" in XML.

For reference, I display the focus view in onCreate(). And also implement OnGlobalLayoutListener() to monitor the focus view after layout finished, and when focus view changed.

focus on a specified EditText view


package com.example.androidfocus;

import android.os.Bundle;
import android.app.Activity;
import android.view.View;
import android.view.ViewTreeObserver;
import android.view.ViewTreeObserver.OnGlobalLayoutListener;
import android.widget.EditText;
import android.widget.TextView;
import android.widget.Toast;

public class MainActivity extends Activity {
 
 TextView textInfo;
 EditText editText1, editText2, editText3;

 @Override
 protected void onCreate(Bundle savedInstanceState) {
  super.onCreate(savedInstanceState);
  setContentView(R.layout.activity_main);
  
  textInfo = (TextView)findViewById(R.id.info);
  editText1 = (EditText)findViewById(R.id.edittext1);
  editText2 = (EditText)findViewById(R.id.edittext2);
  editText3 = (EditText)findViewById(R.id.edittext3);
  
  editText2.requestFocus();
  
  View focusViewOnCreate = getWindow().getCurrentFocus();
  if(focusViewOnCreate == null){
   Toast.makeText(MainActivity.this, 
     "NO View get focus onCreate()!", Toast.LENGTH_LONG).show();
  }else{
   Toast.makeText(MainActivity.this, 
     "focus onCreate(): " + focusViewOnCreate.toString(), 
     Toast.LENGTH_LONG).show();
  }
  
  ViewTreeObserver viewTreeObserver = textInfo.getViewTreeObserver();
  viewTreeObserver.addOnGlobalLayoutListener(new OnGlobalLayoutListener(){

   @Override
   public void onGlobalLayout() {
    /*
     *  onGlobalLayout() will be called whenthe global layout state 
     *  or the visibility of views within the view tree changes.
     *  
     *  In this case, it will be called after layout displayed, or 
     *  focus view changed. 
     */
    
    View focusViewOnGlobalLayout = getWindow().getCurrentFocus();
    if(focusViewOnGlobalLayout == null){
     textInfo.setText("NO View get Focus!");
    }else{
     textInfo.setText("Focus View:\n" +  focusViewOnGlobalLayout.toString());
    }
   }});
 }

}


<LinearLayout xmlns:android="http://schemas.android.com/apk/res/android"
    xmlns:tools="http://schemas.android.com/tools"
    android:layout_width="match_parent"
    android:layout_height="match_parent"
    android:orientation="vertical"
    android:paddingBottom="@dimen/activity_vertical_margin"
    android:paddingLeft="@dimen/activity_horizontal_margin"
    android:paddingRight="@dimen/activity_horizontal_margin"
    android:paddingTop="@dimen/activity_vertical_margin"
    tools:context=".MainActivity" >

    <TextView
        android:layout_width="wrap_content"
        android:layout_height="wrap_content"
        android:text="android-coding.blogspot.com" />

    <EditText
        android:id="@+id/edittext1"
        android:layout_width="match_parent"
        android:layout_height="wrap_content"
        android:text="android-coding" />

    <EditText
        android:id="@+id/edittext2"
        android:layout_width="match_parent"
        android:layout_height="wrap_content"
        android:text="android-coding.blogspot.com" />

    <EditText
        android:id="@+id/edittext3"
        android:layout_width="match_parent"
        android:layout_height="wrap_content"/>
    <TextView
        android:id="@+id/info"
        android:layout_width="wrap_content"
        android:layout_height="wrap_content" />

</LinearLayout>


Alternatively, you can also Request focus by defining in layout XML.

Sep 22, 2013

Create Dialog with List, using AlertDialog.Builder setItems()

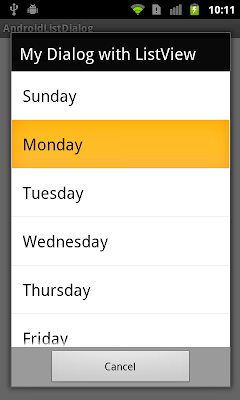
You can add list to Dialog, use the setItems() method of AlertDialog.Builder. Because the list appears in the dialog's content area, the dialog cannot show both a message and list.


Dialog with ListView, using AlertDialog.Builder setItems()

package com.example.androidlistdialog;

import android.os.Bundle;
import android.view.View;
import android.view.View.OnClickListener;
import android.widget.Button;
import android.widget.Toast;
import android.app.Activity;
import android.app.AlertDialog;
import android.content.DialogInterface;

public class MainActivity extends Activity {
 
 Button buttonOpenDialog;

 @Override
 protected void onCreate(Bundle savedInstanceState) {
  super.onCreate(savedInstanceState);
  setContentView(R.layout.activity_main);
  buttonOpenDialog = (Button)findViewById(R.id.opendialog);
  buttonOpenDialog.setOnClickListener(new OnClickListener(){

   @Override
   public void onClick(View arg0) {
    openDialog();
   }});
 }

 private void openDialog(){
  
  final String[] days = {
    "Sunday", "Monday", "Tuesday",
    "Wednesday", "Thursday", "Friday", "Saturday"  
  };
  
  AlertDialog.Builder myDialog = 
    new AlertDialog.Builder(MainActivity.this);
  myDialog.setTitle("My Dialog with ListView");
  myDialog.setItems(days, new DialogInterface.OnClickListener(){

   @Override
   public void onClick(DialogInterface dialog, int which) {
    String item = days[which];
    Toast.makeText(MainActivity.this, 
      item, Toast.LENGTH_LONG).show();
    
   }});
  
  myDialog.setNegativeButton("Cancel", null);
  
  myDialog.show();
 }

}


<LinearLayout xmlns:android="http://schemas.android.com/apk/res/android"
    xmlns:tools="http://schemas.android.com/tools"
    android:layout_width="match_parent"
    android:layout_height="match_parent"
    android:paddingBottom="@dimen/activity_vertical_margin"
    android:paddingLeft="@dimen/activity_horizontal_margin"
    android:paddingRight="@dimen/activity_horizontal_margin"
    android:paddingTop="@dimen/activity_vertical_margin"
    android:orientation="vertical"
    tools:context=".MainActivity" >

    <TextView
        android:layout_width="wrap_content"
        android:layout_height="wrap_content"
        android:text="android-coding.blogspot.com" />
    <Button 
        android:id="@+id/opendialog"
        android:layout_width="wrap_content"
        android:layout_height="wrap_content"
        android:text="Open Dialog"/>

</LinearLayout>


Related: Create Dialog with traditional ListView, using AlertDialog.Builder.

Sep 21, 2013

Create Dialog with ListView, using AlertDialog.Builder.

Dialog with ListView

package com.example.androidlistdialog;

import android.os.Bundle;
import android.view.View;
import android.view.View.OnClickListener;
import android.widget.AdapterView;
import android.widget.AdapterView.OnItemClickListener;
import android.widget.ArrayAdapter;
import android.widget.Button;
import android.widget.Toast;
import android.widget.ListView;
import android.app.Activity;
import android.app.AlertDialog;
import android.graphics.Color;

public class MainActivity extends Activity {
 
 Button buttonOpenDialog;

 @Override
 protected void onCreate(Bundle savedInstanceState) {
  super.onCreate(savedInstanceState);
  setContentView(R.layout.activity_main);
  buttonOpenDialog = (Button)findViewById(R.id.opendialog);
  buttonOpenDialog.setOnClickListener(new OnClickListener(){

   @Override
   public void onClick(View arg0) {
    openDialog();
   }});
 }

 private void openDialog(){
  
  String[] days = {
    "Sunday", "Monday", "Tuesday",
    "Wednesday", "Thursday", "Friday", "Saturday"  
  };
  
  AlertDialog.Builder myDialog = 
    new AlertDialog.Builder(MainActivity.this);
  myDialog.setTitle("My Dialog with ListView");
  
  ListView listView = new ListView(MainActivity.this);
  listView.setBackgroundColor(Color.argb(255, 255, 255, 255));
  ArrayAdapter<String> adapter = 
    new ArrayAdapter<String>(this, 
      android.R.layout.simple_list_item_1, days);
  listView.setAdapter(adapter);
  
  listView.setOnItemClickListener(new OnItemClickListener(){

   @Override
   public void onItemClick(AdapterView<?> parent, 
     View view, int position, long id) {
    String item = (String)parent.getItemAtPosition(position);
    Toast.makeText(MainActivity.this, 
      item, Toast.LENGTH_LONG).show();
   }});
  
  myDialog.setNegativeButton("Cancel", null);
  
  myDialog.setView(listView);
  myDialog.show();
 }

}


<LinearLayout xmlns:android="http://schemas.android.com/apk/res/android"
    xmlns:tools="http://schemas.android.com/tools"
    android:layout_width="match_parent"
    android:layout_height="match_parent"
    android:paddingBottom="@dimen/activity_vertical_margin"
    android:paddingLeft="@dimen/activity_horizontal_margin"
    android:paddingRight="@dimen/activity_horizontal_margin"
    android:paddingTop="@dimen/activity_vertical_margin"
    android:orientation="vertical"
    tools:context=".MainActivity" >

    <TextView
        android:layout_width="wrap_content"
        android:layout_height="wrap_content"
        android:text="android-coding.blogspot.com" />
    <Button 
        android:id="@+id/opendialog"
        android:layout_width="wrap_content"
        android:layout_height="wrap_content"
        android:text="Open Dialog"/>

</LinearLayout>


Related: Create Dialog with List, using AlertDialog.Builder setItems()

Sep 20, 2013

New Features in the Google Maps Mobile APIs for Android and iOS

Maps Live: New Features in the Google Maps Mobile APIs for Android and iOS

Google Maps API Team members Daniel Schramm and Chris Broadfoot discuss exciting new cross platform features in the Google Maps Android API v2 (http://goo.gl/5k18Es) and the Google Maps SDK for iOS (http://goo.gl/r2c2e). New to the latest versions are map padding, marker rotation, and flat markers.

Sep 11, 2013

Common user experience issues

Android Design in Action: Common UX Issues

This video run through a top-ten-style list of the most common user experience issues.

Sep 9, 2013

Html.ImageGetter load image from internet

Last example "Display HTML String with multi images on TextView, with Html.ImageGetter" load image from local drawable. This example demonstrate how to implement Html.ImageGetter() to load image from internet, and also how to handle images from difference source, local drawable and internet.

Html.ImageGetter load image from internet


package com.example.androidhtmltextview;

import java.io.BufferedInputStream;
import java.io.IOException;
import java.io.InputStream;
import java.net.MalformedURLException;
import java.net.URL;
import java.net.URLConnection;

import android.os.Bundle;
import android.app.Activity;
import android.graphics.Bitmap;
import android.graphics.BitmapFactory;
import android.graphics.drawable.BitmapDrawable;
import android.graphics.drawable.Drawable;
import android.text.Html;
import android.text.method.LinkMovementMethod;
import android.widget.TextView;
import android.widget.Toast;

public class MainActivity extends Activity {

 String htmlString = "<img src='ic_launcher'><i>Welcome to<i> <b><a href='http://android-coding.blogspot.com'>Android Coding</a></b>"
   + "<br/><br/>"
   + "another image load from internet<br/>"
   + "<img src='https://blogger.googleusercontent.com/img/b/R29vZ2xl/AVvXsEg_vBn5OxsMM1fUIK0w8awJdKJjgJJ07cBYdWcCscYMujdoEYWWi549p7J5FYnYJSggLjw2pomiwcseExrMX6X8OarAb-bEQwH-sccJtSyHlGnoUrrVtIbgbXP_60n3nzhAwAA1mMuXoNRf/s400/AndroidHtmlTextView_multi_images.png'><br/>";

 @Override
 protected void onCreate(Bundle savedInstanceState) {
  super.onCreate(savedInstanceState);

  TextView htmlTextView = new TextView(this);
  setContentView(htmlTextView);

  htmlTextView.setText(Html.fromHtml(htmlString, new Html.ImageGetter() {

   @Override
   public Drawable getDrawable(String source) {

    Toast.makeText(getApplicationContext(), source,
      Toast.LENGTH_LONG).show();

    Drawable drawable = null;
    if (source.startsWith("http")) {
     // load from internet

     URL sourceURL;
     try {
      sourceURL = new URL(source);
      URLConnection urlConnection = sourceURL.openConnection();
      urlConnection.connect();
      InputStream inputStream = urlConnection.getInputStream();
      BufferedInputStream bufferedInputStream = 
        new BufferedInputStream(inputStream);
      Bitmap bm = BitmapFactory.decodeStream(bufferedInputStream);

      // convert Bitmap to Drawable
      drawable = new BitmapDrawable(getResources(), bm);
      
      drawable.setBounds(0, 0, 
        bm.getWidth(),
        bm.getHeight());

     } catch (MalformedURLException e) {
      // TODO Auto-generated catch block
      e.printStackTrace();
     } catch (IOException e) {
      // TODO Auto-generated catch block
      e.printStackTrace();
     }

    } else {
     // load from local drawable

     int dourceId = getApplicationContext()
       .getResources()
       .getIdentifier(source, "drawable", getPackageName());

     drawable = getApplicationContext().getResources()
       .getDrawable(dourceId);

     drawable.setBounds(0, 0, drawable.getIntrinsicWidth(),
       drawable.getIntrinsicHeight());
    }

    return drawable;
   }

  }, null));

  htmlTextView.setMovementMethod(LinkMovementMethod.getInstance());

 }

}


In order to load image from internet, permission of "android.permission.INTERNET" have to be added in AndroidManifest.xml.

To solve error of android.os.NetworkOnMainThreadException, read Html.ImageGetter load image from internet, in AsyncTask.

Display HTML String with multi images on TextView, with Html.ImageGetter

Previous example load single image in HTML String with Html.ImageGetter. This example load two different images in HTML String. Because both images in drawable, so we can use a common Html.ImageGetter.

Display HTML String with multi images on TextView, with Html.ImageGetter


package com.example.androidhtmltextview;

import android.os.Bundle;
import android.app.Activity;
import android.graphics.drawable.Drawable;
import android.text.Html;
import android.text.method.LinkMovementMethod;
import android.widget.TextView;
import android.widget.Toast;

public class MainActivity extends Activity {
 
 String htmlString = "<img src='ic_launcher'><i>Welcome to<i> <b><a href='http://android-coding.blogspot.com'>Android Coding</a></b>" +
   "<br/>" +
   "<img src='page'><b><a href='https://plus.google.com/b/113141750089533146251/'>My G+ Page</a></b><br/>";

 @Override
 protected void onCreate(Bundle savedInstanceState) {
  super.onCreate(savedInstanceState);
  
  TextView htmlTextView = new TextView(this);
  setContentView(htmlTextView);
  
  htmlTextView.setText(Html.fromHtml(htmlString, new Html.ImageGetter(){

   @Override
   public Drawable getDrawable(String source) {
    
    Toast.makeText(getApplicationContext(), 
      source, 
      Toast.LENGTH_LONG).show();
    
    Drawable drawable;
    int dourceId = 
      getApplicationContext()
      .getResources()
      .getIdentifier(source, "drawable", getPackageName());
    
    drawable = 
      getApplicationContext()
      .getResources()
      .getDrawable(dourceId);
    
    drawable.setBounds(
      0, 
      0, 
      drawable.getIntrinsicWidth(),
      drawable.getIntrinsicHeight());
    
    return drawable;
   }
   
  }, null));
  
  htmlTextView.setMovementMethod(LinkMovementMethod.getInstance());
  
 }

}


Next: Html.ImageGetter load image from internet

Sep 8, 2013

zxing, multi-format 1D/2D barcode image processing library with clients for Android, Java

ZXing (pronounced "zebra crossing") is an open-source, multi-format 1D/2D barcode image processing library implemented in Java, with ports to other languages. Our focus is on using the built-in camera on mobile phones to scan and decode barcodes on the device, without communicating with a server. However the project can be used to encode and decode barcodes on desktops and servers as well. We currently support these formats:
  • UPC-A and UPC-E
  • EAN-8 and EAN-13
  • Code 39
  • Code 93
  • Code 128
  • ITF
  • Codabar
  • RSS-14 (all variants)
  • RSS Expanded (most variants)
  • QR Code
  • Data Matrix
  • Aztec ('beta' quality)
  • PDF 417 ('alpha' quality)

link: https://code.google.com/p/zxing/


Android-Universal-Image-Loader, a powerful image loading library for Android

The project Universal Image Loader for Android (Android-Universal-Image-Loader) aims to provide a reusable instrument for asynchronous image loading, caching and displaying. It support Android 2.0+ with tje features:
  • Multithread image loading
  • Possibility of wide tuning ImageLoader's configuration (thread executors, downlaoder, decoder, memory and disc cache, display image options, and others)
  • Possibility of image caching in memory and/or on device's file sysytem (or SD card)
  • Possibility to "listen" loading process
  • Possibility to customize every display image call with separated options
  • Widget support

Android-Universal-Image-Loader screenshoots

Sep 6, 2013

Cardflip Animation

DevBytes: Cardflip Animation

This video shows how the basic graphics and animation APIs can be used to rotate and flip views from different perspectives, as well as how to apply darkening shadow effects onto a View. code: http://developer.android.com/shareables/devbytes/CardFlip.zip

Sep 3, 2013

Sliding Fragments: animate transition between two fragments

DevBytes Sliding Fragments

How to animate Fragment Transitions.This video discusses several different methods how animations can be incorporated into the transition between two fragments.

code: http://developer.android.com/shareables/devbytes/SlidingFragments.zip

Aug 30, 2013

Send list of file between activities

To send list of file via intent, in sender activity:

   ArrayList<File> fileList = new ArrayList<File>();
   ...

   Intent intent = new Intent(MainActivity.this, secondActivity.class);
   intent.putExtra("FILES_TO_SEND", fileList);
   startActivity(intent);


In receiver activity:

  ArrayList<File> filelist = 
      (ArrayList<File>)getIntent().getSerializableExtra("FILES_TO_SEND");


Aug 29, 2013

Simple example of Navigation Drawer

Navigation drawer is a panel that transitions in from the left edge of the screen and displays the app’s main navigation options.

It is a simple example of Navigation Drawer:
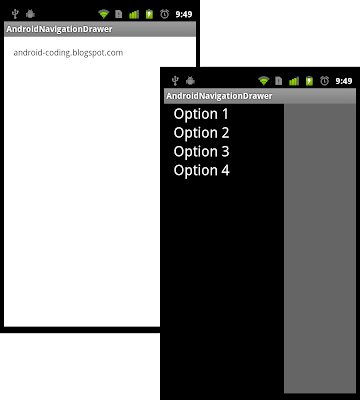
Simple example of Navigation Drawer


Modify layout to add <android.support.v4.widget.DrawerLayout > as root.
<android.support.v4.widget.DrawerLayout 
    xmlns:android="http://schemas.android.com/apk/res/android"
    android:id="@+id/drawer_layout"
    android:layout_width="match_parent"
    android:layout_height="match_parent" >

    <RelativeLayout
        xmlns:android="http://schemas.android.com/apk/res/android"
        xmlns:tools="http://schemas.android.com/tools"
        android:layout_width="match_parent"
        android:layout_height="match_parent"
        android:paddingBottom="@dimen/activity_vertical_margin"
        android:paddingLeft="@dimen/activity_horizontal_margin"
        android:paddingRight="@dimen/activity_horizontal_margin"
        android:paddingTop="@dimen/activity_vertical_margin"
        tools:context=".MainActivity" >

        <TextView
            android:layout_width="wrap_content"
            android:layout_height="wrap_content"
            android:text="android-coding.blogspot.com" />
    </RelativeLayout>

    <ListView
        android:id="@+id/drawer"
        android:layout_width="200dp"
        android:layout_height="match_parent"
        android:layout_gravity="start"
        android:background="@android:color/background_dark"
        android:choiceMode="singleChoice"
        android:divider="@android:color/transparent"
        android:dividerHeight="0dp" />

</android.support.v4.widget.DrawerLayout>


Create /res/layout/drawer_list_item.xml to define row layout of the ListView in our drawer.
<TextView xmlns:android="http://schemas.android.com/apk/res/android"
    android:id="@android:id/text1"
    android:layout_width="match_parent"
    android:layout_height="wrap_content"
    android:gravity="center_vertical"
    android:paddingLeft="16dp"
    android:paddingRight="16dp"
    android:textColor="@android:color/white"
    android:textSize="24sp"/>


MainActivity.java
package com.example.androidnavigationdrawer;

import android.os.Bundle;
import android.app.Activity;
import android.support.v4.widget.DrawerLayout;
import android.view.Menu;
import android.view.View;
import android.widget.AdapterView;
import android.widget.AdapterView.OnItemClickListener;
import android.widget.ArrayAdapter;
import android.widget.ListView;
import android.widget.Toast;

public class MainActivity extends Activity {
 
 private String[] optsArray = {
   "Option 1",
   "Option 2",
   "Option 3",
   "Option 4"
 };
    private DrawerLayout drawer;
    private ListView drawerList;
    ArrayAdapter<String> optionArrayAdapter;

 @Override
 protected void onCreate(Bundle savedInstanceState) {
  super.onCreate(savedInstanceState);
  setContentView(R.layout.activity_main);
  
  drawer = (DrawerLayout) findViewById(R.id.drawer_layout);
        drawerList = (ListView) findViewById(R.id.drawer);
        
        optionArrayAdapter = new ArrayAdapter<String>(this, 
          R.layout.drawer_list_item, 
          optsArray);
        drawerList.setAdapter(optionArrayAdapter);
        
        drawerList.setOnItemClickListener(new OnItemClickListener(){

   @Override
   public void onItemClick(AdapterView<?> parent, View view, 
     int position, long id) {
    Toast.makeText(MainActivity.this, 
      optsArray[position], 
      Toast.LENGTH_LONG).show();
   }});
 }

 @Override
 public boolean onCreateOptionsMenu(Menu menu) {
  // Inflate the menu; this adds items to the action bar if it is present.
  getMenuInflater().inflate(R.menu.main, menu);
  return true;
 }

}

/res/menu/main.xml, it's the auto generated menu resources by Eclipse. You can ignore it by removing onCreateOptionsMenu() in MainActivity.java if you don't need it.
<menu xmlns:android="http://schemas.android.com/apk/res/android" >

    <item
        android:id="@+id/action_settings"
        android:orderInCategory="100"
        android:showAsAction="never"
        android:title="@string/action_settings"/>

</menu>


more: DrawerLayout with custom Layout/View

Aug 28, 2013

Error retrieving parent for item: No resource found that matches the given name...

If you import the API Demo in Android SDK, you will have the error of "Error retrieving parent for item: No resource found that matches the given name '@android:style/Theme.Holo.Light.NoActionBar'."

Error retrieving parent for item: No resource found that matches the given name '@android:style/Theme.Holo.Light.NoActionBar'.
To solve it, you have to fix your Target API Level. Right click the Project, select Properties. Select Android tab, and select higher API level.


Then Clean and Build your project again.

Aug 21, 2013

Game On! - Intro to Open GL ES 3.0

Game On! - Intro to Open GL ES 3.0
The video provide you with a breakdown of what's new in OpenGL ES 3.0!

Aug 19, 2013

Google Wallet Integration with Instant Buy

Google Wallet Integration with Instant Buy

During this session one of partners, Tagstand, will talk about their Google Wallet Instant Buy API integration experience. We will show a demo of the app followed by a detailed discussion on what it took them to build this app and integrate with Instant Buy API. Developers selling physical goods and services on Android should use this URL to get access to Instant Buy API - http://getinstantbuy.withgoogle.com

Cloud save using Play Games services


Game On!: Cloud Save
Join Todd and Bruno from the Play Games team as they share exciting news and updates, and go over some of the finer points of enabling cloud save using Play Games services.

Aug 15, 2013

Implement horizontal and scrollable Radio Button Group

This example implement RadioButton Group horizontally and scrollable.

horizontal and scrollable Radio Button Group


<LinearLayout xmlns:android="http://schemas.android.com/apk/res/android"
    xmlns:tools="http://schemas.android.com/tools"
    android:layout_width="match_parent"
    android:layout_height="match_parent"
    android:orientation="vertical"
    android:paddingBottom="@dimen/activity_vertical_margin"
    android:paddingLeft="@dimen/activity_horizontal_margin"
    android:paddingRight="@dimen/activity_horizontal_margin"
    android:paddingTop="@dimen/activity_vertical_margin"
    tools:context=".MainActivity" >

    <TextView
        android:layout_width="wrap_content"
        android:layout_height="wrap_content"
        android:text="android-coding.blogspot.com" />

    <RadioGroup
        android:id="@+id/radiogroup_vertical"
        android:layout_width="match_parent"
        android:layout_height="wrap_content" >

        <RadioButton
            android:id="@+id/normalradiobutton1"
            android:layout_width="wrap_content"
            android:layout_height="wrap_content"
            android:text="normal option 1" />

        <RadioButton
            android:id="@+id/normalradiobutton2"
            android:layout_width="wrap_content"
            android:layout_height="wrap_content"
            android:text="normal option 2" />
    </RadioGroup>
    
    <RadioGroup
        android:id="@+id/radiogroup2"
        android:layout_width="match_parent"
        android:layout_height="wrap_content"
        android:orientation="horizontal" >

        <RadioButton
            android:id="@+id/radiobutton1"
            android:layout_width="0dp"
            android:layout_height="wrap_content"
            android:layout_weight="1"
            android:text="option 1" />

        <RadioButton
            android:id="@+id/radiobutton2"
            android:layout_width="0dp"
            android:layout_height="wrap_content"
            android:layout_weight="1"
            android:text="option 2" />
    </RadioGroup>

    <HorizontalScrollView
        android:layout_width="wrap_content"
        android:layout_height="wrap_content" >

        <RadioGroup
            android:id="@+id/radiogroup3"
            android:layout_width="wrap_content"
            android:layout_height="wrap_content"
            android:orientation="horizontal" >

            <RadioButton
                android:id="@+id/radiobuttona"
                android:layout_width="0dp"
                android:layout_height="wrap_content"
                android:layout_weight="1"
                android:text="option A" />

            <RadioButton
                android:id="@+id/radiobuttonb"
                android:layout_width="0dp"
                android:layout_height="wrap_content"
                android:layout_weight="1"
                android:text="option B" />

            <RadioButton
                android:id="@+id/radiobuttonc"
                android:layout_width="0dp"
                android:layout_height="wrap_content"
                android:layout_weight="1"
                android:text="option C" />
            <RadioButton
                android:id="@+id/radiobuttond"
                android:layout_width="0dp"
                android:layout_height="wrap_content"
                android:layout_weight="1"
                android:text="option D" />

            <RadioButton
                android:id="@+id/radiobuttone"
                android:layout_width="0dp"
                android:layout_height="wrap_content"
                android:layout_weight="1"
                android:text="option E" />
        </RadioGroup>
    </HorizontalScrollView>

</LinearLayout>


In the example, <RadioGroup> with id=radiogroup_vertical is default vertical RadioGroup. <RadioGroup> with id=radiogroup2 is horizontal RadioGroup with android:orientation="horizontal". <RadioGroup> with id=radiogroup3 is another horizontal RadioGroup, but with 5 option expect more space than device's screen width. So place it in a <HorizontalScrollView> to make it svrollable.

May 29, 2013

If you copy the contents of this blog...

If you copy the contents of this blog, please include a LINK to the original post.

May 21, 2013

CalendarView

android.widget.CalendarView, added in API level 11, is a calendar widget for displaying and selecting dates. The range of dates supported by this calendar is configurable. A user can select a date by taping on it and can scroll and fling the calendar to a desired date. To handle user action of changing the date, implement CalendarView.OnDateChangeListener.

android.widget.CalendarView


<LinearLayout xmlns:android="http://schemas.android.com/apk/res/android"
    xmlns:tools="http://schemas.android.com/tools"
    android:layout_width="match_parent"
    android:layout_height="match_parent"
    android:paddingBottom="@dimen/activity_vertical_margin"
    android:paddingLeft="@dimen/activity_horizontal_margin"
    android:paddingRight="@dimen/activity_horizontal_margin"
    android:paddingTop="@dimen/activity_vertical_margin"
    android:orientation="vertical"
    tools:context=".MainActivity" >

    <TextView
        android:layout_width="wrap_content"
        android:layout_height="wrap_content"
        android:text="@string/hello_world" />
    <CalendarView
        android:id="@+id/calendar"
        android:layout_width="match_parent"
        android:layout_height="match_parent" />

</LinearLayout>


package com.example.androidcalendarview;

import android.os.Bundle;
import android.widget.CalendarView;
import android.widget.CalendarView.OnDateChangeListener;
import android.widget.Toast;
import android.app.Activity;

public class MainActivity extends Activity {
 
 CalendarView calendar;

 @Override
 protected void onCreate(Bundle savedInstanceState) {
  super.onCreate(savedInstanceState);
  setContentView(R.layout.activity_main);
  calendar = (CalendarView)findViewById(R.id.calendar);
  calendar.setOnDateChangeListener(new OnDateChangeListener(){

   @Override
   public void onSelectedDayChange(CalendarView view, 
     int year, int month, int dayOfMonth) {
    Toast.makeText(getApplicationContext(), 
      "Year: " + year + "\n" +
      "Month: " + month + "\n" +
      "Day of Month: " + dayOfMonth, 
      Toast.LENGTH_LONG).show();
    
   }});
 }

}


May 13, 2013

Implement EditTextPreference in PreferenceFragment

EditTextPreference is a Preference that allows for string input. It is a subclass of DialogPreference and shows the EditText in a dialog. This EditText can be modified either programmatically via getEditText(), or through XML by setting any EditText attributes on the EditTextPreference.

EditTextPreference in PreferenceFragment


Works on previous article of "ListPreference example".

Modify /res/xml/preferences.xml to add <EditTextPreference>.

<PreferenceScreen xmlns:android="http://schemas.android.com/apk/res/android">
    
    <PreferenceCategory
        android:title="PreferenceCategory CheckBoxPreference">
        <CheckBoxPreference
            android:key="PREF_CHECKBOX"
            android:title="Title"
            android:summary="summary" />
    </PreferenceCategory>
    
    <PreferenceCategory
        android:title="PreferenceCategory ListPreference">
        <ListPreference
            android:key="PREF_LIST"
            android:title="ListPreference title"
            android:summary="ListPreference summary"
            android:entries="@array/listentries"
            android:entryValues="@array/listvalues" />
    </PreferenceCategory>
    
    <PreferenceCategory
        android:title="PreferenceCategory Intent">
        <PreferenceScreen
                android:title="Android Coding"
                android:summary="android-coding.blogspot.com">
            <intent android:action="android.intent.action.VIEW"
                    android:data="http://android-coding.blogspot.com/" />
        </PreferenceScreen>
        <PreferenceScreen
                android:title="Android Developers"
                android:summary="developer.android.com">
            <intent android:action="android.intent.action.VIEW"
                    android:data="http://developer.android.com/" />
        </PreferenceScreen>
        <PreferenceScreen
                android:title="Google"
                android:summary="www.google.com">
            <intent android:action="android.intent.action.VIEW"
                    android:data="http://www.google.com/" />
        </PreferenceScreen>
    </PreferenceCategory>
    
    <PreferenceCategory
            android:title="PreferenceCategory EditTextPreference">
        <EditTextPreference
                android:key="PREF_EDITTEXT"
                android:title="EditText title"
                android:summary="EditText summary"
                android:dialogTitle="EditText Dialog" />

    </PreferenceCategory>

</PreferenceScreen>


Modify /res/layout/activity_main.xml to add TextView, setting_edittext, to display the EditTextPreference.
<LinearLayout xmlns:android="http://schemas.android.com/apk/res/android"
    xmlns:tools="http://schemas.android.com/tools"
    android:layout_width="match_parent"
    android:layout_height="match_parent"
    android:paddingBottom="@dimen/activity_vertical_margin"
    android:paddingLeft="@dimen/activity_horizontal_margin"
    android:paddingRight="@dimen/activity_horizontal_margin"
    android:paddingTop="@dimen/activity_vertical_margin"
    android:orientation="vertical"
    tools:context=".MainActivity" >

    <Button
        android:id="@+id/setpreference"
        android:layout_width="match_parent"
        android:layout_height="wrap_content"
        android:text="Set Preference" />
    <TextView
        android:id="@+id/setting_checkbox"
        android:layout_width="match_parent"
        android:layout_height="wrap_content" />
    <TextView
        android:id="@+id/setting_list"
        android:layout_width="match_parent"
        android:layout_height="wrap_content" />
    <TextView
        android:id="@+id/setting_edittext"
        android:layout_width="match_parent"
        android:layout_height="wrap_content" />

</LinearLayout>


Modify MainActivity.java to update preferences once activity returned.
package com.example.androidpreferencefragment;

import android.os.Bundle;
import android.preference.PreferenceManager;
import android.app.Activity;
import android.content.Intent;
import android.content.SharedPreferences;
import android.view.View;
import android.view.View.OnClickListener;
import android.widget.Button;
import android.widget.TextView;

public class MainActivity extends Activity {
 
 Button buttonSetPreference;
 TextView settingCheckBox, settingList;
 TextView settingEditText;

 @Override
 protected void onCreate(Bundle savedInstanceState) {
  super.onCreate(savedInstanceState);
  setContentView(R.layout.activity_main);
  buttonSetPreference = (Button)findViewById(R.id.setpreference);
  settingCheckBox = (TextView)findViewById(R.id.setting_checkbox);
  settingList = (TextView)findViewById(R.id.setting_list);
  settingEditText = (TextView)findViewById(R.id.setting_edittext);
  
  buttonSetPreference.setOnClickListener(new OnClickListener(){

   @Override
   public void onClick(View arg0) {
    Intent intentSetPref = new Intent(getApplicationContext(), PrefActivity.class);
    startActivityForResult(intentSetPref, 0);
   }});
 }

 @Override
 protected void onActivityResult(int requestCode, int resultCode, Intent data) {
  super.onActivityResult(requestCode, resultCode, data);
  
  SharedPreferences sharedPreferences = PreferenceManager.getDefaultSharedPreferences(this);
  Boolean prefCheckBox = sharedPreferences.getBoolean("PREF_CHECKBOX", false);
  settingCheckBox.setText("CHECKBOX preference = " + prefCheckBox.toString());
  String prefList = sharedPreferences.getString("PREF_LIST", "no selection");
  settingList.setText("LIST preference = " + prefList);
  
  String prefEditText = sharedPreferences.getString("PREF_EDITTEXT", "default");
  settingEditText.setText("EDITTEXT preference = " + prefEditText);
 }


}


Keep using PrefFragment.java and PrefActivity.java in the article "PreferenceFragment example for Android 3.0 (HoneyComb)".

May 9, 2013

Open page in PreferenceFragment with intent

Add Preference of <intent> with android:action="android.intent.action.VIEW" and android:data="http://...", user can click the item to open browser to visit the specified web address.

Example:

PreferenceFragment with intent


<PreferenceScreen xmlns:android="http://schemas.android.com/apk/res/android">
    
    <PreferenceCategory
        android:title="PreferenceCategory CheckBoxPreference">
        <CheckBoxPreference
            android:key="PREF_CHECKBOX"
            android:title="Title"
            android:summary="summary" />
    </PreferenceCategory>
    
    <PreferenceCategory
        android:title="PreferenceCategory ListPreference">
        <ListPreference
            android:key="PREF_LIST"
            android:title="ListPreference title"
            android:summary="ListPreference summary"
            android:entries="@array/listentries"
            android:entryValues="@array/listvalues" />
    </PreferenceCategory>
    
    <PreferenceCategory
        android:title="PreferenceCategory Intent">
        <PreferenceScreen
                android:title="Android Coding"
                android:summary="android-coding.blogspot.com">
            <intent android:action="android.intent.action.VIEW"
                    android:data="http://android-coding.blogspot.com/" />
        </PreferenceScreen>
        <PreferenceScreen
                android:title="Android Developers"
                android:summary="developer.android.com">
            <intent android:action="android.intent.action.VIEW"
                    android:data="http://developer.android.com/" />
        </PreferenceScreen>
        <PreferenceScreen
                android:title="Google"
                android:summary="www.google.com">
            <intent android:action="android.intent.action.VIEW"
                    android:data="http://www.google.com/" />
        </PreferenceScreen>
    </PreferenceCategory>

</PreferenceScreen>


May 8, 2013

Display ListPreference selected item on summary

Refer to the article "Implement ListPreference in PreferenceFragment", the default display on summary field is hard-coded in /res/xml/preferences.xml. Such that, the user cannot know the current selected item of ListPreference, without open the ListPreference dialog.

To update summary of ListPreference programmatically, call ListPreference.setSummary().

Display ListPreference selected item on summary


Implement updateListPrefSummary_PREF_LIST() to update summary of ListPreference with key="PREF_LIST", call it in onCreate() in fragment start-up. And also implement OnSharedPreferenceChangeListener to call it when ListPreference with key="PREF_LIST" changed. Register and Unregister in onResume() and onPause().

package com.example.androidpreferencefragment;

import android.content.SharedPreferences;
import android.content.SharedPreferences.OnSharedPreferenceChangeListener;
import android.os.Bundle;
import android.preference.ListPreference;
import android.preference.PreferenceFragment;

public class PrefFragment extends PreferenceFragment 
 implements OnSharedPreferenceChangeListener{

 @Override
 public void onCreate(Bundle savedInstanceState) {
  super.onCreate(savedInstanceState);
  addPreferencesFromResource(R.xml.preferences);
  
  updateListPrefSummary_PREF_LIST();
 }
 
 @Override
 public void onResume() {
  super.onResume();
  getPreferenceScreen().getSharedPreferences()
   .registerOnSharedPreferenceChangeListener(this);
 }
 
 @Override
 public void onPause() {
  super.onPause();
  getPreferenceScreen().getSharedPreferences()
   .unregisterOnSharedPreferenceChangeListener(this);
 }

 //Apply for ListPreference with key="PREF_LIST"
 private void updateListPrefSummary_PREF_LIST(){
  ListPreference preference = (ListPreference)findPreference("PREF_LIST");
  CharSequence entry = ((ListPreference) preference).getEntry();
  preference.setSummary("current selection: " + entry);
 }

 @Override
 public void onSharedPreferenceChanged(
   SharedPreferences sharedPreferences, String key) {
  
  //if changed SharedPreference is ListPreference with key="PREF_LIST",
  // update summary
  if(key.equals("PREF_LIST")){
   updateListPrefSummary_PREF_LIST();
  };
  
 }

}


Infolinks In Text Ads